Lighting / Ceiling Fans
User Manual for Lucci Air Leyndell 142cm DC Ceiling Fan
Quick guide for the Lucci Air Leyndell 142cm DC Ceiling Fan. Includes installation steps, wiring diagrams, remote control pairing, and maintenance instructions.
Table of contents
Manual images
Click an image to enlargeQuick Start Guide
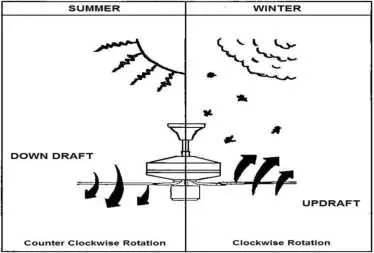
The Lucci Air Leyndell DC ceiling fan is designed for energy efficiency and silent operation. This fan must be installed by a licensed electrician. It is suitable for indoor and alfresco areas that are fully undercover with at least two walls. The remote control is supplied with default coding, so pairing is generally not required upon installation.
Safety Precautions
- The fan must be installed by a licensed electrician.
- An all-pole disconnection switch must be incorporated into the fixed wiring.
- The structure supporting the fan must be capable of supporting a weight of 26 kg.
- Blades must be mounted at least 2.1 m above the floor.
- This fan is not waterproof. In alfresco areas, it must be protected from water, wind, dust, and salt.
- If unusual wobbling or oscillating movement is observed, stop using the fan immediately and contact the manufacturer or service agent.
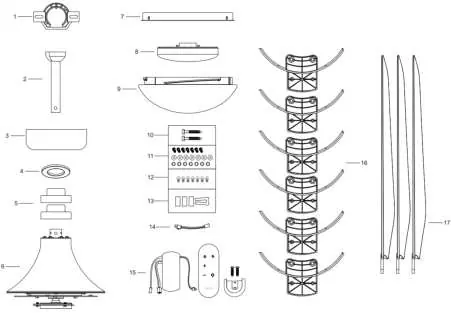
Parts List
Before assembly, ensure all components are present, including the mounting bracket, down rod, canopy, fan assembly, light kit, GX53 lamp, glass shade, and remote control components.
Installation
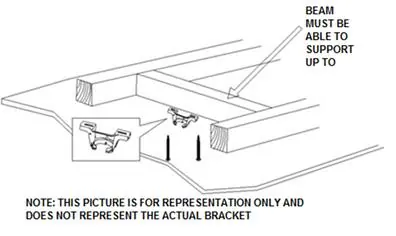
Installing the Mounting Bracket: Install the bracket to a ceiling joist or structure capable of supporting at least 26 kg using the provided screws. Ensure a minimum of 30mm of the screw is threaded into the support. The system supports a maximum 15-degree angled ceiling.
Installing the Down Rod: Remove the ball joint and dowel pin. Feed the fan wires through the down rod. Assemble the down rod into the coupling housing, secure with the hitch pin and lock clip, and tighten the set screws.
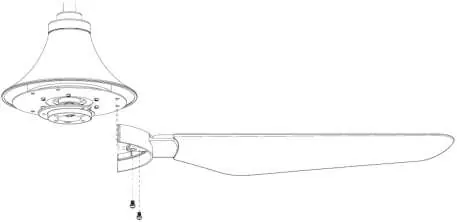
Installing Blades and Light Kit: Attach blades to the blade brackets, ensuring the "THIS SIDE UP" marking faces the ceiling. Install the light kit plate, GX53 lamp, and glass shade by turning them clockwise to secure.
Electrical Wiring
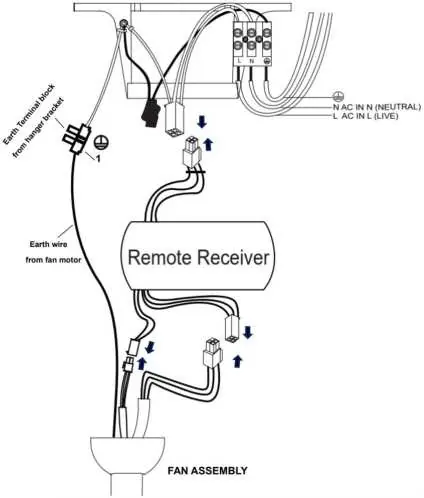
All electrical connections must be performed by a licensed electrician. Connect the live, neutral, and earth wires from the mains supply to the terminal block on the mounting bracket. Connect the DC motor receiver to the mounting bracket and the fan motor using the provided quick connector plugs. Ensure the motor earth wire is connected to the single earthing terminal block.
Remote Control Operation
The remote control features buttons for Fan Off, Reverse Function, Fan Speed Increase/Decrease (6 speeds), and Light On/Off. The LED indication light ring displays speed levels and charging status. The remote uses a non-replaceable rechargeable Li-ion battery, charged via the Type-C USB port.
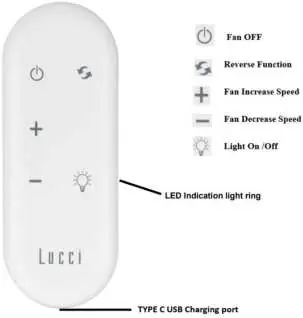
Pairing Remote and Receiver
If the remote and receiver lose control, they must be repaired. Turn off the mains supply for 30 seconds, then turn it back on. Within 30 seconds of powering on, press the power button on the remote for 5 seconds. The LED light ring will flash twice to indicate successful pairing.
Maintenance and Care
Perform periodic cleaning every 6 months using a soft brush or lint-free cloth. Do not soak or immerse the fan in water or use organic solvents. The motor has permanently lubricated ball bearings and does not require oiling.
Troubleshooting
If the fan wobbles, check that all screws on the mounting bracket and down rod are secure. If the fan is noisy, allow a 24-hour settling-in period. For loss of control, perform the pairing process again.
Technical Specifications
Fan Model: SKU# 216181. Rated Voltage: 220-240V~ 50Hz. Motor Wattage: 35W. Lamp: GX53, 12W, 1100lm (3000K included). Battery: Rechargeable Li-ion (USB-C charging).
Practical help
Common problems
Fan only runs at high speed after installation
Repair the pairing between the remote and the receiver.
No reverse function
Repair the pairing between the remote and the receiver.
Excessive fan wobble
Check that all screws fixing the mounting bracket and down rod are secure.
Occasional small noises
Allow a 24-hour settling-in period for new fans; this is normal.
Before use
- Ensure installation is performed by a licensed electrician.
- Verify the ceiling structure can support 26 kg.
- Ensure blades are at least 2.1 m above the floor.
- Check that there is at least 300mm clearance from the blade tip to the nearest object.
- Confirm an all-pole disconnection switch is incorporated into the fixed wiring.
- Ensure the remote is charged via the USB-C port.
Specs in practice
- Rated Voltage
- 220-240V~ 50Hz
- Motor Wattage
- 35W
Images and diagrams
- Fig. 1: Exploded parts list for assembly reference.
- Fig. 2: Mounting bracket installation showing support requirements.
- Fig. 11: Electrical wiring diagram connecting mains to receiver and motor.
- Fig. 14: Remote control functions and charging port location.
Model compatibility
- Suitable for indoor and fully undercover alfresco areas with at least 2 walls.
- Not waterproof; exposure to water, wind, dust, or salt voids the warranty.
- Remote does not support PD charging.

Manual page author
David Miller
Documentation analyst
Organizes user manual content into clear summaries, with attention to model details, product context, and everyday usability.