Lighting / Ceiling Fans
User Manual for Lucci Londo DC Ceiling Fan
Quick guide for the Lucci Londo DC Ceiling Fan. Includes installation steps, remote pairing instructions, wiring diagrams, and maintenance tips.
Table of contents
Manual images
Click an image to enlargeQuick guide from the manual
This ceiling fan must be installed by a licensed electrician. A critical requirement for safe operation is the inclusion of an all-pole disconnection switch in the fixed wiring, in accordance with local wiring rules. The fan is suitable for indoor, alfresco, and coastal areas, provided it is fully undercover with at least one wall and protected from water, wind, and dust. The remote control and receiver must be paired after installation. If you experience loss of control, the pairing process can be repeated.
Installation requirements
- Electrical: All electrical connections must be performed by a licensed electrician. An all-pole disconnection switch must be incorporated into the fixed wiring.
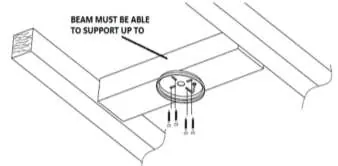
- Mounting: The structure must support a weight of at least 16kg. The hanging system is for flat ceilings only; do not install on angled ceilings.
- Clearance: Blades must be at least 2.1m above the floor and 300mm from the nearest object or wall.
- Tools required: Phillips/flat head screwdriver, pliers, adjustable spanner, step ladder, wire cutter.
Installation steps
1. Mounting Bracket: Install the bracket to the ceiling joist using the 4 provided screws. Ensure at least 30mm of the screw is threaded into the support.
2. Hanging the Fan: Install the motor housing onto the motor assembly. Lift the fan assembly and hang it onto the J-hook of the mounting bracket.
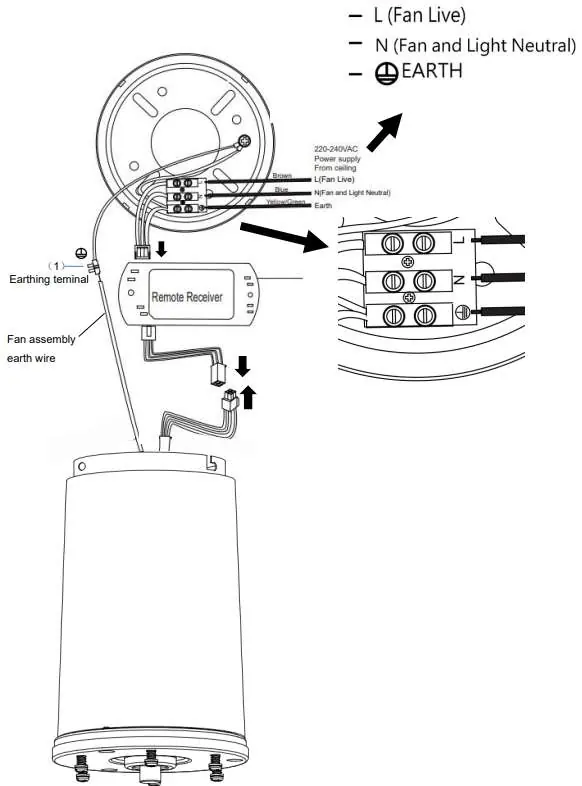
3. Wiring: Connect the mains supply to the terminal block on the mounting bracket (Live, Neutral, Earth). Connect the receiver to the mounting bracket and the fan motor using the quick connector plugs. Ensure the motor earth wire is connected to the earthing terminal block.
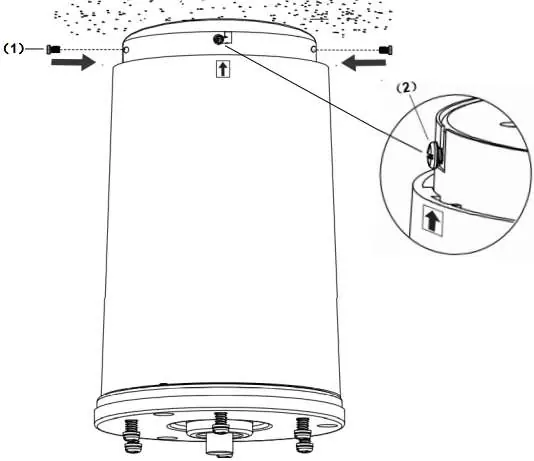
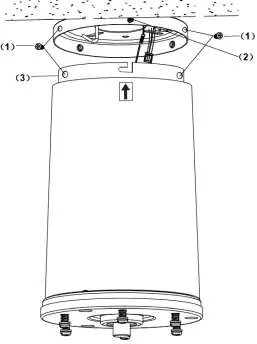
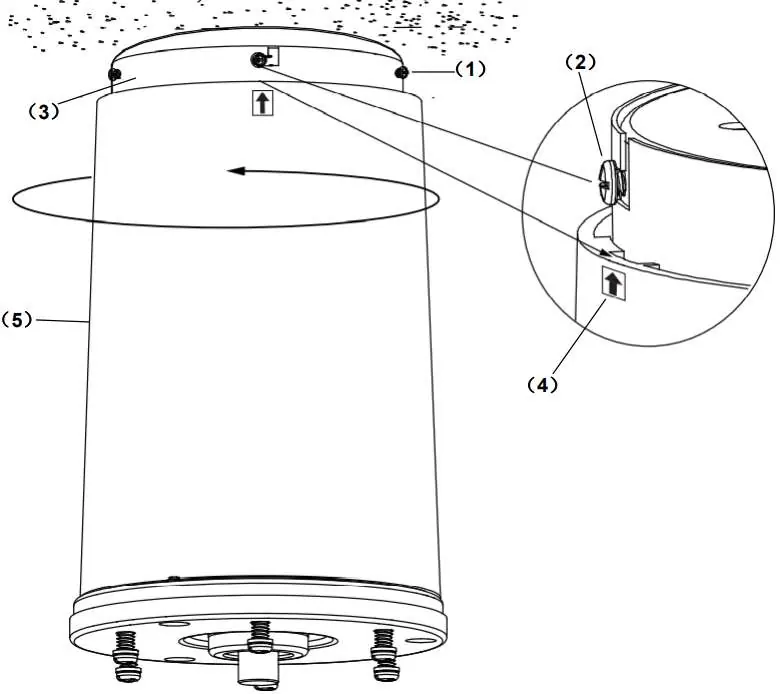
4. Canopy and Blades: Secure the hanging canopy to the mounting bracket using the provided screws. Attach the fan blades to the fan assembly using the blade support plates and screws. Ensure the side marked 'THIS SIDE UP' faces the ceiling.
5. Finishing: Secure the bottom cover by turning it clockwise. Install the remote control holder on a wall.
Remote control pairing
For 1 fan: Turn off the mains supply. Install batteries in the remote. Turn on the power to the receiver. Within 30 seconds of switching the power on, press and hold the power button on the remote for 3-5 seconds. A 'beep' sound indicates successful pairing.
For 2+ fans: Each fan must have its own isolation switch. Turn off power to all receivers. Turn on power to only the receiver you wish to pair. Follow the same pairing process as above. Repeat for each fan individually.
Care and maintenance
- Clean the fan every 6 months using a soft brush or lint-free cloth.
- Do not soak or immerse the fan in water.
- Do not use organic solvents or cleaners.
- The motor has permanently lubricated ball bearings; no oiling is required.
Technical specifications
- Rated Voltage: 220-240V~ 50Hz
- Rated Wattage (Motor): 35W
- Battery for remote: 2 x AAA (Included)
- Weight: 4.0kg
Practical help
Common problems
Fan is only running at high speed after installation
The remote and receiver have lost pairing. Switch off main power for 30 seconds, switch back on, and repeat the pairing process.
No reverse function after installation
Repair the pairing between the remote and receiver by following the pairing instructions.
Unusual wobbling or oscillating movement
Stop using the fan immediately and contact the manufacturer or a qualified person. Check that all mounting bracket and down rod screws are secure.
Noise during operation
Slight noise is normal, especially at night. Allow a 24-hour 'settling-in' period for new fans. Ensure the fan is not mounted rigidly to the ceiling (it should be on a rubber grommet).
Before use
- Ensure installation is performed by a licensed electrician.
- Verify an all-pole disconnection switch is installed in the fixed wiring.
- Check that the mounting structure can support 16kg.
- Ensure the ceiling is flat (not angled).
- Verify blades are at least 2.1m above the floor.
- Check that the fan is protected from water, wind, and dust if installed in an alfresco or coastal area.
Specs in practice
- Rated Wattage (Motor)
- 35W - Indicates the power consumption of the DC motor.
- Rated Voltage
- 220-240V~ 50Hz - Standard electrical supply requirements.
Images and diagrams
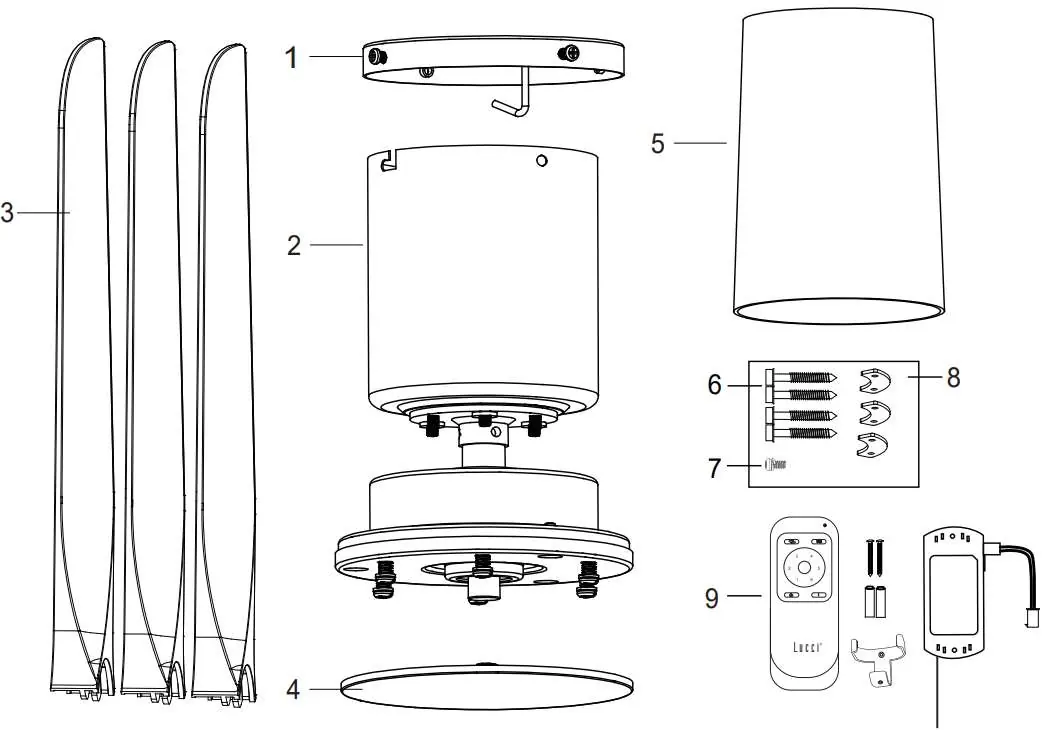
- Fig 1: Parts list identifying all components including mounting bracket, blades, and remote.
- Fig 5: Electrical wiring diagram showing connections from mains to mounting bracket and receiver.
- Fig 10: Blade attachment showing the correct orientation of the blade support plate and screws.
Model compatibility
- Suitable for indoor, alfresco, and coastal areas if fully undercover.
- Not waterproof; exposure to water or moisture voids the warranty.
- Only suitable for flat ceiling installation.

Manual page author
Michael Turner
Technical manual editor
Reviews PDF manuals for structure, safety notes, and practical product details so readers can find the right information quickly.