Toys / Ride-on Toys
User Manual for Costway 10001US-CF-CYSE-CA Ceiling Fan with Light
Comprehensive user guide for the Costway 10001US-CF-CYSE-CA ceiling fan. Includes installation instructions for wooden and concrete ceilings, wiring diagrams, remote control operation, and troubleshooting tips.
Table of contents
Manual images
Click an image to enlargeQuick guide from the manual
This ceiling fan requires a secure mounting point capable of supporting at least 35 lbs (15.9 kg). Before installation, ensure the electricity is turned off at the circuit breaker. The fan must be mounted with a minimum clearance of 7 ft (2 m) from the trailing edge of the blades to the floor. Always remove the rubber motor stops on the bottom of the fan before installing blades or testing the motor.
Safety Information
- Electrical Safety: Installation should be performed by a qualified licensed electrician in accordance with local codes.
- Mounting: Use only UL-listed outlet boxes marked "Acceptable for Fan Support of 35lbs (15.9kg) or less."
- Operation: Do not operate the reversing switch while the fan blades are in motion.
- Compatibility: Do not use this fan with any solid-state speed control device.
Installation
Tools Required
- Phillips screwdriver
- Flat blade screwdriver
- Step ladder
- Wire stripper
- Electrical tape
Hanging Bracket Installation
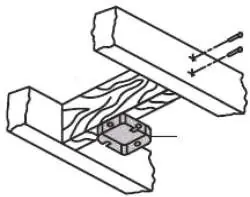
Wooden Ceiling: Use the mounting bracket as a guide to mark and drill 4 holes (3mm diameter) into the wooden beam or junction box. Secure with the provided self-tapping screws.
Concrete Ceiling: Use a percussion bit (8mm diameter) to drill holes according to the length of the expansion screws. Secure the bracket using the provided expansion bolts, washers, and nuts.
Hanging the Fan
Lift the fan motor assembly and seat the hanger ball into the mounting bracket socket. Rotate the assembly until the check groove drops into the registration slot. The downrod should not rotate if installed correctly.
Wiring
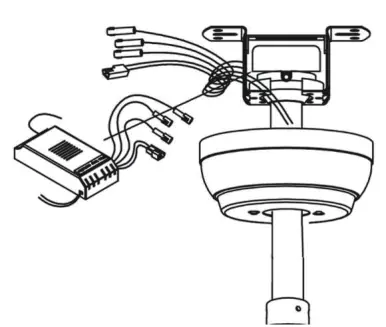
Insert the remote receiver into the mounting bracket with the flat side facing the ceiling. Connect the wires according to the provided diagram, ensuring all connections are secure with plastic wire connectors and electrical tape.
Blade and Light Kit Installation
Remove pre-installed screws to attach the fan blades to the motor hub. For the light kit, attach the LED light source to the disc (magnetized), pass the motor lead through the center hole, and plug the male terminal into the female terminal. Finally, screw the lampshade on counterclockwise.
Operation
The remote control allows you to:
- Control fan speed (Levels 1-6).
- Turn the fan on/off.
- Set auto-off timers (1H, 4H, 8H).
- Toggle the light on/off.
- Change rotation direction (Forward/Reverse): Press the F/R button for 2 seconds until a beep sounds.
- Activate Natural Wind mode.
Troubleshooting
- Fan will not start: Check circuit fuses/breakers and wire connections in the switch housing. Ensure motor housing screws are snug.
- Fan wobbles: Check that all blade and blade-arm screws are secure. Ensure blade levels are equal by measuring from the ceiling to the tip of each blade (deviation should be within 1/8 in).
Manufacturer information
Costway
Practical help
Common problems
Fan will not start
Check main/branch circuit fuses or breakers. Verify line wire connections to the fan and switch housing. Ensure motor housing screws are snug.
Fan wobbles
Check that all blade and blade-arm screws are secure. Measure the distance from the ceiling to the tip of each blade; deviation should be within 1/8 in.
Before use
- Turn off electricity at the circuit breaker or fuse box.
- Ensure the outlet box is marked 'Acceptable for Fan Support of 35lbs or less'.
- Ensure 7 ft (2 m) clearance from blades to floor.
- Remove rubber motor stops from the bottom of the fan.
- Check that all set screws are tightened.
Images and diagrams
- Wiring diagram shows connections between ceiling wires, controller, and fan motor.
- Remote control layout identifies buttons for speed, light, timer, and direction.
Model compatibility
- Mounting bracket must be secured to a structure capable of supporting 35 lbs.
- Not for use with solid-state speed control devices.

Manual page author
David Miller
Documentation analyst
Organizes user manual content into clear summaries, with attention to model details, product context, and everyday usability.