Lighting / Ceiling Fans
User Manual for Lucci Air Aria CTC Ceiling Fan
Get started with your Lucci Air Aria CTC ceiling fan. This guide covers installation, electrical wiring, operation modes, maintenance, and technical specifications for the 48-inch and 52-inch models.
Table of contents
Manual images
Click an image to enlargeQuick Guide from the Manual
The Lucci Air Aria CTC is a ceiling fan designed for indoor, alfresco, and coastal areas (fully undercover). Installation must be performed by a licensed electrician. The structure must support at least 21kg, and blades must be at least 2.1m above the floor. An all-pole disconnection switch must be incorporated into the fixed wiring.
Installation
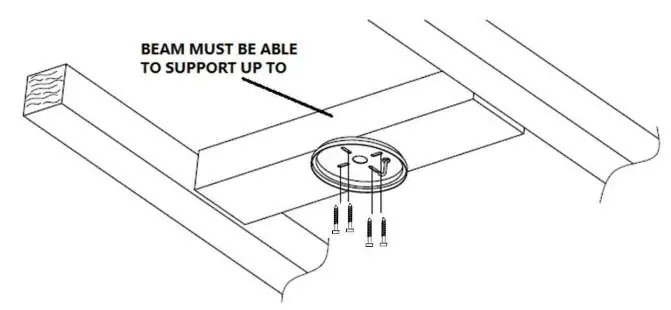
Mounting Bracket: Install the hanging bracket to a ceiling joist or structure capable of supporting 21kg using the provided long screws. Ensure at least 30mm of the screw is threaded into the support. This system does not support angled ceilings.
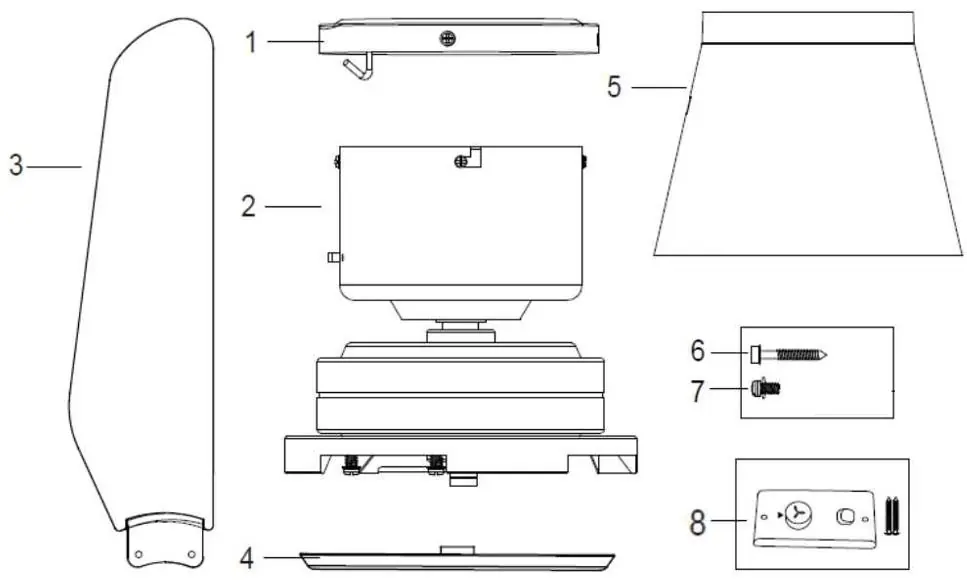
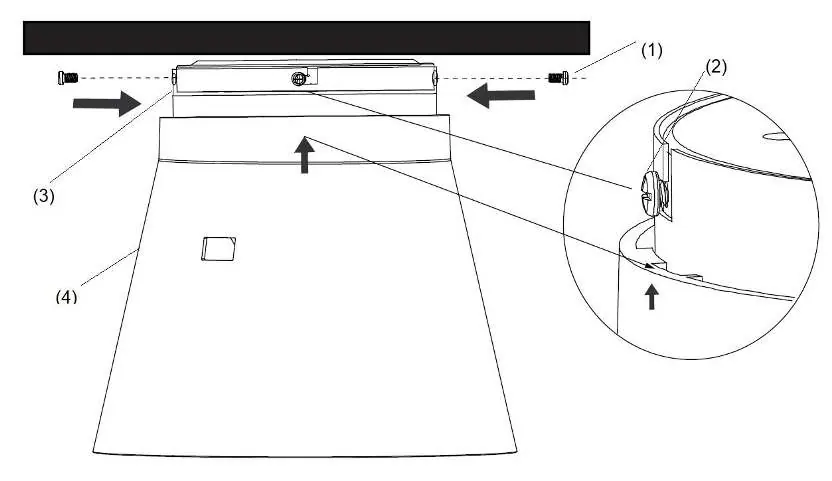
Hanging the Fan: Install the motor housing onto the motor assembly. Lift the fan assembly and hang it onto the J-hook of the mounting bracket.
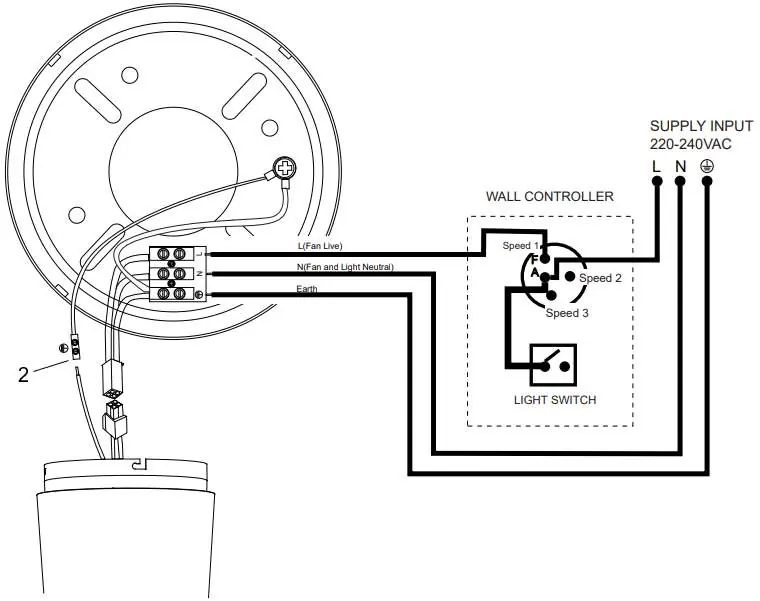
Electrical Wiring: All electrical connections must be undertaken by a licensed electrician. Ensure the motor earth wire is connected to the earthing terminal block. An additional all-pole disconnection switch must be included in the fixed wiring.
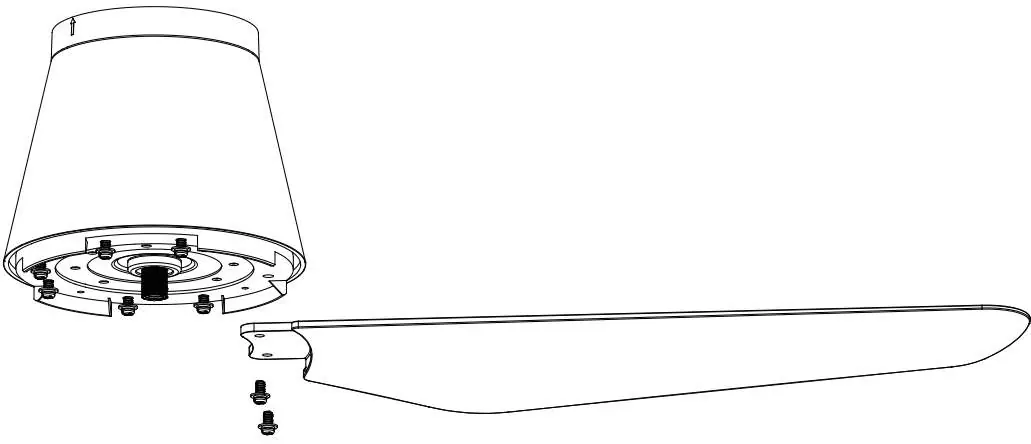
Blade Attachment: Remove blade screws and flat washers from the bottom of the motor. Align the blade holes with the rotating member and secure using the screws. Tighten evenly to prevent unbalance.
Operation
Wall Control: The fan features three speeds (1st: High, 2nd: Medium, 3rd: Low) and an OFF position.
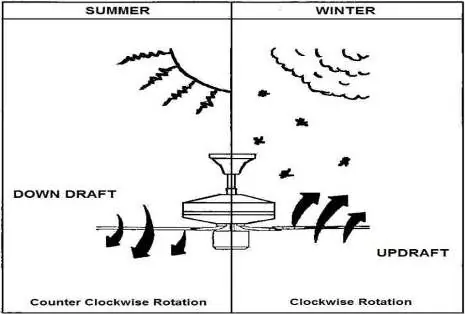
Reversing Switch: The fan includes a summer/winter mode switch on the motor housing. Use the SUMMER position for anticlockwise rotation (downward airflow) and the WINTER position for clockwise rotation (upward airflow for heat circulation).
Maintenance
Cleaning: Perform periodic cleaning every 6 months using a soft brush or lint-free cloth. Turn off the power before cleaning. Do not soak or immerse the fan in water or use organic solvents. The motor has permanently lubricated ball bearings and does not require oiling.
Troubleshooting
Wobble: Ceiling fans may move slightly due to the rubber grommet mounting; this is normal. If excessive, check that all screws on the mounting bracket and down rod are secure.
Noise: Occasional small noises may occur, especially at night. Allow a 24-hour settling-in period for new fans. Ensure power fluctuations are not causing motor noise.
Practical help
Common problems
Fan wobbling
Check that all screws fixing the mounting bracket and down rod are secure.
Noise during operation
Allow a 24-hour settling-in period. Check for power fluctuations or frequency signals.
Before use
- Ensure the ceiling structure can support 21kg.
- Verify blades are at least 2.1m above the floor.
- Confirm a licensed electrician is performing the installation.
- Ensure an all-pole disconnection switch is included in the fixed wiring.
- Check that all parts are present before assembly.
Specs in practice
- Rated Voltage
- 220-240V~ 50Hz
- Rated Wattage (Motor)
- 50W
Images and diagrams
- Wiring Diagram: Shows connections for wall controller and remote receiver.
- Reversing Switch: Explains summer (anticlockwise) and winter (clockwise) modes.
Model compatibility
- Suitable for indoor, alfresco, and coastal areas (fully undercover).
- Not waterproof.
- Remote control sold separately.

Manual page author
Emily Carter
User documentation editor
Prepares concise manual descriptions and highlights the most useful setup, operation, and maintenance information for readers.