Lighting / Fixtures
User Manual for Tidoin 1073L Ceiling Fan
Quick guide for the Tidoin 1073L ceiling fan. Includes installation steps, wiring instructions, remote control operation, and troubleshooting tips.
Table of contents
Manual images
Click an image to enlargeQuick guide from the manual
This manual provides installation and operation instructions for the Tidoin 1073L ceiling fan. Before starting, ensure the power is disconnected at the circuit breaker. The fan requires a ceiling support capable of holding at least 100 lbs (45 kg) and must be installed with at least 30 inches (76 cm) of clearance from walls. Blades must be at least 7ft (2.1 m) above the ground.
Installation
Ceiling bracket
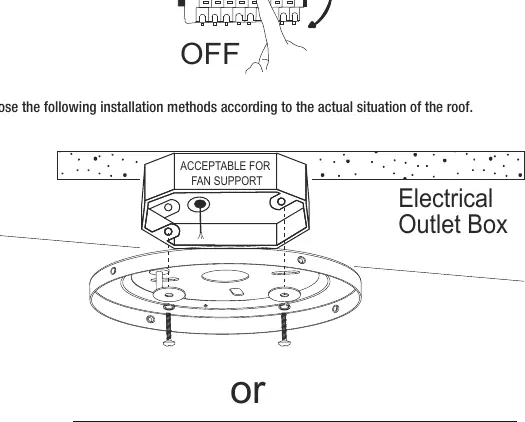
Turn off the power supply at the circuit breaker. Choose the installation method based on your ceiling type (Electrical Outlet Box or Solid wood roof). Secure the bracket firmly to the ceiling structure.
Wiring
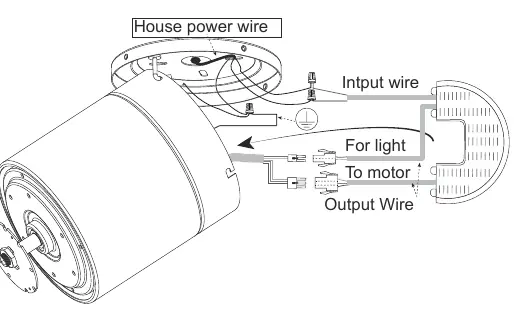
Connect the house power wires to the receiver according to the provided wiring diagram. Ensure the receiver is placed into the bracket and wires are arranged neatly. Do not connect the fan to wall-mounted variable speed controls.
Blades and Light kit
Align the blades with the mounting holes and fix them with screws. Connect the light kit cable and secure the light kit to the motor housing.
Operation
The fan is controlled via the included remote. Features include:
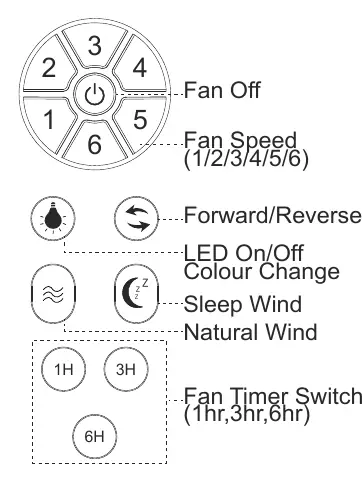
- Fan speed control (1-6)
- Fan Off button
- Timer settings (1hr, 3hr, 6hr)
- Forward/Reverse direction
- LED On/Off and Color Change
- Natural Wind and Sleep Wind modes
Maintenance and Troubleshooting
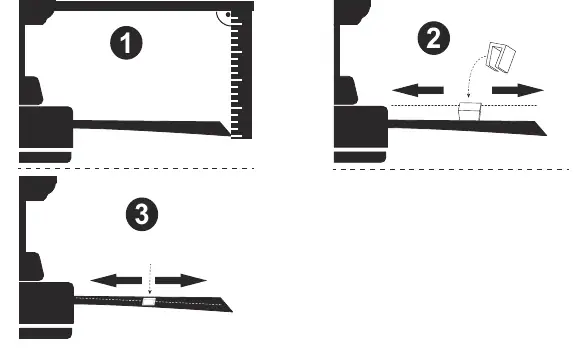
If the fan wobbles, check that all blades are fastened tightly and that the distance between each blade and the ceiling is consistent. Use the provided balancing kit if necessary. If the fan is noisy, ensure all screws are snug and allow a 24-hour break-in period. Do not use wall-mounted variable speed controls as they may damage the motor.
Practical help
Common problems
The fan will not start
Check main and branch circuit fuses or breakers. Verify wire connections in the switch housing. Ensure frequency switches on the remote and receiver are set to the same frequency.
The fan sounds noisy
Ensure all motor housing and blade screws are tight. Check that wire nuts are not rattling. Allow a 24-hour break-in period. Ensure the canopy is not touching the ceiling.
Remote control is not working
Check if the battery is installed correctly and charged. Ensure no other remote control products are interfering. Re-pair the remote by holding '1' and '2' buttons within 10 seconds of powering on.
Before use
- Ensure power is off at the circuit breaker.
- Verify ceiling support can hold at least 100 lbs (45 kg).
- Ensure at least 30 inches (76 cm) of clearance from walls.
- Check that blades are at least 7ft (2.1 m) above the ground.
- Verify all electrical connections comply with local codes.
Images and diagrams
- Wiring diagram shows connections for house power, motor, and light.
- Balancing diagram illustrates using a clip to identify the unbalanced blade.
Model compatibility
- Do not connect to dimmers, potentiometers, or wall-mounted variable speed controls.

Manual page author
Michael Turner
Technical manual editor
Reviews PDF manuals for structure, safety notes, and practical product details so readers can find the right information quickly.