Music / Instruments
User Manual for Behringer XENYX 1002B Audio Mixer
Comprehensive user manual and quick start guide for the Behringer XENYX 1002B audio mixer. Includes detailed setup instructions, control explanations, hook-up diagrams, and technical specifications.
Table of contents
Manual images
Click an image to enlargeQuick Start Guide
This guide provides the essential steps to set up and operate your Behringer XENYX 1002B mixer. Before beginning, ensure all controls are set to their neutral positions: EQ and PAN/BAL centered, and all other controls turned down or off.
Getting Started
- Initial Setup: Set all controls as described above.
- Channel Setup: Raise the Channel 1 fader to 0. Sing, speak, or play at a normal level through the microphone or instrument connected to Channel 1.
- Adjusting Gain: While performing, turn the Channel 1 GAIN control until the CLIP LED flashes occasionally, but not constantly.
- Repeat: Repeat these steps for any other channels you intend to use. For channels 3/4 through 7/8, use the GAIN MIC knob for microphones or the GAIN LINE knob for 1/4" inputs.
- Main Output: With the MAIN fader all the way down, turn on your PA system. Slowly raise the MAIN fader to 0 or your desired level.
- Final Adjustments: Adjust the relative levels of various microphones and instruments by raising each individual CHANNEL fader.
Controls Overview
The XENYX 1002B features a variety of controls to shape your sound:
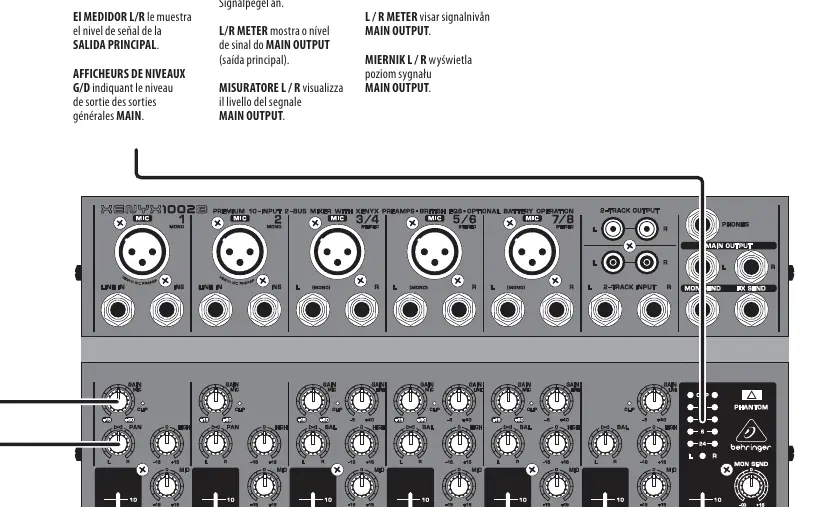
- GAIN: Adjusts the sensitivity of the MIC and LINE inputs.
- EQ (LOW, MID, HIGH): Adjusts the frequency response for each channel.
- PAN/BAL: Adjusts the left-to-right positioning of the channel in the stereo field.
- FX and MON: Adjusts the amount of channel signal sent to the FX SEND and MON SEND jacks.
- CHANNEL FADER: Adjusts the volume of the channel in the main mix.
- PHONES: Adjusts the output level at the PHONES jack.
- MAIN FADER: Adjusts the overall output level of the mixer.
- PHANTOM: Sends 23V of power to the XLR MIC inputs for use with condenser microphones.
Hook-up and Connections
The mixer supports various configurations, including:
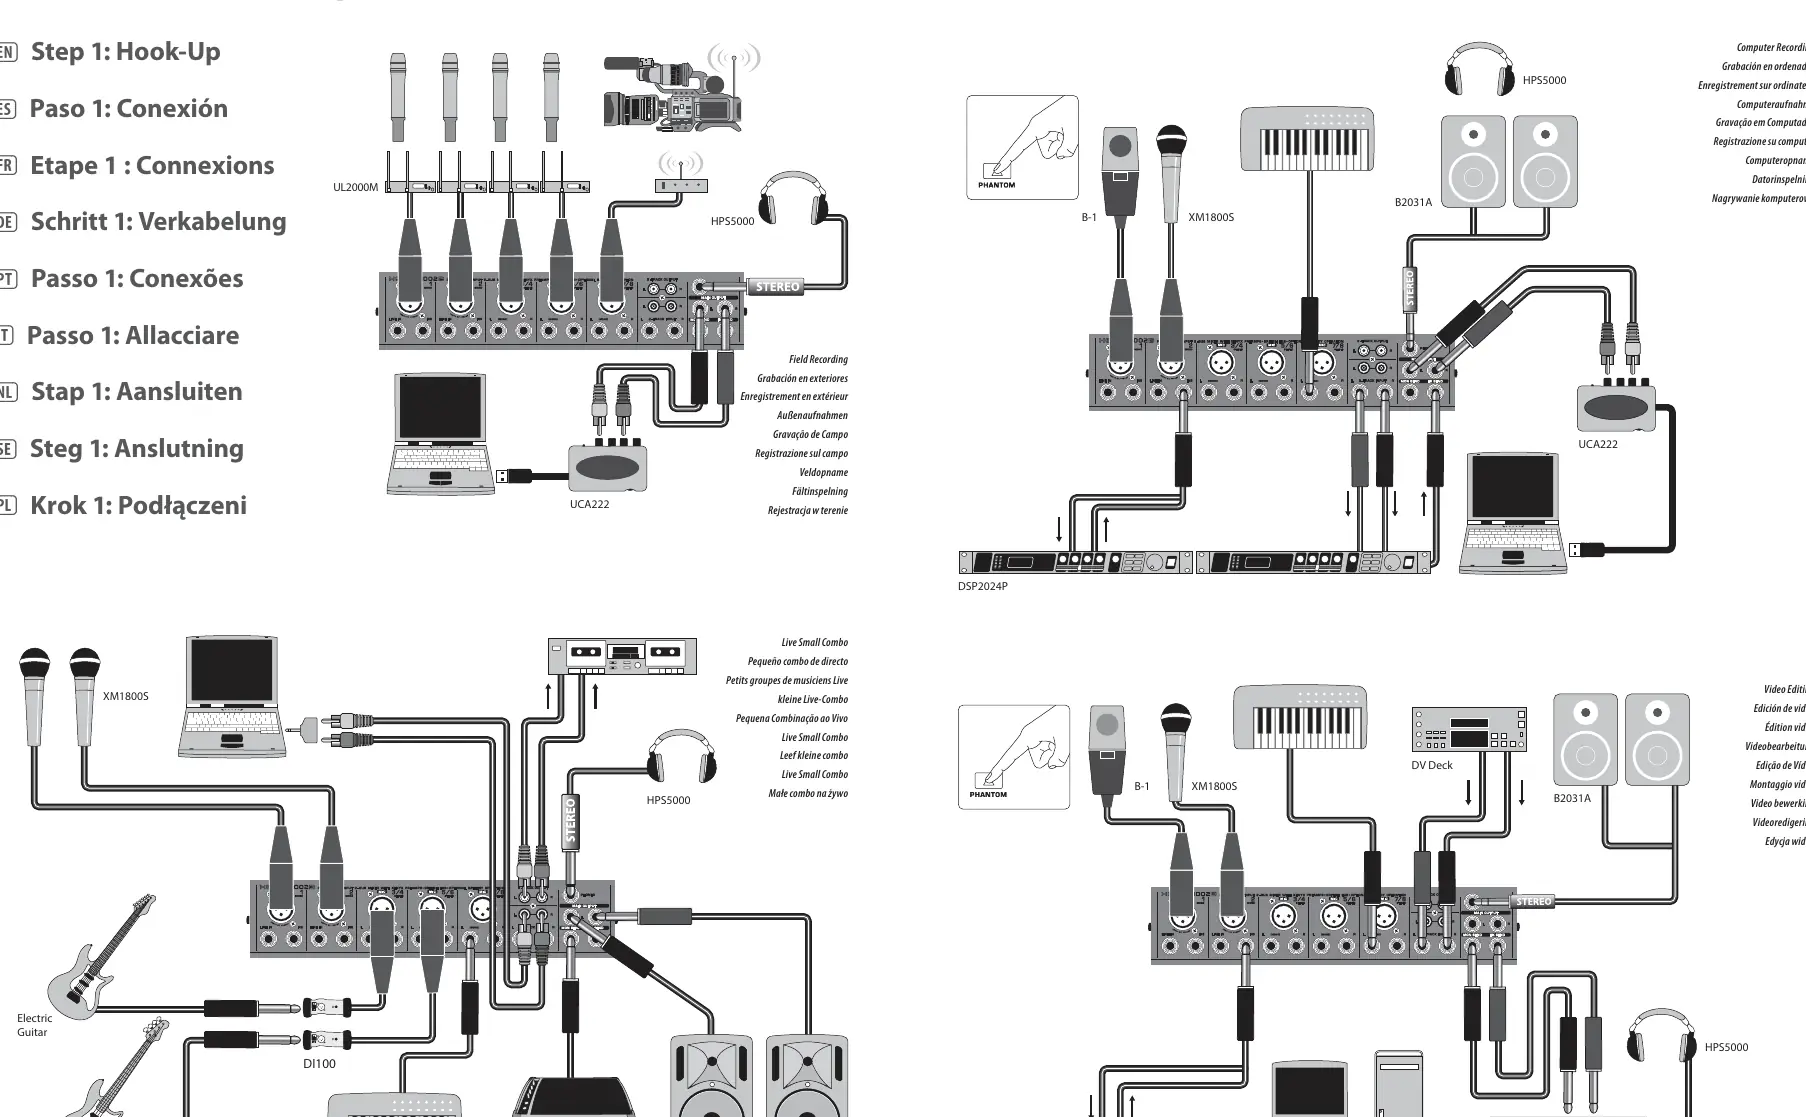
- Live Applications: Connect the mixer to power amps or powered speakers using the MAIN outputs.
- Recording: Use the FX SEND and MON SEND jacks to connect to external effects processors or monitor mixes.
- Computer Recording: Utilize the appropriate outputs to connect to computer recording interfaces.
Technical Specifications
The XENYX 1002B is a premium 10-input 2-bus mixer. Key specifications include:
- Microphone Inputs: XLR connector, electronically balanced, discrete input circuit.
- Frequency Response:
- Power Supply: 50 W power consumption.
- Phantom Power: +18 V with battery power, +23 V with AC adaptor.
- Battery Life: Approximately 4 hours with high-quality Alkaline battery.
- Dimensions: 40 mm x 298 mm x 216 mm.
- Weight: 6.1 lbs / 2.77 kg (PSU not included).
Safety and Maintenance
Always follow these safety guidelines:
- Do not remove the top cover; there are no user-serviceable parts inside.
- Do not expose the apparatus to rain or moisture.
- Use only high-quality professional speaker cables with 1/4" TS or twist-locking plugs.
- Ensure the apparatus is connected to a MAINS socket outlet with a protective earthing connection.
- If the unit is damaged, refer all servicing to qualified service personnel.
Manufacturer information
Behringer
Practical help
Common problems
CLIP LED lights constantly
Reduce the GAIN control for that specific channel until the LED only flashes occasionally.
No sound from main output
Ensure the MAIN fader is raised and the PA system is powered on.
Distortion in the signal
Check GAIN levels and ensure the CLIP LEDs are not constantly lit.
Before use
- Ensure the correct mains voltage for your region is used.
- Set all controls to neutral (EQ and PAN/BAL centered, others down/off).
- Connect microphones and instruments to the appropriate inputs.
- Ensure phantom power is only activated when using condenser microphones (23V).
- Verify that the PA system or amplifiers are off before connecting the mixer.
Specs in practice
- Phantom Power
- Provides 23V power to XLR MIC inputs, necessary for condenser microphones.
Images and diagrams
- The hook-up diagrams illustrate connections for live sound, field recording, and computer recording setups.
- The controls section provides a visual guide to the function of every knob and fader on the mixer surface.
Model compatibility
- Requires high-quality professional speaker cables with 1/4" TS or twist-locking plugs.
- Suitable for use in tropical and moderate climates up to 45°C.

Manual page author
David Miller
Documentation analyst
Organizes user manual content into clear summaries, with attention to model details, product context, and everyday usability.