Electronics / Audio
User Manual for Behringer XENYX 1002FX/1202FX Mixing Console
Quick guide for the Behringer XENYX 1002FX and 1202FX mixing consoles. Learn about channel controls, wiring for recording and live sound, installation, and technical specifications.
Table of contents
Manual images
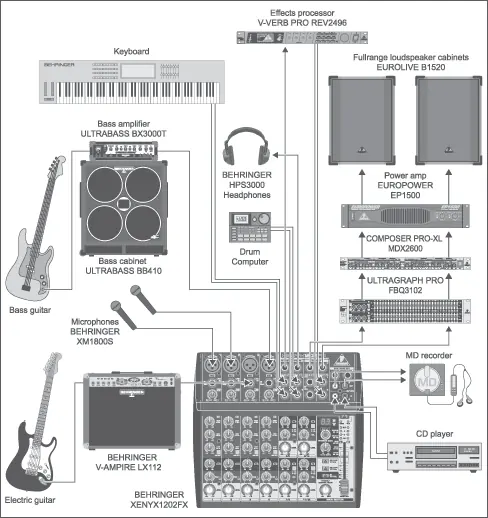
Click an image to enlargeQuick guide from the manual
The Behringer XENYX 1002FX and 1202FX are compact mixing consoles designed for studio and live sound applications. Before using the unit, ensure the power supply matches your local mains voltage. Always connect the power supply to the console before plugging it into the mains outlet. Set all channel LEVEL controls to minimum before powering on to prevent sudden volume spikes.
Control elements
The mixer is divided into several sections to manage audio signals:


- Mono channels: Feature MIC (XLR) and LINE IN (1/4 inch) inputs, TRIM control for gain adjustment, 3-band EQ, FX send, PAN, and LEVEL controls.
- Stereo channels: Feature balanced line inputs, FX send, BAL (balance) control, and LEVEL control.
- Main section: Includes the MAIN MIX fader, PHONES/CONTROL ROOM volume, CD/TAPE routing switches, and the digital effects processor.
- Digital effects processor: Allows you to select from 100 presets (reverb, delay, chorus, etc.) using the PROGRAM control.
Applications
The mixer is versatile for various setups:

- Recording studio: Connect microphones and instruments to input channels. Route the output to your recording device (e.g., computer or MD recorder). Use the CD/TAPE inputs for playback monitoring.
- Live sound: Connect microphones, instruments, and external effects processors. Use the MAIN OUT to connect to power amplifiers or active loudspeakers.
Installation and connections
Proper cabling is essential for signal integrity:
- Mains connection: Use only the provided power supply unit.
- Audio connections: Use high-grade cables. The mixer supports balanced XLR and 1/4 inch TRS connections.
- Phantom power: The +48V switch provides power for condenser microphones. Ensure this is off before connecting non-condenser microphones to avoid damage.
Specifications
Key technical parameters include:
- Mic E.I.N.: -127 dB / 133.9 dB A-weighted.
- Frequency response:
- Power consumption: 16 W (1002FX) or 17 W (1202FX).
- Dimensions: Compact design suitable for desktop use.
Safety instructions
To ensure safe operation:
- Do not expose the apparatus to rain or moisture.
- Do not block ventilation openings.
- Refer all servicing to qualified personnel.
- Unplug the unit during lightning storms or when unused for long periods.
Manufacturer information
Behringer
Practical help
Common problems
Feedback loop during recording
Ensure the CD/TAPE TO MIX switch is not pressed when recording, or check that FX SEND levels are not causing a loop.
Distorted sound
If the CLIP LED illuminates, reduce the TRIM control on the input channel to lower the preamp gain.
No sound output
Check that the MAIN MIX fader is raised and the correct input source is connected and active.
Before use
- Verify the power supply matches local mains voltage.
- Connect the power supply to the console before plugging into the mains.
- Set all channel LEVEL controls to minimum before powering on.
- Ensure phantom power (+48V) is off before connecting non-condenser microphones.
- Check that there is sufficient space around the unit for cooling.
Specs in practice
- Frequency response
- The range of frequencies the mixer can process accurately without significant loss.
- Phantom power (+48V)
- DC power required to operate condenser microphones.
Images and diagrams
- Wiring diagrams illustrate how to connect instruments, microphones, and external processors to the mixer.
- Connector diagrams show the pinout for XLR and 1/4 inch TRS cables to ensure correct signal flow.
Model compatibility
- Compatible with standard dynamic and condenser microphones.
- Supports line-level signals from keyboards, CD players, and other audio equipment.

Manual page author
Michael Turner
Technical manual editor
Reviews PDF manuals for structure, safety notes, and practical product details so readers can find the right information quickly.