Electronics / PA Systems
User Guide for Behringer EUROLIVE B115D/B112D Active PA Speaker
Quick start guide for the Behringer EUROLIVE B115D and B112D active 2-way PA speaker systems. Includes setup instructions, control panel overview, wireless microphone configuration, and technical specifications.
Quick answers from the manual
Quick answer
- The Behringer EUROLIVE B115D/B112D is an active 2-way PA speaker. To set it up, place the speaker, connect your audio source (mixer or microphone) to the input, power on the unit, and adjust the LEVEL and EQ knobs as needed. p. 20
Key actions
- Adjusting volume p. 20
- Connecting audio source p. 15
First start
- Powering on p. 20
Problems and fixes
Clip LED flashes
Turn the LEVEL knob down.
p. 20Technical specifications
| Parameter | Value | Meaning | Pages |
|---|---|---|---|
| Max output power (LF) | 700 W | Low-frequency driver power | p. 29 |
Where to find it in the PDF
- Safety Instructions p. 2, 3, 4, 5
- Hook-up Diagram p. 13
- Controls Overview p. 14, 15, 16, 17
- Getting Started p. 20, 21, 22, 23
- Specifications p. 29
Table of contents
Manual images
Click an image to enlargeQuick guide from the manual
The Behringer EUROLIVE B115D and B112D are active 2-way PA speaker systems. This guide covers the essential steps for setup, operation, and configuration.
- Placement: Position speakers on stands or use them as floor wedge monitors.
- Connections: Ensure the power is off before making connections. Connect your audio source (mixer or microphone) to the input.
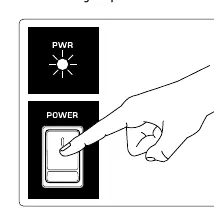
- Powering On: Press the POWER switch. The POWER LED will light up.
- Adjustment: Play your audio source and adjust the LEVEL knob. If the CLIP LED flashes, turn the LEVEL knob down.
- EQ: Use the HIGH and LOW EQUALIZER knobs to adjust treble and bass frequencies to your preference.
Controls Overview
The rear panel contains the following controls and connections:
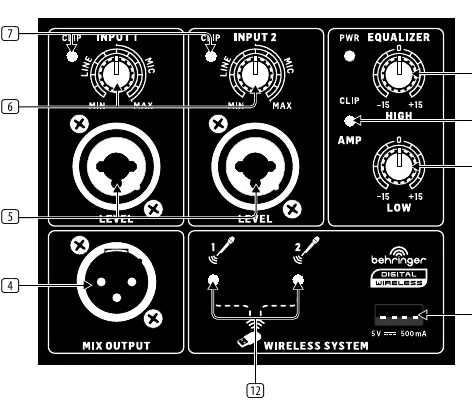
- POWER Switch: Turns the speaker on.
- IEC Input: Connect the included power cable here.
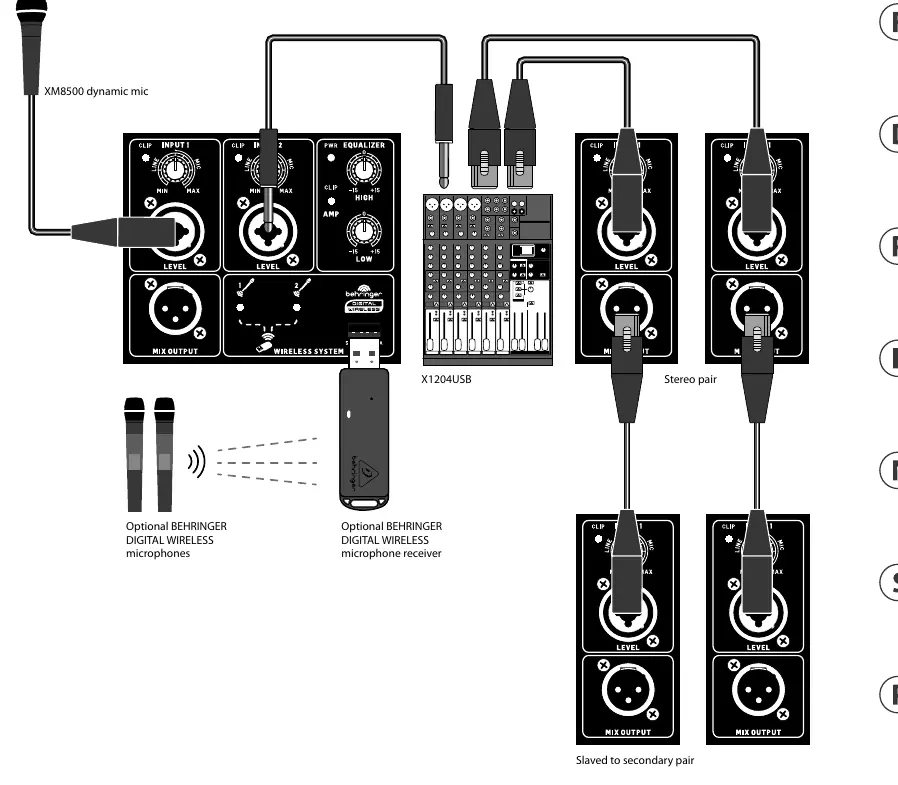
- MIX OUTPUT: Sends a copy of the source signal to another speaker using an XLR cable.
- INPUT 1 & INPUT 2: XLR/TRS combination jacks for microphones, mixers, or line-level signals. Use the knobs to adjust input sensitivity (gain).
- CLIP LED: Indicates when the input or output signal is overloading.
- EQUALIZER: High and Low knobs to cut or boost frequencies by ±15 dB.
- Wireless System: Slot for the optional Behringer digital wireless microphone receiver.
Wireless Microphone Setup
To use an optional Behringer digital wireless microphone system:
- Insert the wireless receiver into the dedicated input slot on the speaker.
- Turn the microphone ON/OFF switch to the "ON" position.
- Wait for the pairing process; the LED on the dongle will flash during pairing and remain solid once connected.
- Use the volume buttons on the microphone to adjust levels. Press the volume down button for two seconds to mute the signal.
Technical Specifications
The B115D and B112D feature a 700W (LF) and 300W (HF) max output power. The frequency response is 45 Hz to 20 kHz for the B115D and 50 Hz to 20 kHz for the B112D. Both models include an optical limiter and standard IEC mains connection.
Safety and Maintenance
Always ensure the speaker is connected to a mains socket with a protective earthing connection. Do not block ventilation openings and avoid installing near heat sources. Repairs must be performed by qualified service personnel only. Dispose of the product according to local WEEE regulations.
Manufacturer information
Behringer
Practical help
Common problems
CLIP LED is flashing
The input signal is overloading. Turn down the LEVEL knob on the speaker.
No sound from speaker
Check that the power switch is on, the power cable is connected, and the audio source (mixer/mic) is active and sending a signal.
Wireless microphone not connecting
Ensure the receiver is fully inserted and the microphone is turned on. Wait for the pairing process to complete (LED will stop flashing).
Before use
- Verify the power source matches the voltage requirements for your region.
- Ensure all audio connections are secure before powering on.
- Place the speaker on a stable surface or stand.
- Turn off the power before making any cable connections.
Specs in practice
- Max output power
- The peak power handling capacity for the low-frequency (700W) and high-frequency (300W) drivers.
- Input impedance
- 14 kOhm, indicating the electrical load the input presents to the source device.
- Frequency response
- The range of frequencies the speaker can reproduce (45Hz-20kHz for B115D, 50Hz-20kHz for B112D).
Images and diagrams
- The rear panel diagram shows the location of the power switch, fuse holder, XLR/TRS inputs, and the wireless receiver slot.
- The hook-up diagram illustrates how to connect a microphone, a mixer, and how to daisy-chain speakers using the Mix Output.
Model compatibility
- Compatible with optional Behringer digital wireless microphone systems.
- Supports balanced XLR and 1/4" TRS connections.
- Can be used in tropical and moderate climates up to 45°C.

Manual page author
David Miller
Documentation analyst
Organizes user manual content into clear summaries, with attention to model details, product context, and everyday usability.