Lighting / Fixtures
Installation Guide for Bell Lighting Arial Pro CCT Downlight
Quick installation guide for Bell Lighting Arial Pro CCT Downlights (models 10950-10973). Includes wiring diagrams, cutout dimensions, IP rating guidance, and dimming configuration instructions.
Table of contents
Manual images
Click an image to enlargeQuick Guide from the Manual
This document provides installation instructions for the Bell Lighting Arial Pro CCT Downlight series (models 10950 to 10973). Installation must be performed by a competent electrician in accordance with current IEE wiring regulations (BS7671:2018). The light source is not replaceable; the entire luminaire must be replaced when the light source reaches the end of its life.
Installation Instructions
- Preparation: Ensure the power supply is switched off before starting.
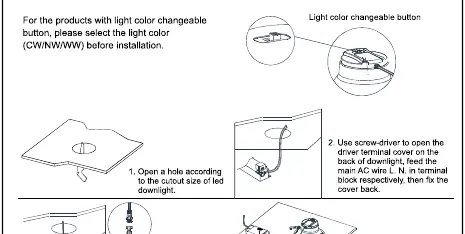
- Cutout: Open a hole in the ceiling according to the required cutout size for your specific model (see Technical Specifications).
- Wiring: Use a screwdriver to open the driver terminal cover on the back of the downlight. Connect the main AC line and Neutral (L, N) to the terminal block.
- Mounting: Hold back the spring clips and push the downlight into the hole.
- Finishing: Ensure the downlight is fixed tightly in the ceiling.
Wiring and Dimming
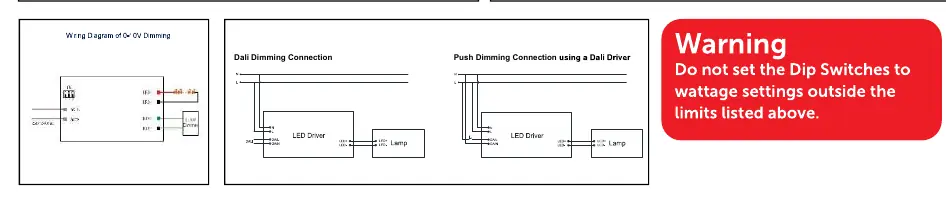
The luminaire supports various dimming configurations depending on the driver model:
- Non-dim: Cannot be used with any dimmer.
- Triac Dim: Compatible with recommended TRIAC dimmers (dimming range 8-100%).
- 1-10V: 1-10% dimming.
- Dali / Switch Dim: 1-100% dimming.
Wiring diagrams are provided for 1-10V Dimming, Dali Dimming, and Push Dimming connections. Ensure all connections are secure within the driver housing.
Technical Specifications
Before installation, verify the IP rating and cutout requirements:
- IP20/IP40: Suitable for indoor use only; do not use in wet or damp places.
- IP44/IP54: Suitable for indoor areas including bathrooms and covered/sheltered areas such as porches.
- IP65: Suitable for outdoor areas; not suitable for water immersion.
- Operating Temperature: 0°C to +35°C.
Ceiling Cutout Sizes:
- Downlight Ø 115mm: Cutout Ø 90mm
- Downlight Ø 190mm: Cutout Ø 160mm
- Downlight Ø 240mm: Cutout Ø 200mm
Safety Warnings
- Wattage Settings: Do not set the Dip Switches to wattage settings outside the limits listed on the driver.
- Insulation: Do not cover the luminaire with any insulation.
- Testing: All tests should be carried out in accordance with EN 50172:2004.
- Environment: This product contains hazardous components; do not dispose of with general household waste.
Manufacturer information
BELL Lighting
Practical help
Common problems
Light not working
Ensure the power supply is on and check that the AC Line (L) and Neutral (N) wires are correctly connected to the driver terminal block.
Dimming not functioning correctly
Verify that the dimmer type (Triac, 1-10V, Dali) is compatible with the specific driver installed and that the wiring matches the provided diagrams.
Wattage setting error
Ensure Dip Switches are not set to wattage values outside the limits specified on the driver label.
Before use
- Ensure installation is performed by a competent electrician.
- Verify the IP rating matches the installation environment (IP20/40 vs IP65).
- Check the ceiling cutout size against the specific model requirements (90mm, 160mm, or 200mm).
- Set the desired light color (CW/NW/WW) using the light color changeable button before installation.
- Ensure the power supply is switched off.
Specs in practice
- Triac Dimming
- Compatible with recommended TRIAC dimmers, providing 8-100% dimming range.
Images and diagrams
- The cutout table provides the required hole diameter (90mm, 160mm, 200mm) based on the downlight diameter.
- Wiring diagrams illustrate the specific connections required for 1-10V, Dali, and Push dimming setups.
Model compatibility
- Not suitable for water immersion.
- Light source is not replaceable; the entire unit must be replaced at end of life.

Manual page author
Emily Carter
User documentation editor
Prepares concise manual descriptions and highlights the most useful setup, operation, and maintenance information for readers.