Lighting / Emergency Lighting
Installation Guide for Bell Lighting 10281V2 Emergency Pack
Installation and maintenance guide for the Bell Lighting 10281V2 Emergency Pack. Includes wiring instructions, battery replacement steps, testing procedures, and LED status indicators.
Table of contents
Manual images
Click an image to enlargeQuick guide from the manual
The Bell Lighting 10281V2 Emergency Pack is designed to provide emergency lighting functionality. Installation must be performed by a qualified electrician in compliance with current IEE wiring regulations (BS7671:2018). The unit features a 3-hour emergency duration and requires a 16-hour recharge time. Always disconnect mains power before installation or maintenance.
Safety and installation
Ensure the installation complies with local building control and IEE wiring regulations. The light source is not replaceable; if it reaches the end of its life, the whole luminaire must be replaced. This unit is not suitable for petrochemical installations.
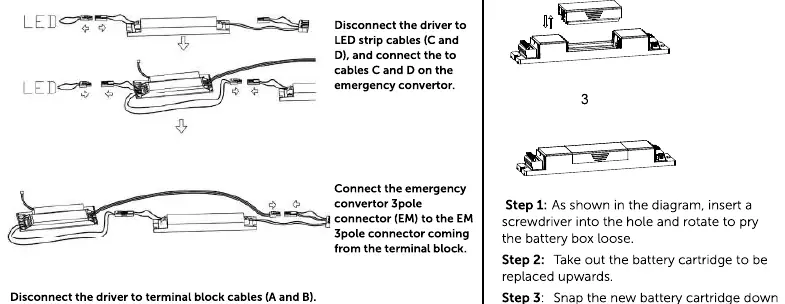
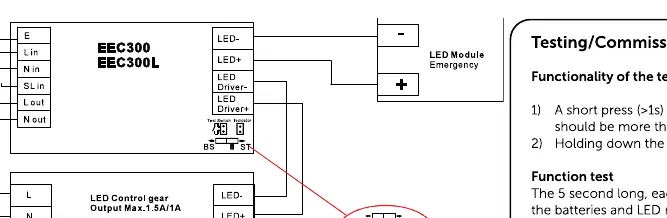
Wiring procedure:
- Disconnect the driver to LED strip cables (C and D) and connect them to the emergency convertor.
- Connect the emergency convertor 3-pole connector to the 3-pole connector from the terminal block.
- Connect cable A from the packaging to the SLin contact on the emergency convertor and the terminal block.
- Connect cable B from the packaging to the Lout and Nout contacts on the emergency convertor and cable B from the driver.
- Plug the emergency indicator LED into the emergency convertor and the indicator LED recess in the fitting end cap.
Battery replacement
The battery should be replaced when the required duration is no longer met. The battery is replaceable and should not be covered with insulation.
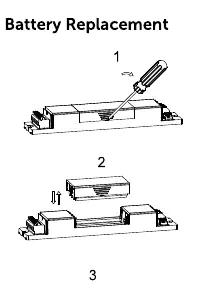
- Insert a screwdriver into the hole on the battery box and rotate to pry the battery box loose.
- Take out the battery cartridge by pulling it upwards.
- Snap the new battery cartridge down to complete the installation.
Testing and commissioning
Functionality of the test button:
- Short press (>1s): Starts a 5-second function test.
- Holding down (>10s): Resets the timer (System-reset).
Testing procedures:
- Function test: Conducted every 7 days to check the functionality of the emergency unit.
- Duration test: Conducted every 180-182 days to check battery capacity. After 24 hours of AC mains power input, the unit will enter a 3-hour duration test.
If a mains supply failure occurs during a test, the test will be postponed and the system will enter emergency operation. The test will resume once the battery is fully recharged.
Indicator LED status
The bi-color indicator LED provides the following status updates:
- Permanent Green: Standby, System OK (Mains operation, battery charged).
- Fast flashing Green: Function test underway.
- Slow flashing Green: Duration test underway.
- Permanent Red: Lamp failure (Open circuit or short circuit).
- Fast flashing Red: Battery capacity failure (Battery failed duration test).
- Slow flashing Red: Battery fault (Incorrect battery voltage or short circuit).
- Green and Red off: Battery Operation (Emergency mode: Mains disconnected or Mains failure).
Technical specifications
- Output Power: 2.5W
- Insulation Class: Class II
- Emergency Duration: 3 Hours
- Battery Recharge Time: 16 hours
- Mains Voltage: 220-240V AC
- Mains Frequency: 50/60 Hz
- Ambient Temperature: 0°C to +35°C
- Maximum Casing Temperature: 70°C
Manufacturer information
BELL Lighting
Practical help
Common problems
Indicator flashing red (0.25s on 0.25s off)
Battery capacity failure. The battery failed the duration test.
Indicator permanent red
Lamp failure. Check for open circuit or short circuit in the LED module.
Indicator slow flashing red (1s on 1s off)
Battery fault. Check for incorrect battery voltage or short circuit.
Indicator Green and Red off
Battery Operation mode. Mains power is disconnected or has failed.
Before use
- Ensure installation is performed by a qualified electrician.
- Verify mains power is disconnected before starting.
- Check that the load is connected.
- Ensure the battery is connected.
- Verify the emergency convertor is clipped into the fitting base.
Specs in practice
- Emergency Duration
- The unit provides 3 hours of light during a power failure.
- Battery Recharge Time
- Requires 16 hours to fully charge the battery.
- Insulation Class II
- Double insulated equipment, does not require an earth connection.
- Ambient Temperature
- Operating range is 0°C to +35°C.
Images and diagrams
- The wiring diagram illustrates the connection path between the terminal block, emergency convertor, and LED driver.
- The battery replacement diagram shows the 3-step process of prying open the battery box and swapping the cartridge.
Model compatibility
- Not suitable for petrochemical installations.
- The light source is not replaceable; the entire luminaire must be replaced if the light source fails.

Manual page author
Emily Carter
User documentation editor
Prepares concise manual descriptions and highlights the most useful setup, operation, and maintenance information for readers.