Toys / Games
Instruction Manual for Spidey 2-in-1 Balance Bike
Quick guide for the Spidey 2-in-1 Balance Bike. Includes assembly instructions for both balance bike and trike modes, safety guidelines, and maintenance tips.
Quick answers from the manual
Quick answer
- The Spidey 2-in-1 Balance Bike can be assembled as a balance bike (one rear wheel) or a trike (two rear wheels). It is designed for children under 3 years with a maximum weight of 20kg. p. 1
Key actions
- Assemble the bike p. 1, 2
First start
- Adjust seat height so the child's feet can rest on the ground while astride the bike. p. 1
Problems and fixes
Missing or damaged parts
Contact Kmart Customer Service Team.
p. 1Maintenance and reset
- Clean the bike with a damp cloth or sponge. Protect from dust, humidity, water, and extreme temperatures. p. 1
Technical specifications
| Parameter | Value | Meaning | Pages |
|---|---|---|---|
| Max Weight | 20kg | Maximum load capacity | p. 1 |
Where to find it in the PDF
- Parts List and Safety p. 1
- Assembly Instructions p. 2
Table of contents
Manual images
Click an image to enlargeQuick guide from the manual
The Spidey 2-in-1 Balance Bike is designed to assist in the development of a child's balance, coordination, and steering. It can be configured as a standard balance bike or a trike. Maximum weight capacity is 20kg, and it is recommended for children under 3 years. Adult supervision is required at all times.
Parts and Hardware
Before assembly, ensure all parts are present and undamaged. The package includes:
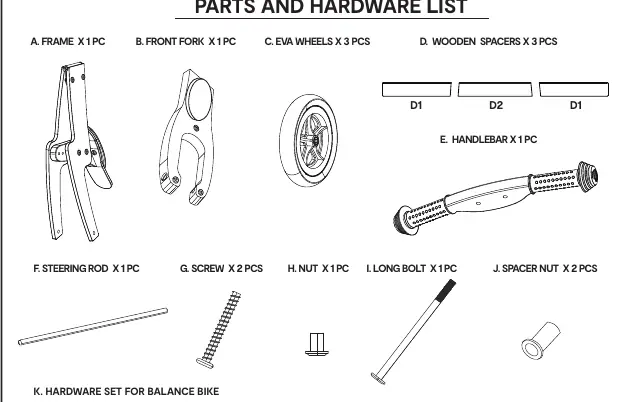
- Frame, Front Fork, and 3 EVA Wheels
- Handlebar, Steering Rod, and Wooden Spacers
- Hardware sets for Balance Bike (K) and Trike (L)
- Various bolts, screws, and nuts
Assembly Instructions
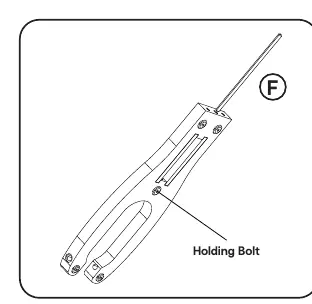
Step 1: Pull out the pre-inserted steering rod (part F) from the front fork. Do not adjust the holding bolt in the middle of the front fork.
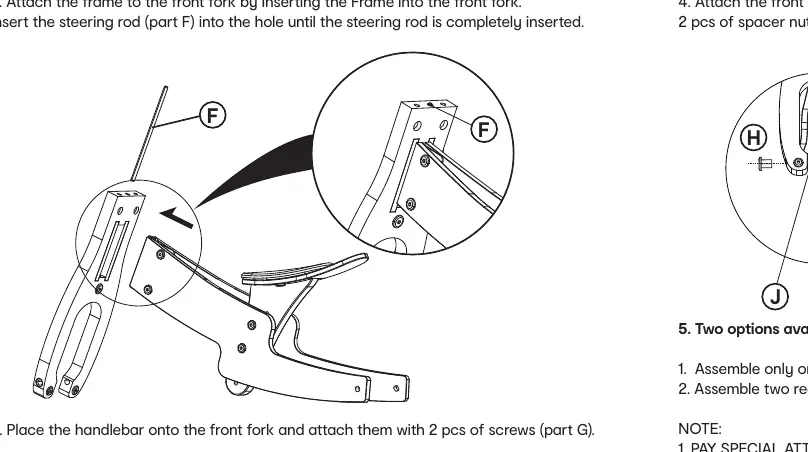
Step 2: Insert the frame into the front fork. Insert the steering rod (part F) into the hole until it is completely inserted.
Step 3: Place the handlebar onto the front fork and secure it using 2 screws (part G).
Step 4: Attach the front wheel to the front fork using the long bolt (part I), nut (part H), and 2 spacer nuts (part J).
Step 5: Assemble the rear wheels based on your preferred configuration:
- Option I (Balance Bike): Assemble only one rear wheel using hardware set (part K).
- Option II (Trike): Assemble two rear wheels using hardware set (part L) and wooden spacers (part D).
Note: Pay special attention to the position of wooden spacers. Use Allen keys or wrenches to tighten the nuts on both sides simultaneously.
Safety and Maintenance
- Safety: Always wear protective gear (helmet, knee, elbow, and wrist protectors). Do not use on roadways, steep hills, stairs, or uneven surfaces. Use only on flat surfaces.
- Maintenance: Clean the bike with a damp cloth or sponge. Protect from dust, humidity, water, and extreme temperatures.
- Warning: Item must be assembled by an adult. Contains small parts that pose a choking hazard.
Manufacturer information
Kmart
Practical help
Common problems
Parts missing or damaged
Do not use the bike. Contact the Kmart Customer Service Team.
Steering rod difficult to insert
Ensure the steering rod is pulled out from the front fork before attempting assembly.
Before use
- Check all parts are in good condition.
- Ensure screws and tyres are tightened correctly.
- Adjust seat height so the child's feet can rest on the ground while astride the bike.
- Ensure the child wears appropriate protective gear (helmet, knee/elbow/wrist protectors).
- Verify the child is wearing appropriate footwear.
Specs in practice
- Maximum Weight
- 20kg
- Recommended Age
- Under 3 years
Images and diagrams
- Option I: Single rear wheel configuration for balance bike mode.
- Option II: Dual rear wheel configuration with wooden spacers for trike mode.
Model compatibility
- Not intended for stunting or tricks.
- Use only on flat surfaces.
- Do not use on roadways.

Manual page author
Michael Turner
Technical manual editor
Reviews PDF manuals for structure, safety notes, and practical product details so readers can find the right information quickly.