Toys / Ride-on Toys
Assembly and User Guide for Homcom Children's Pedal Go Kart 370-286V00
Quick assembly and user guide for the Homcom Children's Pedal Go Kart (370-286V00). Includes step-by-step installation, safety warnings, and maintenance tips.
Table of contents
Manual images
Click an image to enlargeQuick guide from the manual
This document provides assembly and safety instructions for the Homcom Children's Pedal Go Kart (Model 370-286V00). The product is designed for children aged 3-8 years with a maximum weight capacity of 30 kg. Adult assembly is required. Ensure the kart is used on flat, smooth surfaces away from traffic, slopes, or water.
Parts list
Before beginning assembly, verify you have all components:
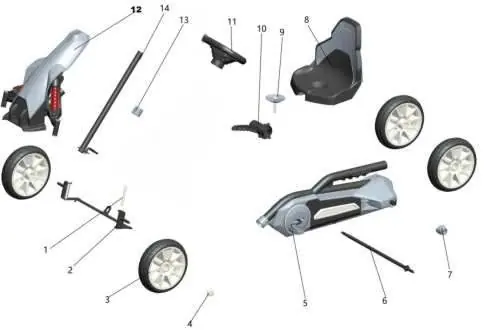
- Main body
- Front assembly
- Handle brake
- Steering wheel
- Steering rod
- Steering assembly
- Wheels (x4)
- Wheel covers (x4)
- Seat fixer
- Rear axle
- Seat
- Screws (4x16mm)
Required tools: Socket tool (included), Screwdriver (not included).
Assembly instructions
Note: Some screws, nuts, and plastic parts may be pre-installed in their positions; remove them before installing the product.
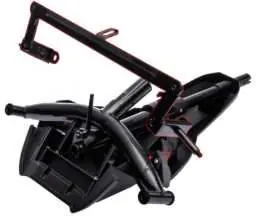
Steering rod assembly
- Insert the steering rod under the front assembly.
- Place the protecting cover to align all holes.
- Use the screw and nut to fix the steering rod.
Steering axle assembly
- Position the steering axle on the front assembly.
- Use the screw and nut to fix the steering axle on both sides.
- Use the nut to secure the steering axle and steering rod.
Steering wheel assembly
- Place the steering wheel onto the rod, ensuring holes are aligned.
- Use the screw and nut to fix the steering wheel.
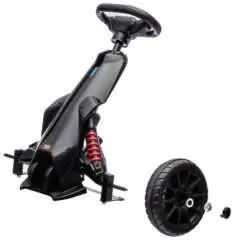
Front wheels assembly
- Attach the front wheel to the assembly.
- Fasten with the nut using the included socket tool. Repeat for the other side.
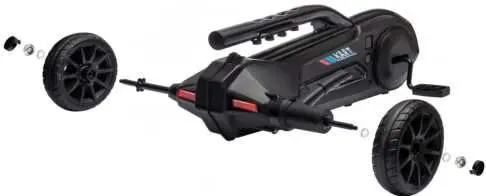
Rear wheels assembly
- Insert the rear axle into the main body from left to right.
- Fix the rear axle with the nut and screw.
- Attach the small cover to the main body.
- Place the handle brake on the rear axle and fasten with 3 screws.
- Attach the rear wheels and fasten with the nut using the socket tool.
Final assembly
- Connect the front assembly to the main body and fasten with nut and screws.
- Place the seat on the main body and secure it with the seat fixer. The seat can be adjusted for comfort.
Using the go kart
- Brake: Use to slow or stop the vehicle.
- Pedals: Use to move the vehicle forward and reverse.
- Steering wheel: Use to control the direction of the vehicle.
Maintenance and care
- Regularly check for damage and ensure all screws are securely tightened.
- Check that the seat is securely fastened.
- Wipe the surface clean with a dry cloth.
- Store away from fire, damp areas, and high temperatures. Avoid direct sun exposure.
Safety warnings
- Choking hazard: Contains small parts; not suitable for children under 3 years.
- Adult supervision is required at all times.
- Children must wear shoes while riding.
- Limited to one-person ride.
- Strictly prohibited near motor vehicles, streets, steps, slopes, hills, or swimming pools.
Manufacturer information
HOMCOM
Practical help
Common problems
Kart does not move smoothly
Check if the pedals are engaged and the rear axle is properly installed and tightened.
Steering feels loose
Ensure the steering rod and steering wheel screws are fully tightened and aligned.
Seat is unstable
Verify the seat fixer is correctly inserted and tightened.
Before use
- Ensure all screws and nuts are securely tightened.
- Verify the seat is firmly attached.
- Check that the steering wheel turns smoothly.
- Confirm the child is within the age (3-8 years) and weight (max 30kg) limits.
- Ensure the riding area is flat, smooth, and free of traffic or water hazards.
Images and diagrams
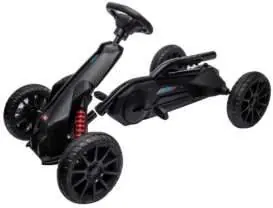
- Parts Diagram: Identifies all components including the main body, steering assembly, wheels, and seat.
Model compatibility
- For use on flat, smooth surfaces only.
- Strictly prohibited near motor vehicles, streets, slopes, or water.

Manual page author
Michael Turner
Technical manual editor
Reviews PDF manuals for structure, safety notes, and practical product details so readers can find the right information quickly.