Furniture / Bathroom Furniture
User Manual for Better Bathrooms Traditional Range 1-120cm Free Standing Cabinet BeBa_25574
Quick guide for the Better Bathrooms Traditional Range 1-120cm free standing cabinet (BeBa_25574). Includes installation steps, wall mounting safety, gap adjustment, and maintenance instructions.
Table of contents
Manual images
Click an image to enlargeQuick guide from the manual
This document provides installation and maintenance instructions for the Better Bathrooms Traditional Range 1-120cm free standing cabinet (BeBa_25574). Please note that this product requires multi-person assembly, and professional installation is strongly recommended. The unit must be permanently fixed to the wall to prevent tipping, which can cause serious or fatal crushing injuries.
Safety and installation requirements
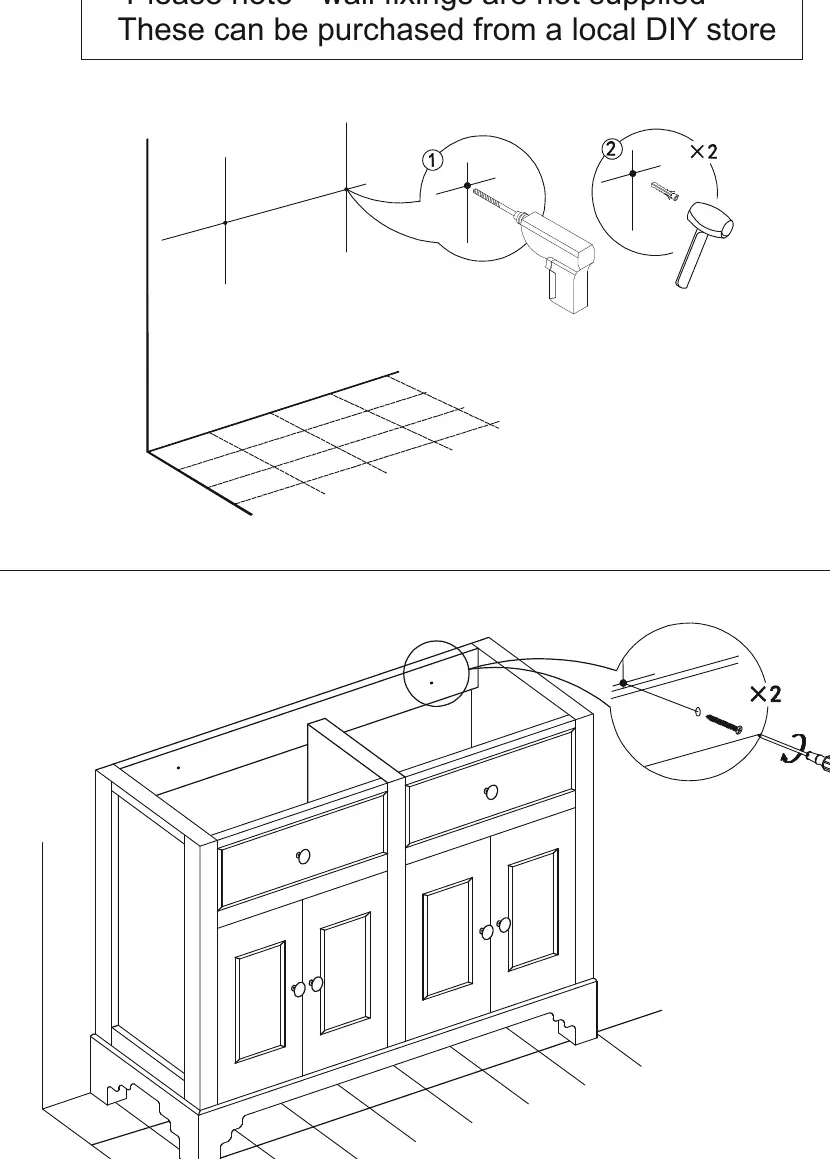
Before beginning installation, ensure you have the necessary tools and check the wall for hidden pipes and cables. Wall fixings are not supplied with the product, as different wall materials require specific types of fittings. Please consult a local dealer for advice on suitable fixings for your home.

- Tools required: Spirit level, hammer, pencil, screwdriver, electric drill, drill bit, and tape measure.
- Safety warning: Always secure the furniture to the wall to prevent tipping.
- Installation advice: Use two people for assembly.
Installation steps
The installation process involves marking the wall, securing the unit, and fitting the basin.
- Preparation: Unpack the unit and verify dimensions (1209mm x 465mm x 800mm).
- Marking: Use a spirit level to mark the wall at the correct height and length for the unit.
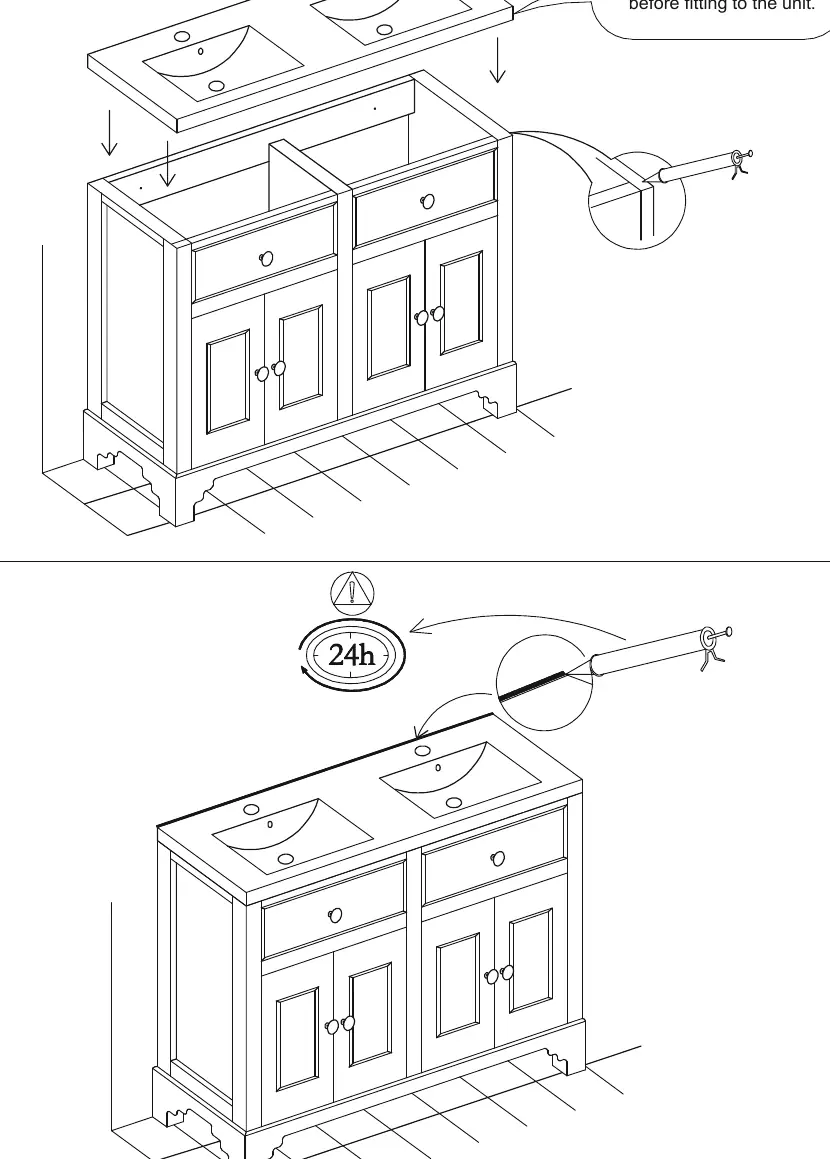
- Fixing: Drill the wall at the marked points and secure the unit. Ensure the unit is level.
- Basin fitting: For ease of installation, it is recommended to fit the tap and waste to the basin before placing the basin onto the unit. Allow 24 hours for any sealant to cure.
Gap adjustment
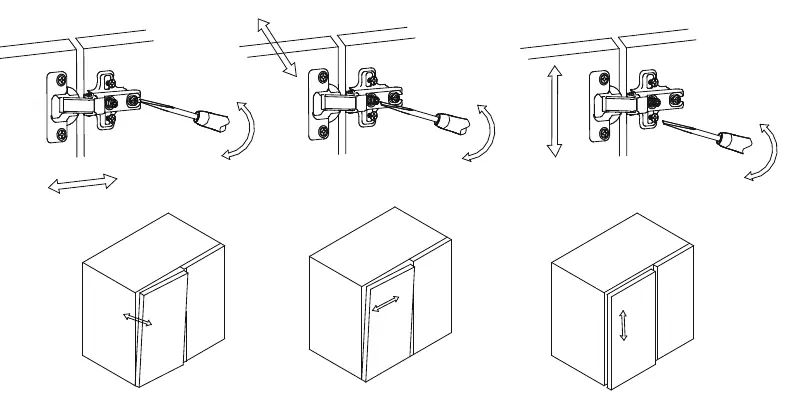
If the doors are misaligned, you can adjust the gaps using the hinge screws. The gap between doors should be maintained between 1mm and 2mm. Use the adjustment screws on the hinges to move the doors horizontally or vertically until they are aligned correctly.
Cleaning and maintenance
To prolong the life of your furniture, follow these cleaning guidelines:
- Clean the unit using a soft cloth and warm soapy water only.
- Do not use abrasive cleaning agents or scouring pads.
- Always wipe the unit dry with a cloth after every use to prevent water damage.
Customer support
For further assistance, you can contact Better Bathrooms via their self-serve portal at betterbathrooms.com/CustomerAccount/Login or via their contact page at betterbathrooms.com/content/contact-us. You can also call 03303903062 or write to Trident Business Park, Neptune Way, Huddersfield, HD2 1UA.
Official resources from the manual
Manufacturer information
Better Bathrooms
Practical help
Common problems
Furniture tipping over
The unit must be permanently fixed to the wall to prevent tipping.
Door misalignment
Use the hinge adjustment screws to align the doors. Maintain a gap of 1mm to 2mm.
Before use
- Check for pipes and cables before drilling the wall
- Ensure you have a spirit level, hammer, pencil, screwdriver, electric drill, drill bit, and tape
- Verify you have a second person to assist with assembly
- Purchase wall fixings suitable for your specific wall type (not included)
- Fit the tap and waste to the basin before fitting to the unit
Specs in practice
- Basin Weight
- 19.55 kg
- Max Loading Weight
- 10.45 kg (in addition to unit and basin)
- Drawer or Shelf Capacity
- 5.00 kg
Images and diagrams
- The manual includes diagrams for wall mounting points and hinge adjustment mechanisms.
- Step-by-step illustrations show the assembly sequence from marking the wall to final basin placement.
Model compatibility
- Wall fixings are not supplied; use fittings suitable for the walls in your home.

Manual page author
David Miller
Documentation analyst
Organizes user manual content into clear summaries, with attention to model details, product context, and everyday usability.