Home Appliances / Vacuum Cleaners
User Manual for Bissell Aeroswift Vacuum 1808 Series
Quick guide for the Bissell Aeroswift Vacuum 1808 Series. Includes assembly instructions, maintenance steps, filter cleaning, brush maintenance, and troubleshooting tips.
Table of contents
Manual images
Click an image to enlargeQuick guide from the manual
This vacuum is designed for household use. Before operating, ensure the dirt container is locked in place and filters are installed. Always unplug the vacuum before performing any maintenance. The vacuum features a polarized plug; if it does not fit, contact a qualified electrician.
What's in the box
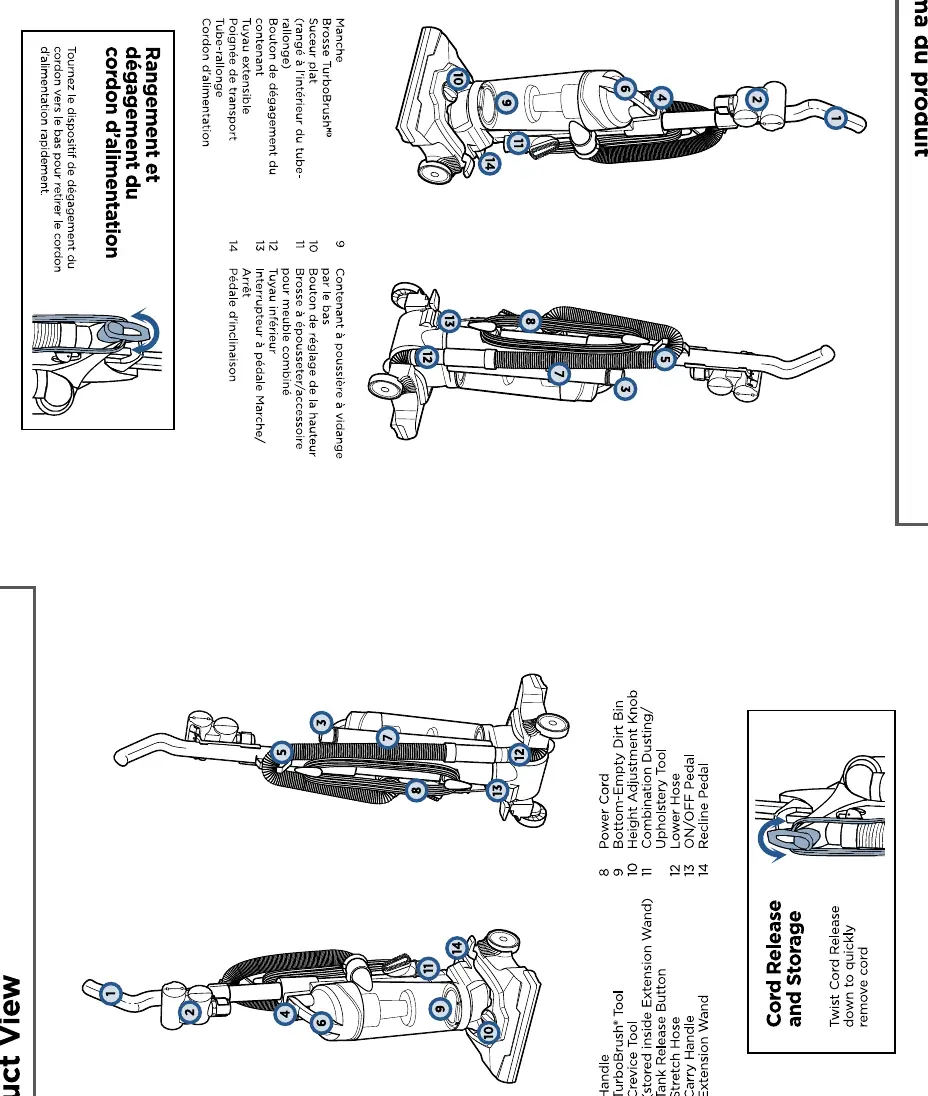
The package includes the base unit, upper handle, hose, extension wand, crevice tool (stored inside the wand), combination dusting/upholstery tool, and TurboBrush tool.
Product View
Key components include the dirt container, height adjustment knob, power cord, hose, and recline pedal. Familiarize yourself with these parts to operate the vacuum effectively.
Assembly

- Insert the upper handle into the base unit until you hear a click.
- Push the hose end into the vacuum base until it clicks.
- Store the TurboBrush tool in the front holder.
- Store the crevice tool inside the extension wand and place it on the side of the vacuum.
- Store the 2-in-1 dusting brush on the opposite side.
Power On & Settings
To turn the vacuum on, press the power pedal located on the lower back of the unit. Press it again to turn it off. Use the height adjustment knob to select the appropriate setting:
- Bare Floor Setting: For hard floors and low pile carpet.
- High Carpet Setting: For high pile and most shag carpet.
If the vacuum is difficult to push, adjust to the next higher setting.
Above Floor Cleaning
- Pull the hose up and out of the vacuum base.
- Attach your desired tool to the hose.
- For extended reach, attach the extension wand first, then attach the tool.
Maintenance
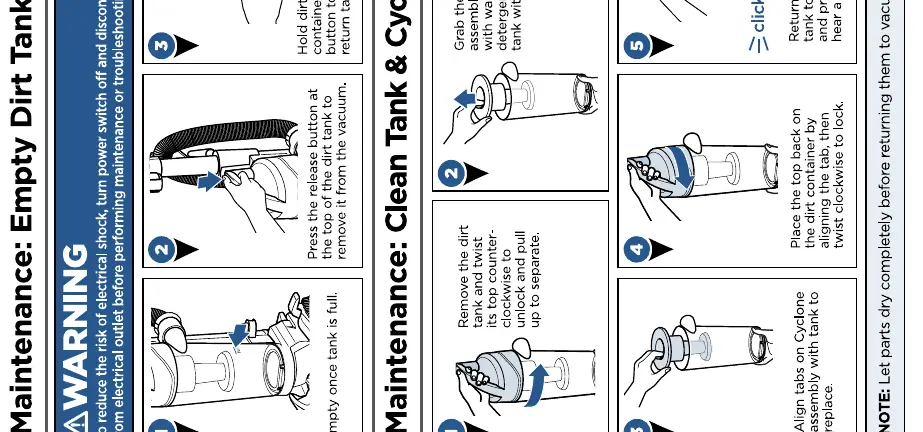
Emptying the Dirt Tank
- Press the tank release button at the top of the dirt tank to remove it.
- Hold the tank over a trash container and press the empty button to release the dirt.
- Close the lid and return the tank to the vacuum base until it clicks.
Cleaning the Tank & Cyclone
- Remove the dirt tank.
- Twist the top of the tank counter-clockwise to unlock and separate.
- Clean the cyclone assembly with warm water and mild detergent.
- Ensure all parts are completely dry before reassembling.
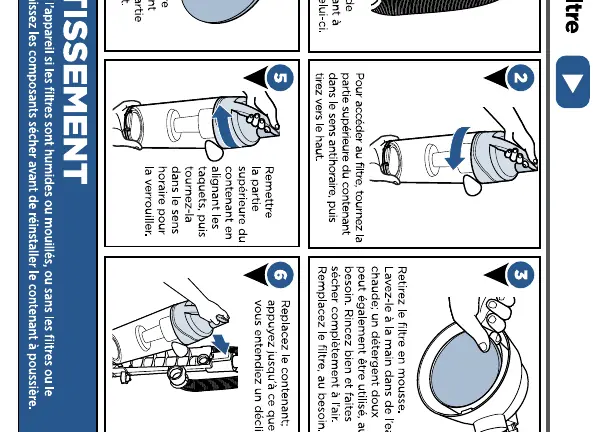
Filter Maintenance
- Remove the dirt tank and access the filter by twisting the top counter-clockwise.
- Remove the foam filter.
- Hand wash in warm water with mild detergent if desired.
- Rinse thoroughly and air dry completely before reinstalling.
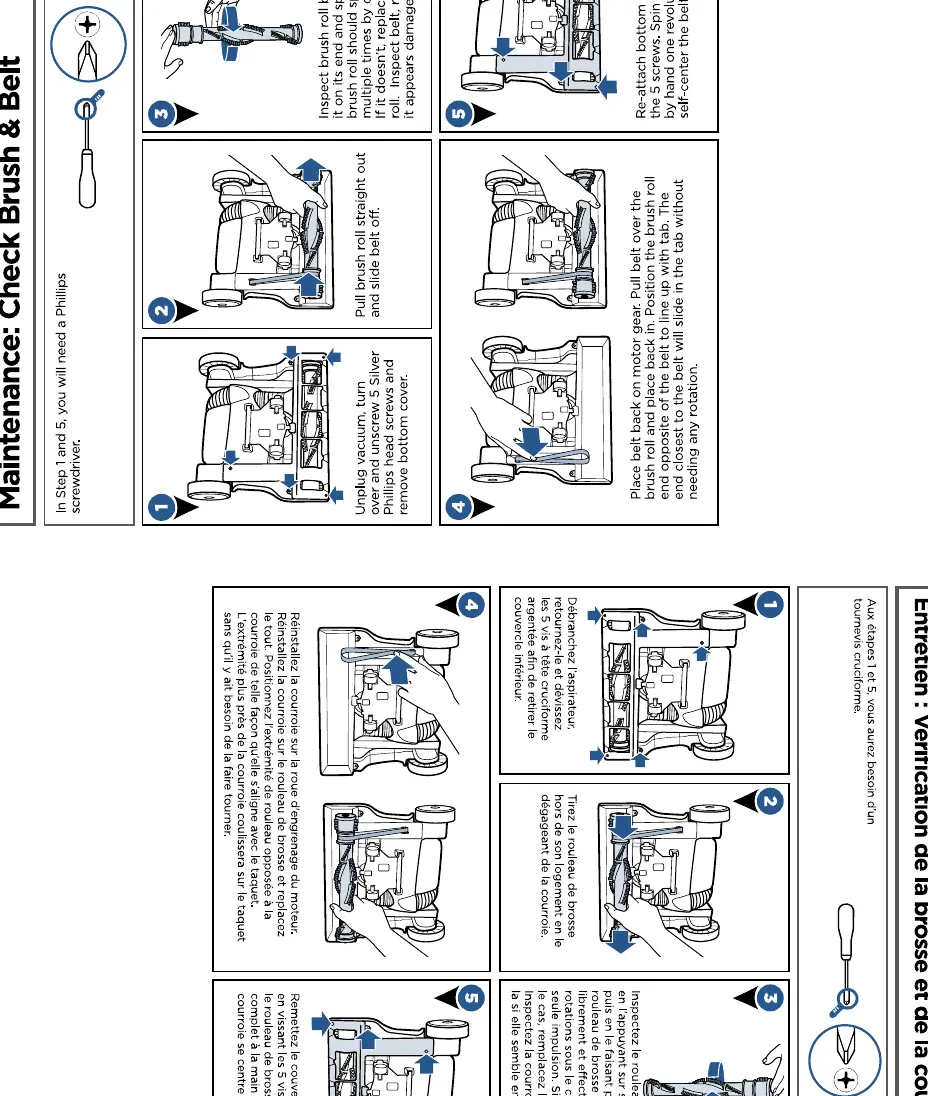
Brush & Belt Maintenance
- Unplug the vacuum and turn it over.
- Unscrew the 5 silver Phillips head screws to remove the bottom cover.
- Remove the brush roll to inspect for debris or damage.
- If the belt is broken, replace it.
- Reassemble the brush roll and cover, ensuring the belt is centered.
Troubleshooting
If the vacuum is not performing as expected, check the following:
- PowerBrush doesn't rotate: Check the belt for breakage or stretching; remove debris from the brush roll.
- Vacuum won't pick up dirt: Check for clogs in the hose, empty the dirt container, and ensure filters are clean and installed.
- Dirt escaping: Ensure the dirt container is seated properly and the filters are correctly installed.
For further assistance, visit www.BISSELL.ca or call 1-800-263-2553.
Official resources from the manual
Manufacturer information
Bissell Inc.
Practical help
Common problems
PowerBrush doesn't rotate
Check belt for breakage or stretching; remove debris from brush roll.
Vacuum won't pick up dirt
Check for clogs in the hose, empty dirt container, check filters.
Dirt escaping from vacuum
Ensure dirt container is seated properly and filters are installed.
Before use
- Ensure dirt container is locked in place.
- Check that filters are installed.
- Ensure the vacuum is unplugged before maintenance.
- Check for clogs in the hose.
Specs in practice
- Bare Floor Setting
- For hard floors and low pile carpet.
- High Carpet Setting
- For high pile and most shag carpet.
Images and diagrams
- The product view shows the dirt container, height adjustment knob, and hose locations.
- Assembly steps require inserting the handle into the base until it clicks.
Model compatibility
- For household use only.
- Do not use on wet surfaces.

Manual page author
Michael Turner
Technical manual editor
Reviews PDF manuals for structure, safety notes, and practical product details so readers can find the right information quickly.