Home Appliances / Vacuum Cleaners
User Manual for Bissell Cleanview Proheat 1456G
Quick guide for the Bissell Cleanview Proheat 1456G carpet and upholstery washer. Includes assembly, operation, maintenance, and troubleshooting steps.
Table of contents
Manual images
Click an image to enlargeQuick Guide
The Bissell Cleanview Proheat 1456G is a carpet and upholstery washer designed for household use. Before starting, ensure you have a Phillips-head screwdriver for assembly. Always use genuine Bissell cleaning formulas to maintain the machine and warranty. Do not use the machine on velvet or silk, and always check upholstery tags for colorfastness before cleaning.
Assembly
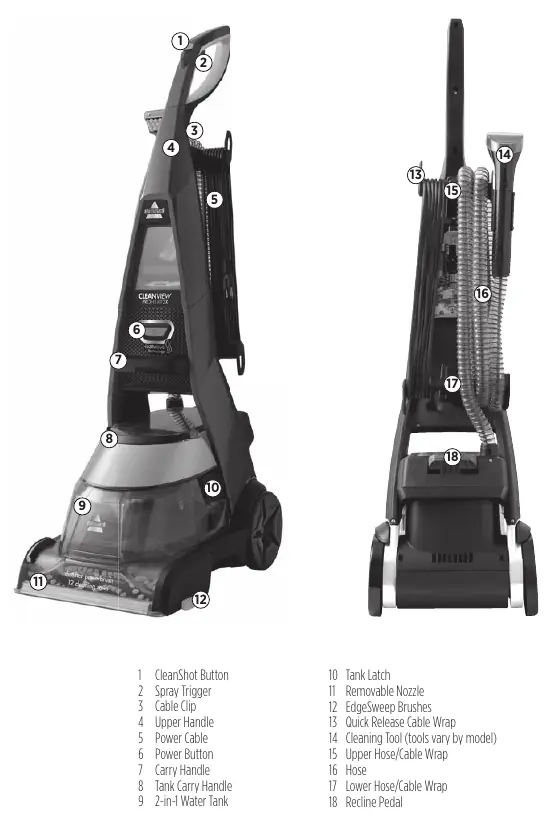
The unit comes in four components: Upper Handle with Screws, Lower Base, Upper Hose Wrap, and Upper Tool Holder.
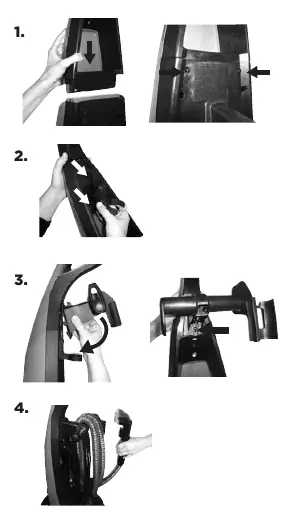
- Slide the Upper Handle onto the lower base and secure with 2 screws.
- Attach the upper tool holder to the Upper Handle by snapping the bottom half in first, then the top half.
- Place the Upper Hose/Cable Wrap on the back of the Upper Handle and secure with 1 screw.
- Wrap the hose around the Lower and Upper Hose/Cable Wraps, securing the trigger into the holder.
- Wrap the power cable around the wraps and secure the plug with the clip.
- Attach cleaning tools to the storage locations.
Operations
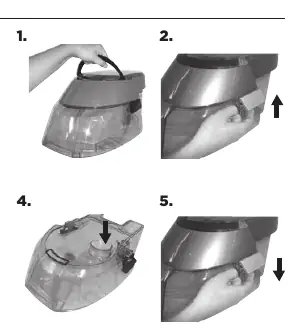
Filling the 2-in-1 Water Tank: Remove the tank by lifting the carry handle. Unlatch the top, fill the bladder with warm tap water (60°C/140°F MAX), and add the recommended amount of Bissell formula using the provided measuring cup. Secure the latches before replacing the tank on the base.
Carpet Cleaning: Plug in and press the Power Button. Recline the handle using the pedal. Press the Spray Trigger while making slow forward and backward passes. Release the trigger and make dry passes to extract water. If the brush roll stops, a circuit breaker may have tripped; unplug, remove the obstruction, and plug back in.
CleanShot: Press the CleanShot button on the handle to aim a focused stream at tough stains. Let it soak for 15 seconds, then extract by running the machine over the area without pressing the spray trigger.
Maintenance and Care
Machine Care: After cleaning, flush the machine by running warm water through the system while pressing the spray trigger for 15 seconds. Empty and rinse the 2-in-1 tank, hair/debris basket, and red filter.
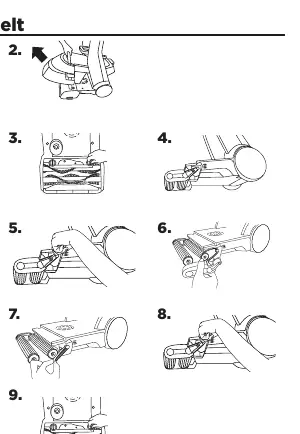
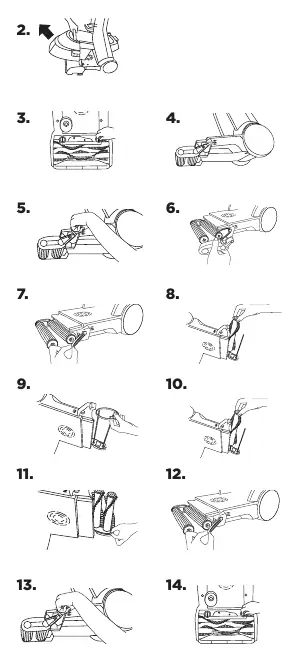
Belt and Brush Replacement: To access belts or brushes, unplug the machine, remove the tank, and unlock the nozzle. Turn the machine on its side (corded side up). Remove the pivot arm screw to access the drive belt and brush rolls. Ensure washers are in place when reassembling.
Troubleshooting
If you experience reduced spray, ensure the bladder is full, the tank is seated properly, and the pump is primed. If the brush does not turn, check for broken belts or foreign objects in the brush roll. If the machine is not picking up formula, check that the tank is latched correctly and the red float door is not closed.
Manufacturer information
Bissell Inc.
Practical help
Common problems
Reduced spray or no spray
Refill bladder with warm water and formula, ensure tank is seated snugly, or prime the pump by turning the machine on and pressing the spray trigger.
DirtLifter PowerBrush does not turn
Check if belts are off or broken. Check for foreign objects caught in the Brush Roll; remove them and plug the machine back in to reset the circuit breaker.
Cleaner not picking up formula
Ensure the 2-in-1 Water Tank is seated and latched properly. Empty the tank if full. Check if the red float door is closed due to rapid movement; slow down your cleaning pace.
Before use
- Check upholstery tags for colorfastness before cleaning.
- Remove loose dirt and impediments from the carpet.
- Plan your cleaning route to leave an exit path.
- Ensure tank latches are secure on both sides.
- Use only genuine Bissell cleaning formulas.
Specs in practice
- 60°C/140°F MAX
- Maximum water temperature allowed for the 2-in-1 Water Tank.
Images and diagrams
- Assembly diagrams illustrate handle attachment and hose wrapping sequence.
- Maintenance diagrams show the steps to remove the nozzle, pivot arm, and drive belts.
Model compatibility
- Do not use on velvet or silk.
- Use only Bissell formulas; other formulas may void the guarantee.
- Do not use Wash & Shine Hard Floor Formula on area rugs or carpet.

Manual page author
Emily Carter
User documentation editor
Prepares concise manual descriptions and highlights the most useful setup, operation, and maintenance information for readers.