Home Appliances / Carpet Cleaners
User Manual for Bissell Revolution Pet Pro Carpet Cleaner
Comprehensive user guide for the Bissell Revolution Pet Pro. Includes assembly instructions, cleaning modes, maintenance, troubleshooting, and belt replacement steps.
Quick answers from the manual
Quick answer
- The Bissell Revolution Pet Pro is a deep carpet cleaner. It features multiple cleaning modes (Max, Deep, Express), a removable dirty water tank, and a hose/tool attachment for upholstery. Always use genuine Bissell formulas and hot tap water (not boiling). p. 1, 7, 9
Key actions
- Assemble the unit p. 5
- Fill the Clean Water Tank p. 7
- Clean the Brush Roll p. 15
First start
- Assemble the handle and carry handle, then fill the tank with water and formula. p. 5, 7
Show 4 more answers Show less
Problems and fixes
No Spray Through Hose & Tool
Prime the hose by removing the nozzle and using a ballpoint pen in the black cylinder to release air, or hold the hose end below the water level.
p. 18Maintenance and reset
- Empty the Dirty Water Tank and clean the red filter. p. 13
Technical specifications
| Parameter | Value | Meaning | Pages |
|---|---|---|---|
| Water Capacity | 1 Gallon | Capacity of the Clean Water Tank. | p. 4 |
Where to find it in the PDF
- Assembly p. 5
- Cleaning Modes p. 9
- Maintenance p. 13, 15
Table of contents
Manual images
Click an image to enlargeQuick Guide
The Bissell Revolution Pet Pro is a deep cleaner designed for carpets and upholstery. Before first use, ensure the unit is assembled correctly. Always use genuine Bissell cleaning formulas to prevent internal damage. The machine features multiple cleaning modes, including Max Clean for heavy-duty cleaning and Express Clean for faster drying times.
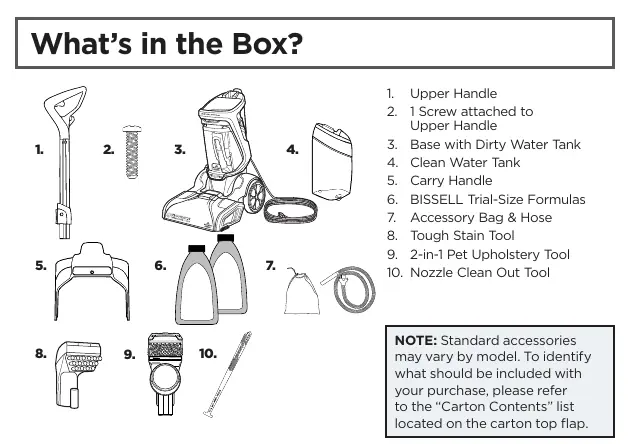
Assembly
Assembly requires a Phillips-head screwdriver.
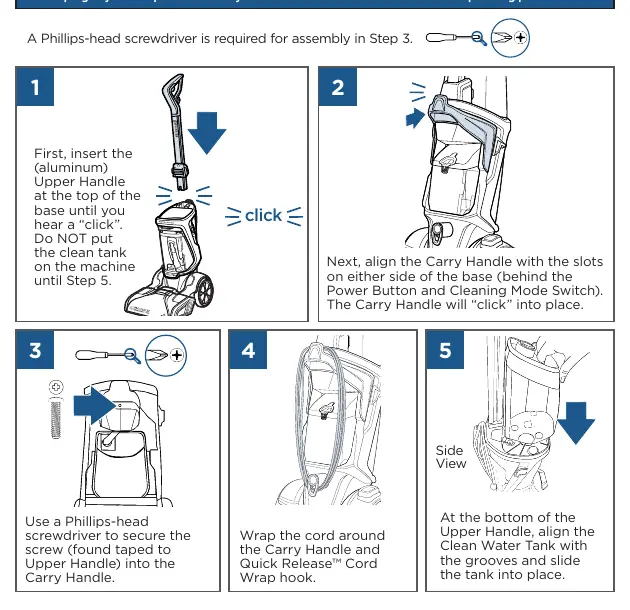
- Insert the aluminum Upper Handle into the top of the base until it clicks.
- Align the Carry Handle with the slots on either side of the base and click into place.
- Secure the Carry Handle using the screw provided (taped to the Upper Handle).
- Wrap the cord around the Carry Handle and Quick Release Cord Wrap hook.
- Align the Clean Water Tank with the grooves at the bottom of the Upper Handle and slide it into place.
Filling the Clean Water Tank
Note: Use hot tap water (140°F/60°C MAX). Do not use boiling water or heat the tank in a microwave.
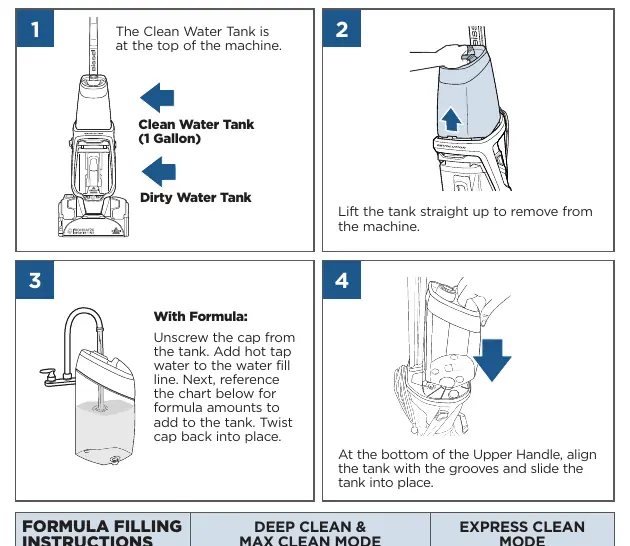
- Deep Clean & Max Clean Mode: Fill water to the Water Fill Line. Add 2.5 oz of formula (or 5 oz for extra power).
- Express Clean Mode: Fill water to the Water Fill Line. Add 1.25 oz of formula.
- Boost Formula: Optional; add 2 oz (Deep/Max) or 1 oz (Express) for enhanced results.
Cleaning Modes
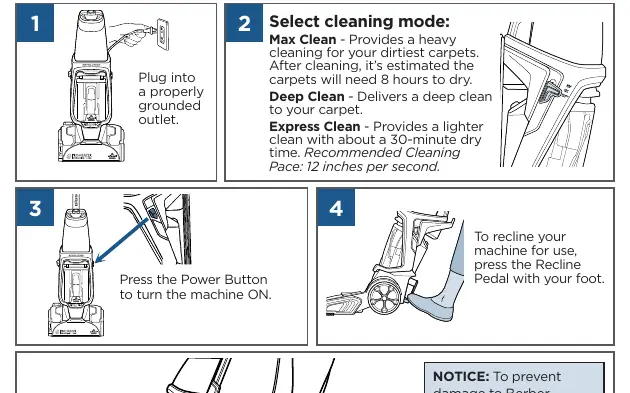
- Max Clean: Heavy cleaning for dirtiest carpets. Estimated 8-hour dry time.
- Deep Clean: Standard deep cleaning.
- Express Clean: Lighter clean with approximately 30-minute dry time. Recommended pace: 12 inches per second.
Maintenance
Emptying the Dirty Water Tank
Press the colored tank handle to release. Tilt and pull to remove. Use the Rubber Tab for quick emptying or unscrew the bottom ring for a full rinse. Ensure the Float Stack is aligned correctly when reassembling.
Cleaning Brush Roll & Nozzle
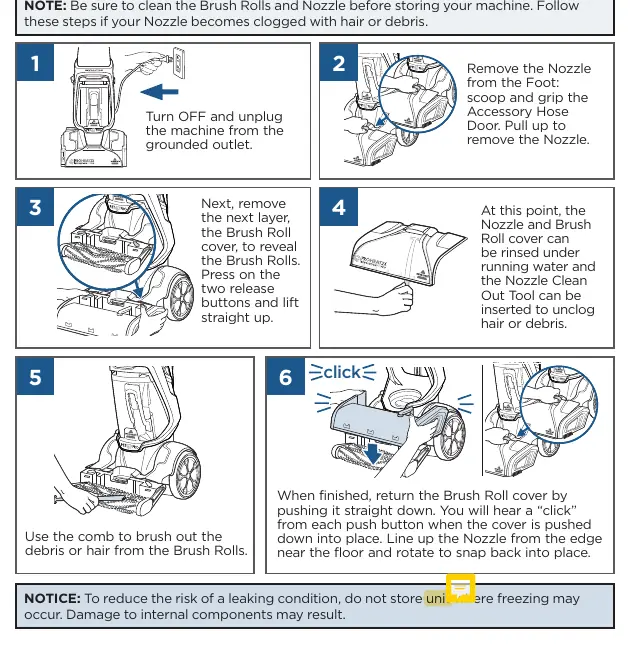
Turn off and unplug the machine. Remove the Nozzle by scooping and gripping the Accessory Hose Door. Remove the Brush Roll cover by pressing the two release buttons. Use the provided comb to remove hair and debris. Rinse parts under running water.
Replacing Belts & Brush Rolls
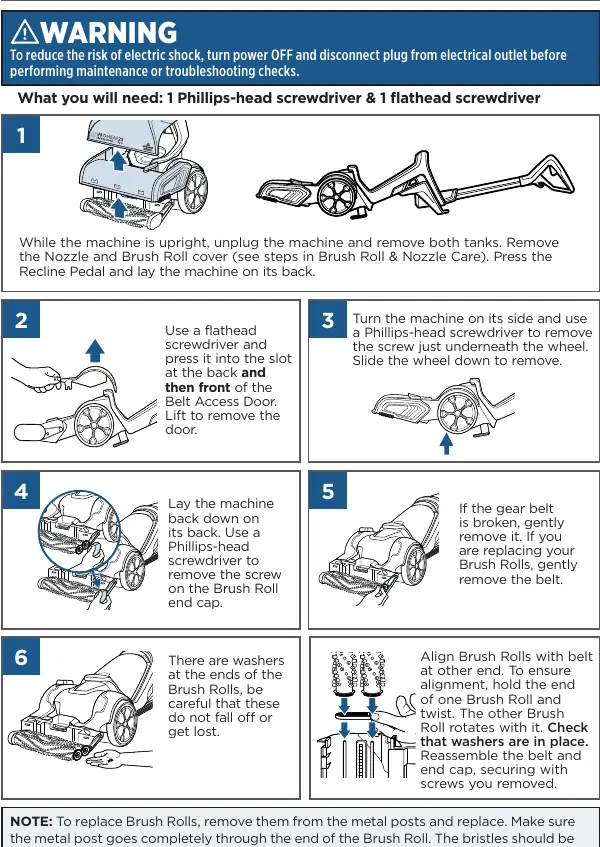
Requires Phillips-head and flathead screwdrivers. Remove tanks, nozzle, and brush roll cover. Use a flathead screwdriver to remove the Belt Access Door. Remove the wheel screw, slide the wheel down, and remove the belt. Replace belts and brush rolls as needed, ensuring washers are in place and bristles are aligned in a 'V' pattern.
Troubleshooting
If you experience reduced spray, check if the tank is empty or not seated properly. For loss of suction, ensure the Dirty Water Tank is seated, the Rubber Tab is sealed, and the Accessory Hose Door is locked. If the machine has no power, ensure the correct button is pressed and the outlet is active.
Manufacturer information
Bissell Inc.
Practical help
Common problems
Reduced or No Spray
Refill the Clean Water Tank, ensure it is seated correctly, or prime the hose by removing the nozzle and using a ballpoint pen in the black cylinder to release air.
Loss of Suction Power
Empty the Dirty Water Tank, ensure the Rubber Tab is sealed, check that the Accessory Hose Door is locked, and clear any clogs from the nozzle or brush roll.
Leaking Tank
Ensure the tank is not overfilled. With the cap tight, hold the tank at an angle over a sink to drain excess water from the space between the tank and handle.
Before use
- Assemble the handle and carry handle.
- Vacuum the area with a dry vacuum cleaner first.
- Pretreat tough stains with Bissell Pretreat.
- Fill the Clean Water Tank with hot tap water and the appropriate formula.
- Ensure the machine is plugged into a properly grounded outlet.
Show more Show less
Specs in practice
- Max Clean Mode
- Heavy-duty cleaning for very dirty carpets; requires approximately 8 hours to dry.
- Express Clean Mode
- Lighter cleaning mode with a faster dry time of approximately 30 minutes.
- Water Temperature
- Use hot tap water up to 140°F (60°C). Do not use boiling water.
Images and diagrams
- Assembly steps for handle and tank.
- Filling instructions for different cleaning modes.
- Brush roll and nozzle removal for cleaning.
- Belt replacement procedure.
Model compatibility
- Use only genuine Bissell cleaning formulas.
- Do not use on unsealed surfaces.
- Do not use on delicate, silk, wool, or antique rugs without checking the manufacturer's tag.

Manual page author
Emily Carter
User documentation editor