Tools / Power Tools
User Manual for Bosch PSS 200 A / 200 AC / 250 AE Orbital Sander
Comprehensive user guide for the Bosch PSS 200 A, PSS 200 AC, and PSS 250 AE orbital sanders. This manual covers safety instructions, assembly, sanding sheet replacement, dust extraction methods, operation, and maintenance.
PDF source: Deutsch · summary: English
Quick answers from the manual
Quick answer
- The Bosch PSS 200/250 series are orbital sanders for dry sanding wood, plastic, metal, and painted surfaces. PSS 250 AE features variable speed control. p. 11
Key actions
- Changing the sanding sheet p. 12
- Emptying the dust box p. 12
First start
- Ensure the switch is in the off position before connecting to power. p. 10
Show 3 more answers Show less
Problems and fixes
Dust extraction issues
Empty the dust box and clean the filter element.
p. 12Technical specifications
| Parameter | Value | Meaning | Pages |
|---|---|---|---|
| Rated power input | 200W / 250W | Power consumption | p. 11 |
Where to find it in the PDF
- Product Overview p. 3
- Dust Extraction p. 4
Table of contents
Manual images
Click an image to enlargeQuick guide from the manual
The Bosch PSS 200/250 series are orbital sanders designed for dry sanding of wood, plastic, metal, filler, and varnished surfaces. Before starting, ensure the mains voltage matches the tool's rating plate. Always wear appropriate personal protective equipment, including safety glasses and a dust mask. Ensure the dust box or external extraction system is properly connected to minimize dust exposure.
Product Description
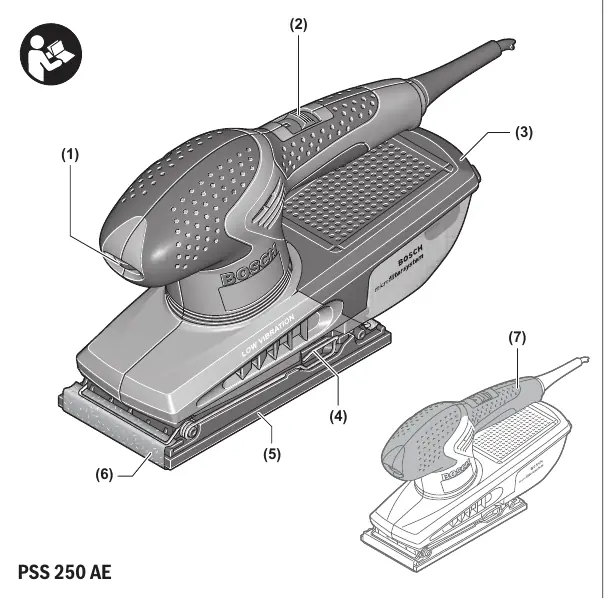
The sander features an on/off switch, a sanding plate, and a dust extraction system. The PSS 250 AE model includes an additional thumbwheel for preselecting the orbital stroke rate.
Assembly
Changing the sanding sheet: Before attaching a new sheet, clean the sanding plate (5) with a brush. Ensure the holes in the sanding sheet align with the holes in the sanding plate for effective dust extraction.
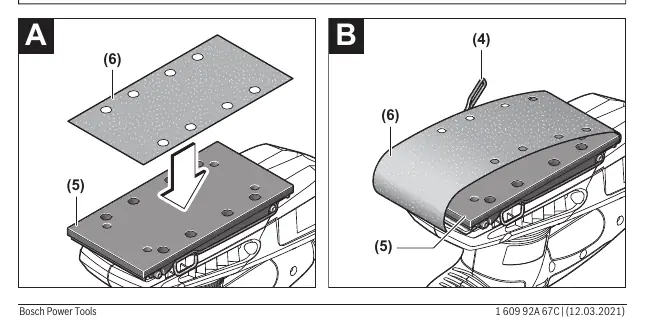
- Hook-and-loop backing (PSS 200 A / PSS 250 AE): The sanding plate is equipped with hook-and-loop fabric. Tap the fabric before attaching the sheet to ensure optimal adhesion. Press the sheet firmly onto the plate.
- Clamping system (PSS 200 AC / PSS 250 AE): Lift the clamps (4), insert the sanding sheet (6) under the rear clamp, and secure it. Pull the sheet tight around the plate and secure the other end under the front clamp.
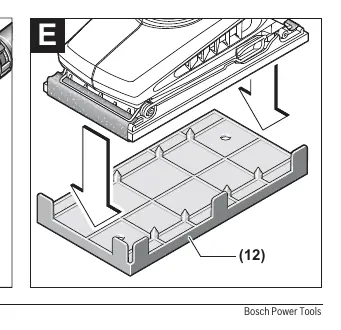
- Punching: If using unperforated sanding sheets, use the punch (12) to create holes for dust extraction by pressing the tool onto the punch.
Dust Extraction
Dust from materials like lead paint, some woods, minerals, and metal can be harmful. Use a dust extraction system whenever possible.
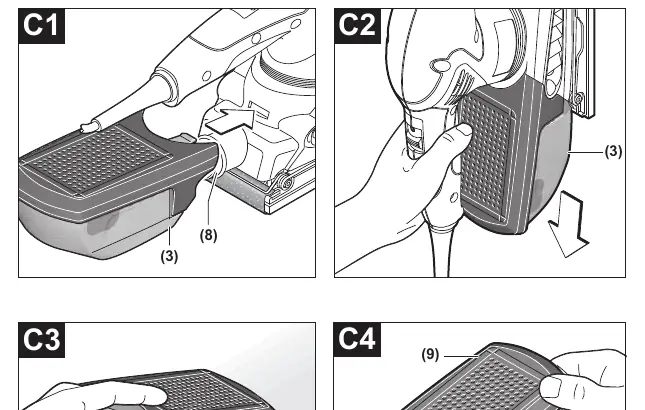
- Self-generated extraction: Attach the dust box (3) to the extraction outlet (8) until it clicks. To empty, pull the box downwards. Tap it against a firm surface to loosen dust from the filter element (9) before opening.
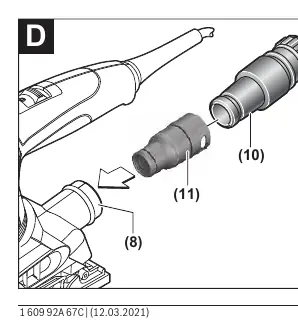
- External extraction: Connect the dust extraction adapter (11) to an extraction hose (10) and connect it to the tool's extraction outlet (8).
Operation
To start the tool, push the on/off switch (2) forward to position "I". To turn it off, push it back to position "0". For the PSS 250 AE, use the thumbwheel (1) to preselect the orbital stroke rate based on the material and working conditions.
Working Advice
Apply consistent pressure to increase the lifetime of the sanding sheets. Excessive pressure does not increase performance but leads to faster wear of the tool and the sanding sheet. Do not use a sanding sheet that has been used for metal on other materials.
Maintenance
Always pull the plug from the socket before performing any work on the tool. Keep the tool and ventilation slots clean for safe and efficient operation. If the power cord needs replacement, it must be done by Bosch or an authorized service center.
Manufacturer information
Bosch
Practical help
Common problems
Dust extraction not working effectively
Empty the dust box and clean the filter element with a soft brush. Ensure the holes in the sanding sheet align with the holes in the sanding plate.
Sanding sheet comes loose
For hook-and-loop models, ensure the plate is clean. For clamp models, ensure the sheet is pulled tight and the clamps are fully secured.
Before use
- Check that the mains voltage matches the tool's rating plate.
- Ensure the sanding sheet is correctly attached and holes are aligned.
- Check that the dust box is securely clicked into place.
- Wear appropriate personal protective equipment (safety glasses, dust mask).
- Ensure the workpiece is securely clamped.
Show more Show less
Specs in practice
- Rated power input
- 200W for PSS 200 A/AC, 250W for PSS 250 AE.
- No-load speed
- 12,000 min-1 for PSS 200 A/AC, 7,000–12,000 min-1 for PSS 250 AE.
- Orbit diameter
- 2.0 mm for all models.
Images and diagrams
- (1) Orbital stroke rate preselection (PSS 250 AE)
- (5) Sanding plate
- (6) Sanding sheet
Model compatibility
- PSS 200 A and PSS 250 AE use hook-and-loop sanding sheets.
- PSS 200 AC and PSS 250 AE use clamps for sanding sheets.

Manual page author
Michael Turner
Technical manual editor