Tools / Woodworking Tools
User Manual for Bosch 1617 Series Routers
Quick guide for Bosch 1617, 1617EVS, 1617EVSPK, and 1618EVS routers. Learn about assembly, depth adjustment, dust collection, and maintenance.
Table of contents
Manual images
Click an image to enlargeQuick guide from the manual
This manual provides operating and safety instructions for the Bosch 1617, 1617EVS, 1617EVSPK, and 1618EVS routers. Always read the full safety warnings before use. Ensure the tool is disconnected from the power source before making any adjustments, changing accessories, or performing maintenance.
Safety Rules
- Personal Safety: Always wear safety goggles and a dust mask. Do not operate the tool while tired or under the influence of drugs, alcohol, or medication.
- Work Area: Keep the work area clean and well-lit. Do not operate in explosive atmospheres.
- Operation: Hold the tool with two hands during start-up to manage motor torque. Never touch the bit during or immediately after use as it will be hot.
- Workpiece: Ensure the work surface is free from nails and foreign objects. Secure the workpiece with clamps.
Assembly
Installing a Router Bit:

- Remove the chip shield or flip it up if using a plunge base.
- Hold the armature shaft in place with the shaft wrench.
- Use the collet wrench to loosen the collet chuck assembly in a counter-clockwise direction.
- Insert the router bit shank into the collet chuck as far as it will go, then back it out approximately 1/8" to 1/4".
- Tighten the collet chuck firmly in a clockwise direction. The shank must be inserted at least 5/8".
Removing the Motor from the Base:
- For non-plunge bases: Open the base clamp lever, depress the coarse adjustment lever, and pull the motor upwards until it stops. Turn the motor counter-clockwise to remove.
- For plunge bases: Open the base clamp lever, pull the motor upwards until it stops, then turn counter-clockwise to remove.
Operating Instructions
Depth Adjustment (Fixed Base):
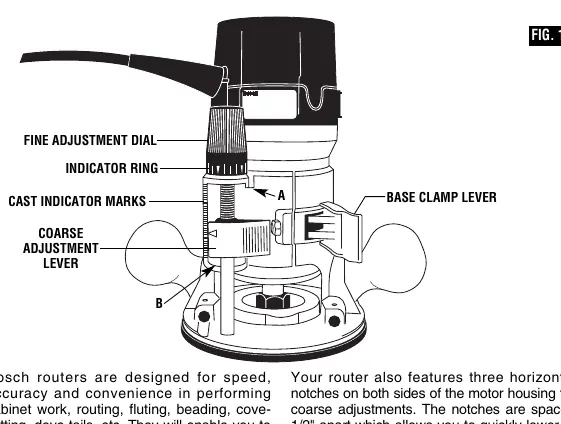
- Ensure the base clamp lever is released.
- Use the coarse adjustment lever to raise or lower the motor using the notches on the housing.
- Use the fine adjustment knob to precisely set the bit position. One full turn equals 1/16".
- Re-clamp the motor after adjustments.
Feeding the Router:
The bit rotates clockwise when viewed from the top. Feed the router so that the bit turns into the work (counter-clockwise feed direction). Feeding too fast or too slow can cause motor overload or friction burns.
Dust Collection
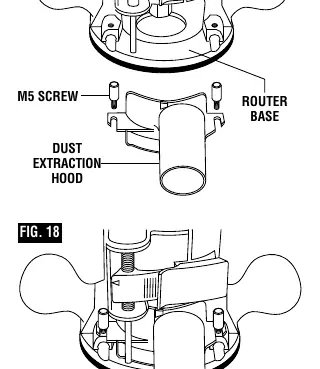
Optional dust extraction hoods are available for both plunge and fixed bases. These hoods are designed to accept 35mm vacuum hoses. Ensure the chip shield is in place for maximum effectiveness. Do not use multiple dust extraction hoods simultaneously to avoid hose entanglement.
Maintenance
- Tool Lubrication: Gears should be regreased at every brush change.
- Carbon Brushes: Examine brushes every two to six months. Use only genuine Bosch replacement brushes.
- Bearings: Replace bearings after 300-400 hours of operation or at every second brush change.
- Cleaning: Use compressed dry air to clean the tool. Do not use cleaning agents like gasoline or ammonia, as they may damage plastic parts.
Manufacturer information
Bosch
Practical help
Common problems
Router is hard to control
Check feed direction, reduce feed rate, or check if the bit is dull.
Motor stalls or overheats
Reduce feed rate, check for a dull bit, or reduce the depth of the cut.
Imperfect cut
Check feed rate and direction; ensure the bit is sharp and the collet is tightened securely.
Before use
- Ensure the switch is in the off-position before connecting to power.
- Check that the work surface is free from nails and foreign objects.
- Verify the collet nut and adjustment devices are securely tightened.
- Ensure the router is placed on a solid, flat, level surface if using a table.
- Wear safety goggles and a dust mask.
Specs in practice
- 1617EVS/1618EVS Speed Control
- Allows matching motor speed to cutter size and material hardness.
- Constant Response Circuitry
- Monitors and adjusts power to maintain desired RPM under load.
Images and diagrams
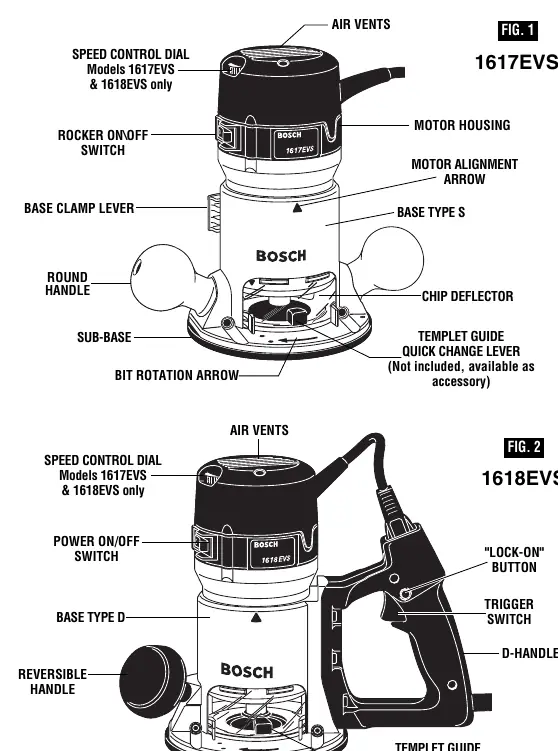
- Fig 1 & 2: Shows controls like speed dial, rocker switch, and base clamp lever.
- Fig 10: Illustrates depth adjustment components including fine adjustment dial and coarse adjustment lever.
- Fig 14: Demonstrates proper feed direction for routing.
Model compatibility
- RA1161 fixed base is designed for 1617, 1617EVS, and 1618EVS motors.
- RA1162 D-handle base is designed only for 1618EVS motor.
- RA1166 plunge base is designed for 1617, 1617EVS, and 1618EVS motors.

Manual page author
Michael Turner
Technical manual editor
Reviews PDF manuals for structure, safety notes, and practical product details so readers can find the right information quickly.