HVAC / Water Heaters
Bradford White Intelligent Cascading Kit Installation and Service Manual
Complete installation and configuration guide for the Bradford White Intelligent Cascading Kit. Includes wiring diagrams, cascading settings, plumbing requirements, and troubleshooting for RTG 199HE/ME and RTG-K series water heaters.
Quick answers from the manual
Quick answer
- The Intelligent Cascading Kit allows up to 24 Bradford White RTG water heaters to be connected in parallel. It requires installing cascading cables in a ring configuration and programming each unit as either Primary or Secondary via the HMI display. p. 3, 7, 8
Key actions
- Connect all appliances in a ring using the cascading cables. p. 7, 8
- Configure Primary/Secondary settings on every unit. p. 8, 9
First start
- Access the programming menu (P2/P5 for older models, P4/PC for newer models) to enable cascading mode and assign roles. p. 8, 9
Problems and fixes
Damaged appliance in cascading system
Turn the unit OFF, disconnect it from the cascading ring, and bypass it by connecting the cables of the remaining units.
p. 10Maintenance and reset
- Primary rotation occurs automatically after 100 burning hours. p. 10
Technical specifications
| Parameter | Value | Meaning | Pages |
|---|---|---|---|
| Max units | 24 | Maximum number of appliances in a cascade. | p. 3 |
| Min pipe diameter | 3/4" | Minimum plumbing requirement. | p. 3 |
| Min water pressure | 50 psi | Minimum water pressure requirement. | p. 3 |
Where to find it in the PDF
- Installation p. 6, 7
- Settings p. 8, 9
Table of contents
Manual images
Click an image to enlargeQuick guide from the manual
This document provides instructions for installing and configuring the Intelligent Cascading Kit for Bradford White RTG series water heaters. The kit allows up to 24 appliances to be connected in parallel to meet hot water demand. This guide covers plumbing requirements, cable installation, and programming settings for both older and newer RTG models.
Safety instructions
- Electric Shock Risk: Ensure only an authorized contractor performs electrical work. Disconnect power and secure the unit against unintentional reconnection before starting.
- Explosion Risk: Do not store or use gasoline or other flammable/combustible vapors and liquids near the appliance.
- Alterations: Inform the customer that they must not carry out any alterations or repairs.
Plumbing setup
For optimal performance, follow these requirements:

- Use the reverse return method with a minimum number of elbows to balance pressures.
- Locate appliances as close as possible to each other.
- Minimum pipe diameter: 3/4".
- Minimum water pressure: 50 psi.
- Maximum distance between appliances: 36".
- Insulate pipes to prevent heat loss.
Installation of Intelligent Cascading Kit
Each appliance has 'cascading input' and 'cascading output' connectors inside.
Removing the front cover
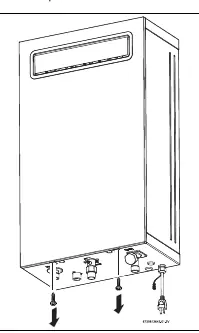
- Loosen the two Phillips head screws located on the bottom of the cover.
- Lift the front cover to remove it from the appliance.
- Disconnect the wire from the HMI (display).
- Remove the ring sealings to access the cable ports.
Connecting the cables
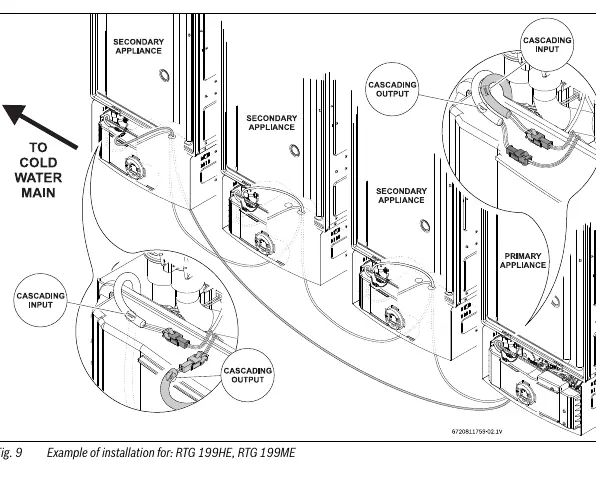
- Connect all appliances together to form a ring.
- Connect units in a row from the first to the last, then connect the last unit back to the first to close the ring.
- Use the holes at the bottom of the appliance to guide cables.
- If a cable is not long enough, connect two or more cables in a row.
Cascading settings
Perform this procedure on all appliances in the setup.
For RTG 199HE, RTG 199ME
- Push ON/OFF to OFF.
- Hold Program button and press ON/OFF to ON. Release Program button when '188' flashes.
- Press '+' until P5 appears.
- Press Program button.
- Press '+' until CC (cascading mode) appears.
- Hold Program button until CC blinks.
- Press Program button to enter main menu.
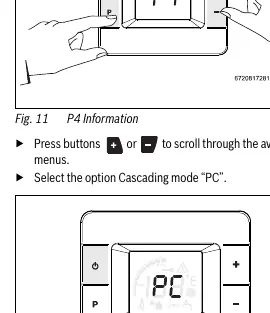
For RTG-K-199N/X1, RTG-K-160N/X1, RTG-K-199N/X2, RTG-K-160N/X2
- Press '+' and '-' and Program button simultaneously for 3 seconds. Display shows P4.
- Press '+' or '-' to scroll to 'PC' (Cascading mode).
- Press Program button to enter.
- Use '+' or '-' to select MA (Primary) or SL (Secondary).
- Press Program button until the option blinks to activate.
System operation
- Primary/Secondary: Only one appliance can be defined as Primary. All others must be Secondary.
- Primary Rotation: Occurs when water flow is OFF and 100 burning hours are reached on the primary unit.
- Error Handling: If an appliance is locked due to an error, it will request the next appliance to take over. If the Primary is damaged, it must be bypassed by disconnecting the cascading cables and turning the unit OFF.
- Recirculation: Appliance-controlled recirculation cannot be activated simultaneously with cascading.
Practical help
Common problems
Cascading not working
Ensure all units are powered on, cables are properly connected in a ring, and settings (Primary/Secondary) are correctly configured on all units.
Damaged appliance in the ring
Turn the damaged unit OFF, disconnect it from the cascading ring, and connect the cascading cables of the adjacent units to ensure communication continuity.
Before use
- Verify pipe diameter is at least 3/4".
- Ensure water pressure is at least 50 psi.
- Check that the distance between appliances does not exceed 36".
- Ensure all units are powered and cables are connected in a ring.
- Configure Primary/Secondary settings on every unit in the system.
Specs in practice
- Cascading Capacity
- Up to 24 appliances can be connected in parallel.
- Primary Rotation
- The system automatically transfers the primary attribute to the next unit after 100 burning hours.
Images and diagrams
- Fig 5/6: Shows the location of the two Phillips head screws on the bottom of the cover for removal.
- Fig 9/10: Illustrates the correct ring connection of cascading cables between multiple units.
- Fig 12: Shows the HMI display interface for selecting the PC (Cascading) menu.
Model compatibility
- Simple cascading option is not compatible with newer models (RTG-K-199/160).
- Appliance controlled recirculation cannot be activated simultaneously with cascading.

Manual page author
Michael Turner
Technical manual editor
Reviews PDF manuals for structure, safety notes, and practical product details so readers can find the right information quickly.