Automotive / Portable Coolers
User Manual for Brass Monkey 65L 12V/24V Fridge and Freezer GH-1676
Quick guide for the Brass Monkey 65L 12V/24V Fridge and Freezer (GH-1676). Learn how to operate, install, adjust temperature, use the app, and troubleshoot your unit.
Table of contents
Manual images
Click an image to enlargeQuick guide from the manual
This manual provides instructions for the Brass Monkey 65L 12V/24V Fridge and Freezer (Model GH-1676). Before first use, ensure the unit is unpacked and stands upright on a level surface for at least 6 hours. The fridge is designed for 12V/24V DC power. You can control the temperature and settings via the control panel or the dedicated smartphone app.
Product description
The unit features a high-efficiency DC compressor, intelligent voltage detection to protect vehicle batteries, and an LCD display. It includes a removable freezer zone and a reversible door for flexible installation.
Installation
When installing in a cabinet, ensure there is at least 75mm of ventilation space on each side, at the rear, and at the top. The unit must be placed on a flat, level surface. Connect the fridge directly to the vehicle's 12V/24V DC power supply. Use the appropriate wire gauge based on the distance between the fridge and the battery: 14AWG for up to 6m, 12AWG for up to 11m, and 10AWG for up to 17m.

Operation
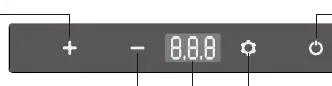
To turn the fridge on, connect the power and press the power button. Press the set button to toggle between the freezer zone (FR) and refrigerator zone (RE) temperature settings. Use the plus (+) or minus (-) buttons to adjust the temperature. To set the battery protection mode, hold the set button for 3 seconds; you can cycle through L (Low), M (Medium), and H (High) protection levels. H is recommended for vehicle starter batteries.
Advanced features
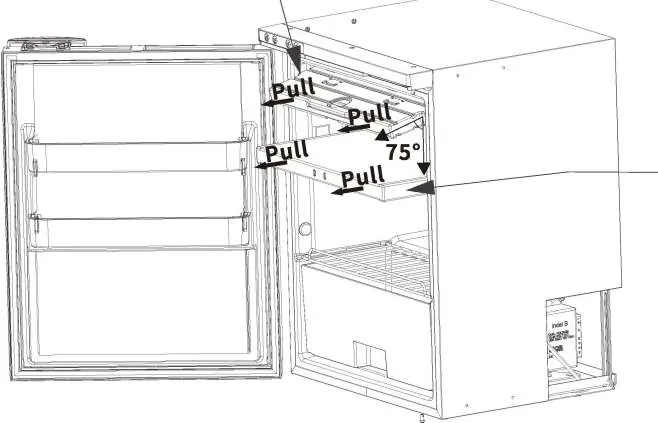
You can remove the freezer zone lid and divider to increase the refrigerator section space. The door opening direction can be reversed by unscrewing the hinges and moving the door latch and decorative sheets to the opposite side. The fridge can be monitored and controlled via the Brass Monkey app, which can be downloaded by scanning the QR code in the manual.
Cleaning and maintenance
Before cleaning, disconnect the power. Clean the exterior with warm water and a soft cloth. For the interior, remove racks and containers and clean with warm water mixed with a little bicarbonate of soda or vinegar. The condenser should be cleaned at least once a year using a vacuum or dry brush. If the fridge will not be used for a long period, clean it, dry it thoroughly, and store it with the door ajar to prevent mould.
Troubleshooting
If the fridge is not working, check the power supply, fuse, and connections. If error codes appear: F1 indicates low voltage (adjust battery protection); F2 indicates fan overload (restart after 30 mins); F3 indicates compressor overload (restart after 30 mins); F5 indicates high temperature (move to a ventilated area); F7/FS indicates a sensor error.
Technical data
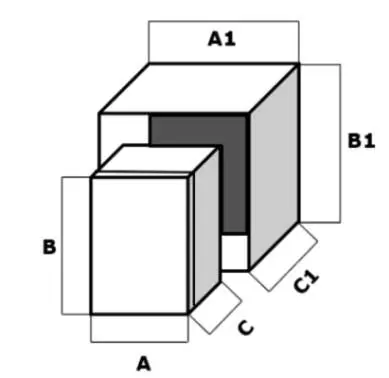
The unit has a capacity of 65L, power consumption of 60W, and operates on 12V/24V DC. The temperature range is 0°C to 8°C for the refrigerator zone and -12°C to -20°C for the freezer zone. The weight is 20kg.
Manufacturer information
Brass Monkey
Practical help
Common problems
Fridge not working
Check the power supply, fuse, and ensure the power switch on the control panel is on.
Food inside is frozen
The temperature is set too low; adjust the setting to a higher temperature.
Code F1 displayed
Low voltage protection. Set the battery protection button from H to M or M to L.
Code F2 or F3 displayed
Fan or compressor overload. Turn off the product and restart it after 30 minutes.
Code F5 displayed
High temperature compressor module protection. Move the product to a ventilated area and restart.
Before use
- Unpack the unit and stand it upright on a level surface for at least 6 hours before switching on.
- Clean the interior with a damp cloth before first use.
- Ensure the supply voltage is within the proper range (12V/24V DC).
- Check that the installation surface is flat and can support the weight.
- Ensure there is at least 75mm of ventilation space around the unit if installing in a cabinet.
Specs in practice
- Rated Voltage
- 12V/24V DC power supply.
- Temperature Range
- 0°C to 8°C (Refrigerator) / -12°C to -20°C (Freezer).
- Climate Class
- T/ST/N/SB.
Images and diagrams
- Control Panel: Includes power button, set button, and temperature adjustment (+/-) buttons.
- Installation: Requires 75mm ventilation space on each side, rear, and top.
Model compatibility
- Designed for 12V/24V DC power systems.
- Bluetooth app available for remote monitoring and control.

Manual page author
Emily Carter
User documentation editor
Prepares concise manual descriptions and highlights the most useful setup, operation, and maintenance information for readers.