Lighting / Ceiling Fans
User Manual for Breezary 23021-SN 52-Inch Ceiling Fan
Comprehensive user guide for the Breezary 52-inch ceiling fan (model 23021-SN). Includes installation steps, wiring diagrams, remote control operation, maintenance tips, and troubleshooting.
Quick answers from the manual
Quick answer
- The Breezary 52-inch ceiling fan is operated via the included remote control. It requires a fan-rated outlet box (max 35 lbs) and must not be used with wall-mounted dimmer switches. Airflow direction can be reversed using the switch on the motor housing. p. 1, 16, 17
Key actions
- Install the fan p. 8, 10, 14
- Pair the remote p. 11, 15
- Reverse airflow p. 17
First start
- Ensure power is off, mount the hanger bracket to a fan-rated box, assemble the downrod, wire the receiver, and pair the remote using the dip switches. p. 8, 10, 11, 12
Show 4 more answers Show less
Problems and fixes
Fan will not start
Check fuse/breaker, wire connections, remote battery, and reversing switch position.
p. 18
Fan is noisy
Check for loose screws in motor housing and rattling wire connectors.
p. 18Maintenance and reset
- Clean periodically with a soft brush or lint-free cloth. Do not use water. p. 17
Technical specifications
| Parameter | Value | Meaning | Pages |
|---|---|---|---|
| Voltage | 120V AC, 60Hz | Electrical supply requirements. | p. 4 |
| Max Weight | 15.9kg (35 lbs) | Maximum load for outlet box. | p. 2, 5 |
| Wire Gauge | 12 AWG | Recommended wire size for 50-100 ft runs. | p. 6 |
Where to find it in the PDF
- Safety Instructions p. 2, 3
- Assembly p. 8, 9
- Operation p. 15, 16, 17
Table of contents
Manual images
Click an image to enlargeQuick Guide
This guide provides essential instructions for the Breezary 52-inch ceiling fan. Important: Do not use a variable (Rheostat) wall controller or dimmer switch, as this will damage the fan's remote control unit. Ensure the fan is installed on a fan-rated outlet box capable of supporting at least 35 lbs (15.9 kg).
Electrical and Structural Requirements
The fan requires a grounded 120V AC, 60Hz, 15 Amp circuit. The outlet box must be securely anchored to the ceiling joist. If installing on an angled ceiling, the maximum angle is 16 degrees.
Assembly and Installation
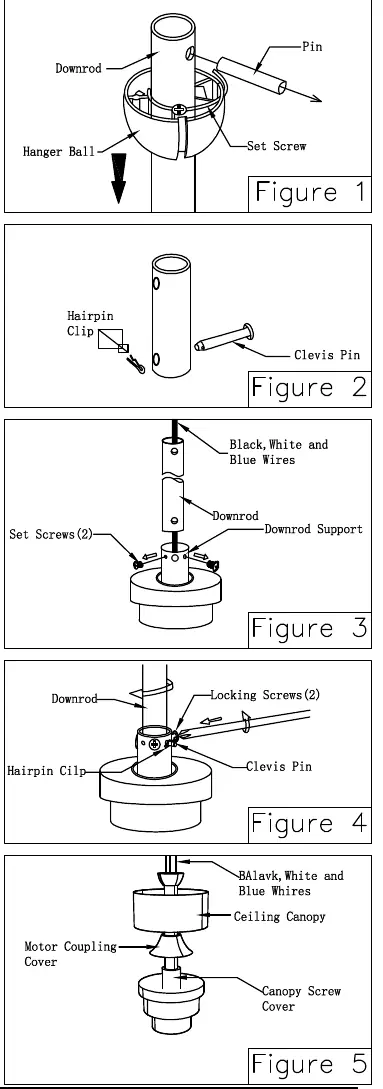
- Downrod Assembly: Remove the hanger ball by loosening the set screw. Route the black, white, and blue wires through the downrod. Secure the downrod to the motor support using the clevis pin and hairpin clip.
- Hanging: Secure the hanger bracket to the outlet box using the provided screws and washers. Lift the fan and seat the downrod/hanger ball assembly into the hanger bracket, ensuring the groove in the ball aligns with the tab on the bracket.
Wiring
Follow these steps to wire the receiver:
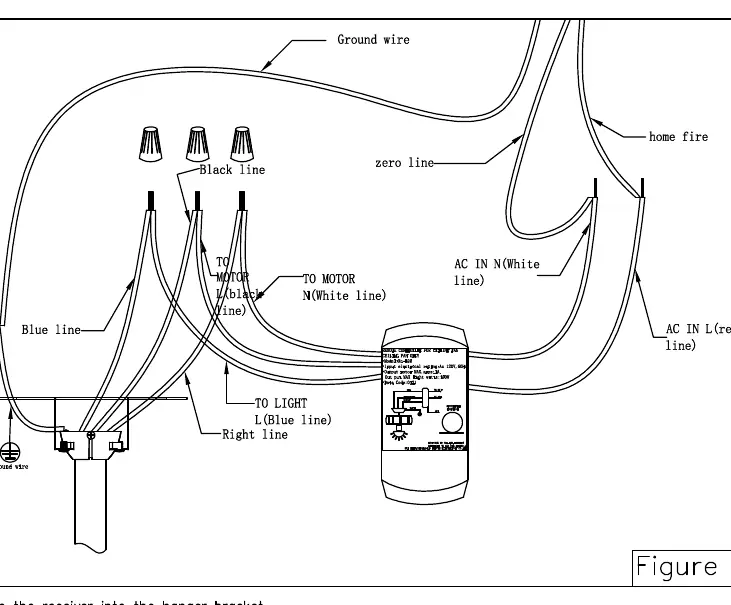
- Connect green wires from the hanger bracket and downrod to the bare (ground) wire.
- Connect the black wire from the wave filter (marked "AC IN L") to the supply black wire.
- Connect the white wire from the wave filter (marked "AC IN N") to the supply white wire.
- Connect the white wire from the receiver (marked "TO MOTOR N") to the fan white wire.
- Connect the black wire from the receiver (marked "TO MOTOR L") to the fan black wire.
- Connect the blue wire from the receiver to the fan blue wire (light).
Operation
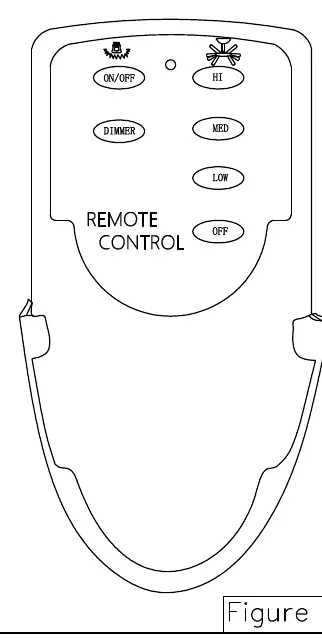
Remote Control: The remote controls fan speed (HI, MED, LOW), light (ON/OFF), and dimmer function. The remote and receiver must be paired using the dip switches (16 combinations available). Ensure the dip switches on both units match.
Reverse Switch: Located on the motor assembly. Use the "Left" position for Summer (Clockwise) to create a cooling effect. Use the "Right" position for Winter (Counter-Clockwise) to circulate warm air.
Maintenance and Troubleshooting
Clean the fan periodically using a soft brush or lint-free cloth. Do not use water, as it may damage the finish or cause electrical shock. If the fan is noisy, wobbling, or fails to start, check the troubleshooting section for loose screws, wire connections, or remote battery issues.
Practical help
Common problems
Fan will not start
Check fuse or circuit breaker, ensure wire connections are tight, replace remote battery, or check if the reversing switch is in the neutral position.
Fan is noisy
Check that all screws in the motor housing are snug, ensure wire connectors are not rattling against the switch housing, and avoid using solid-state variable speed controls.
Fan wobbles excessively
Tighten the set screws in the downrod support and hanger ball assembly. Ensure the hanger bracket is securely fastened to the outlet box.
Not enough air movement
Consider using a longer 10-inch downrod if the fan is mounted too close to the ceiling.
Before use
- Turn off power at the main fuse box before installation.
- Ensure the outlet box is fan-rated and supports at least 35 lbs (15.9 kg).
- Verify that you have the necessary tools: Phillips screwdriver, wire strippers, and stepladder.
- Check that the remote control has fresh AAA batteries.
- Ensure the dip switches on the remote and receiver are set to the same position.
Show more Show less
Specs in practice
- 15.9kg (35 lbs)
- Maximum weight capacity for the ceiling outlet box.
Images and diagrams
- Figure 1-3: Shows different outlet box mounting configurations (pancake, deep box, brace).
- Figure 4: Illustrates remote pairing using dip switches.
- Figure 7-8: Demonstrates the reverse switch positions for Summer and Winter operation.
Model compatibility
- Do not use with variable (Rheostat) wall controllers or dimmer switches.
- Requires a grounded 120V AC, 60Hz, 15 Amp circuit.
- Compatible with standard and angled ceilings (up to 16 degrees).

Manual page author
Michael Turner
Technical manual editor