Lighting / Ceiling Fans
Installation Guide for Nexxt Solutions Smart Wi-Fi 2-in-1 Socket Fan & Light NHA-F100
Quick installation guide for the Nexxt Solutions Smart Wi-Fi 2-in-1 Socket Fan & Light (NHA-F100). Includes step-by-step mounting instructions, remote control functions, and app setup.
Quick answers from the manual
Quick answer
- The NHA-F100 is a smart ceiling fan that installs into a standard E26/E27 socket. It can be mounted directly or via an extension rod and is controlled by a remote or the Nexxt Home app. p. 1, 3
Key actions
- Install ceiling socket p. 3
- Attach fan blades p. 4
First start
- Restore power and pair with app p. 4
Show 4 more answers Show less
Problems and fixes
Device pairing
Hold button 2 for 5 seconds to enter pairing mode.
p. 5Maintenance and reset
- Cancel timer p. 5
Technical specifications
| Parameter | Value | Meaning | Pages |
|---|---|---|---|
| Color Temperature | 2700-4000-6500K | Adjustable light warmth | p. 5 |
Where to find it in the PDF
- Installation components p. 2
- Remote control functions p. 5
Table of contents
Manual images
Click an image to enlargeQuick guide from the manual
This document provides installation and operation instructions for the Nexxt Solutions NHA-F100 Smart Wi-Fi 2-in-1 Socket Fan & Light. Before starting, ensure the power is turned off at the circuit breaker and use a voltage tester to verify the wires are not live. Do not install near water or moisture.
Installation components
Ensure your package contains the following items:
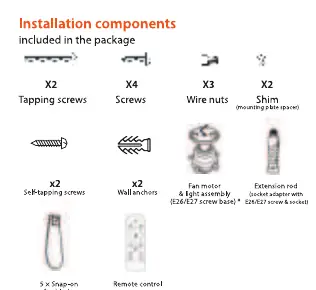
- Fan motor & light assembly
- Extension rod
- 5 Snap-on fan blades
- Remote control
- Mounting hardware (Tapping screws, Screws, Wire nuts, Shim, Wall anchors)
Installation steps
Step 1: Install the Ceiling Socket
If you already have a working E26/E27 ceiling socket, you may skip to the next step. Otherwise:
- Use the shim or a compatible mounting plate as a base.
- Connect live (black or brown) and neutral (white or blue) wires to the new socket using the included wire nuts.
- Secure the socket to the ceiling using expansion bolts and screws.
- Verify that wires are tight and no copper is exposed.
Step 2: Install the Fan Motor Assembly
Choose one of the following options:
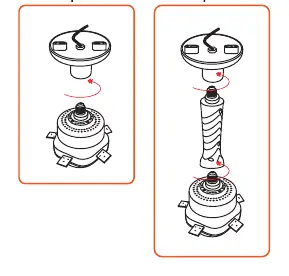
- Option A (Direct Installation): Screw the fan motor assembly directly into the ceiling socket and rotate gently until fully seated.
- Option B (Using Extension Rod): Screw the extension rod into the ceiling socket, insert the fan motor assembly into the rod socket, and tighten the locking screws.
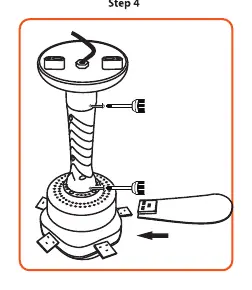
Step 3: Attach the Fan Blades
- Align each blade with its mounting point.
- Press firmly until it snaps into place.
- Repeat for all 5 blades.
- Firmly tighten the screws to secure the assembly.
Remote control and operation
The remote control requires two AAA batteries (not included). Key functions include:
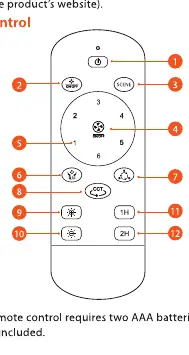
- Button 1: Power off.
- Button 2: Light on/off (CCT mode) and Wi-Fi pairing (hold 5 seconds).
- Button 4: Fan on/off.
- Button 5: Adjust fan speed (1-6).
- Button 6: Switch fan rotation direction (Forward/Reverse).
- Button 8: Cycle color temperatures (2700K-4000K-6500K).
- Buttons 11-12: Timer settings (1H/2H).
App setup
After restoring power, test the device with the remote. Pair the device with the Nexxt Home app for remote management of all key functions.
Practical help
Common problems
Device not pairing with Wi-Fi
Press and hold button 2 on the remote for 5 seconds to enter pairing mode.
Fan not working after installation
Check that the power is restored at the breaker and ensure the fan is fully seated in the socket.
Before use
- Turn off power at the circuit breaker
- Use a voltage tester to ensure wires are not live
- Ensure ceiling socket is E26/E27 compatible
- Have two AAA batteries ready for the remote control
Show more Show less
Images and diagrams
- Step 3-A/B illustrates the two mounting options: direct socket connection or using the extension rod.
- Step 4 illustrates the correct alignment and snapping mechanism for the fan blades.
Model compatibility
- Requires E26/E27 ceiling socket.
- Requires Nexxt Home app for full smart functionality.

Manual page author
Michael Turner
Technical manual editor