Lighting / Ceiling Fans
Installation and User Guide for Schuller Vento 168304D Dimmable Ceiling Fan
Complete installation and user guide for the Schuller Vento 168304D dimmable ceiling fan. Includes wiring instructions, remote control setup, blade balancing, and troubleshooting steps.
Quick answers from the manual
Quick answer
- The Schuller Vento 168304D is a dimmable ceiling fan with a 6-speed DC motor, retractable blades, and remote control. Installation requires a qualified electrician and involves mounting the ceiling bracket, connecting the module, and balancing the blades if necessary. p. 1, 7
Key actions
- Syncing the remote control p. 5, 11
- Balancing the blades p. 4, 10
First start
- Initial installation steps p. 2, 3, 8, 9
Problems and fixes
Fan/Light not working
Check quick installation connections.
p. 6, 12
Remote control failure
Check batteries, ensure no remote swapping, or re-sync.
p. 6, 12Maintenance and reset
- Re-syncing remote control p. 5, 11
Technical specifications
| Parameter | Value | Meaning | Pages |
|---|---|---|---|
| Voltage | 220V / 50Hz | Required power input | p. 2, 8 |
| Light | 3000K - 6000K | Adjustable color temperature | p. 1, 7 |
Where to find it in the PDF
- Installation Guide (ES) p. 2, 3, 4, 5
- Installation Guide (EN) p. 8, 9, 10, 11
Table of contents
Manual images
Click an image to enlargeQuick guide from the manual
The Schuller Vento 168304D is a dimmable ceiling fan featuring a 6-speed DC motor, reversible rotation, and retractable acrylic blades. Installation must be performed by a qualified electrician. The fan is controlled via a remote control and supports color temperature adjustment (3000K-6000K).
Safety Warnings
- Power Input: The fan requires a 220V / 50Hz power supply.
- Installation: Must be carried out by a qualified electrician.
- Safety: Do not touch the blades while the fan is in operation.
Installation Steps

- Ceiling Bracket: Drill two holes (8mm diameter) in the ceiling. Insert expansion bolts or plaster anchors and fix the mounting bracket firmly.
- Suspension System: Select the desired downrod (2A or 2B). Attach the hemisphere to the downrod using the pin and set-screw.
- Wiring: Feed wires through the downrod. Connect the module to the wires from the fan body, then connect the network cable to the module's INPUT cables. Insert the module into the ceiling bracket space.
- Canopy: Raise the canopy to cover the ceiling mount, ensuring it rests on the bracket screws, then tighten.
- Light Shade: Align the diffuser grooves with the pivots on the fan body and turn clockwise to secure.
Balancing the Fan
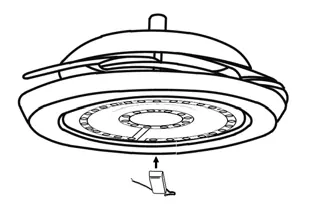
If the fan wobbles after assembly, use the "Invisible system" balancing kit:
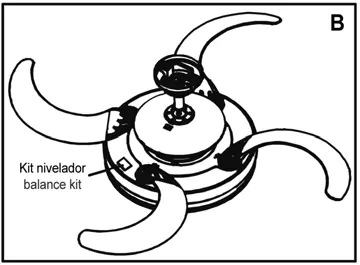
- Place two balance magnets on the marked spaces (as shown in Figure A) and test the fan.
- Repeat until the wobble is corrected.
- Remove the magnets and apply the adhesive balance kit in the final position (Figure B).
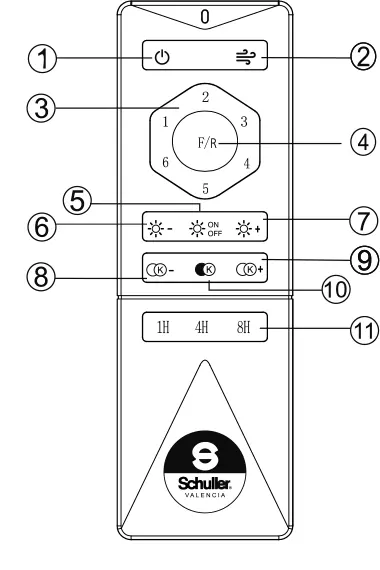
Remote Control Operation
The remote control is synchronized at the factory. If it fails, check the batteries (2x 1.5V AAA) and ensure they are making contact.
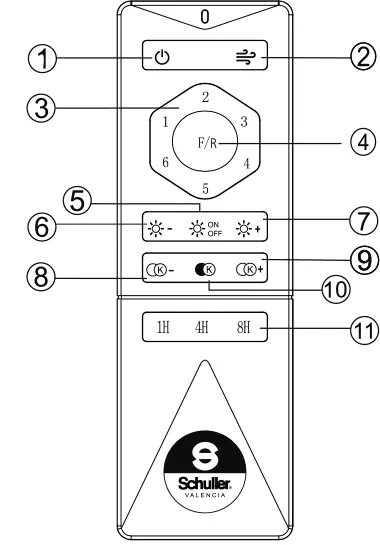
- Fan Control: ON/OFF, Speed control (1-6), Nature wind mode, Forward/Reverse rotation.
- Light Control: ON/OFF, Brightness adjustment, Color temperature selection (3000K, 4500K, 6000K).
- Timer: 1H, 4H, 8H settings.
Troubleshooting
- Fan/Light not working: Check quick installation connections.
- Noise/Rubbing: Ensure ceiling support is fixed, tubes are centered/tight, and no loose parts exist.
- Remote not responding: Check batteries, ensure no remote swapping, or re-sync the remote.
- Blades not opening/closing: Loosen the blade screws slightly.
Practical help
Common problems
Blades do not rotate or light does not turn on
Check that the quick installation connections are securely fastened.
Noises, rubbing, or buzzing
Ensure the ceiling support is completely fixed, central tubes are tight and centered, and no loose pieces are inside the canopy.
Remote control not working
Check batteries, ensure the correct remote is used (they are synchronized to specific fans), and re-sync if necessary.
Retractable blades do not open/close correctly
Loosen the screws that secure the blades slightly.
Before use
- Verify power supply is 220V / 50Hz
- Ensure installation is performed by a qualified electrician
- Check that 2x 1.5V AAA batteries are installed in the remote
- Ensure ceiling support is firmly fixed to the ceiling
- Check that all wiring connections are secure
Images and diagrams
- Remote control button functions (1-11)
- Balancing magnet placement (Figure A)
- Wiring and module connection diagram
Model compatibility
- Requires 220V / 50Hz power input
- If installing on a false ceiling (plaster, wood, metal), insulation is recommended to mitigate noise amplification

Manual page author
David Miller
Documentation analyst
Organizes user manual content into clear summaries, with attention to model details, product context, and everyday usability.