General / Other Manuals
User Manual for BRESSER Mobile Solar Panel 120W
Quick guide for the BRESSER 120W Mobile Solar Panel. Learn how to set up, connect devices via USB or DC, and maintain your solar panel for optimal performance.
Table of contents
Manual images
Click an image to enlargeQuick guide from the manual
The BRESSER Mobile Solar Panel 120W is designed for charging and operating mobile devices in dry, sunny outdoor conditions. To use the panel, unfold it completely and position it so the solar modules face direct, continuous sunlight. Secure the panel using the provided snap hooks and eyelets if necessary. Once positioned, connect your device to the appropriate port (USB-A, USB-C, or DC) on the connection panel. The device will begin charging automatically.
Safety Instructions
Danger of bodily injury: The device contains current-generating parts. Never leave children unattended with the device. Do not hit or pierce the solar modules, as this can release toxic chemicals. If damaged, do not touch the panel; wash affected skin with clean water and seek medical advice if necessary.
Fire/Explosion hazard: Do not operate the panel near extreme heat sources, fire, or open flames. Do not short-circuit the device.
Material damage: Do not disassemble the device. Protect it from excessive vibrations, dust, and moisture. Always fold the panel after use and store it in a dry, dust-free place at room temperature.
Parts Overview
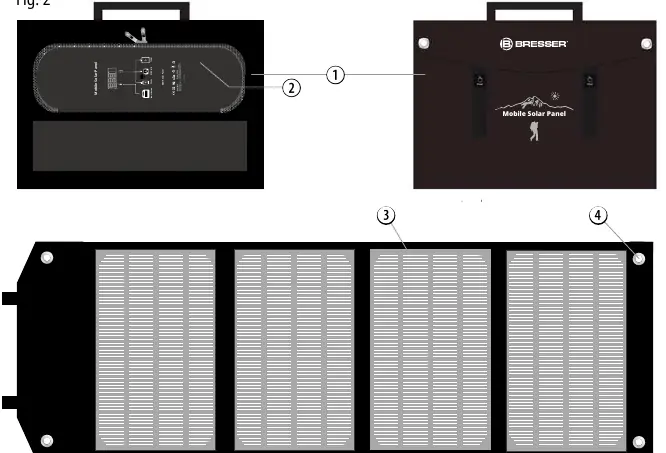
- Panel bag: The main housing containing the solar modules.
- Compartment: Contains the connection panel.
- Solar modules: The active surface for power generation.
- Eyelets: Used for securing the panel with snap hooks.
Connecting Devices
Before connecting, ensure your end device (smartphone, tablet, power bank) is compatible with the output. Protect the connected device from direct sunlight by placing it in the shade or under the solar panel.

USB-A (Quick Charge 3.0)
- Connect a compatible USB cable to the orange USB-A port.
- Plug the other end into your device.
USB Type-C
- Connect a suitable USB cable to the USB-C port.
- Plug the other end into your device.
DC Direct Current
- Connect a suitable DC adapter plug to the integrated DC connection cable.
- Insert the adapter into the designated socket on your device.
Cleaning and Maintenance
- Remove the panel from the sun and let it cool for a few minutes before cleaning.
- Wipe the modules only with a dry, soft, lint-free cloth. Do not use microfiber cloths, cleaning fluids, or sharp tools.
- Store in a dry, dust-free place.
Technical Data
- Model: 3810070 (120W)
- Peak Power Voltage (Vmp): 18V
- Peak Power Current (Imp): 6.6A
- Open Circuit Voltage (Voc): 21.6V
- Short Circuit Current (Isc): 7.33A
- Dimensions (unfolded): 1660 x 520 x 25 mm
- Dimensions (folded): 520 x 370 x 50 mm
- Weight: 4.7 kg
Manufacturer information
Bresser GmbH
Practical help
Common problems
Device not charging
Ensure the panel is in direct, unobstructed sunlight. Check that the device supports the output voltage (5V USB or 12V-18V DC). Clean the solar modules if dirty.
Reduced efficiency
Partial shade or cloudy skies will significantly reduce power output. Move the panel to a location with full, direct sunlight.
Water exposure
The panel is splash-proof, not waterproof. Do not submerge in water or leave outdoors during rain, snow, or frost.
Before use
- Unfold the panel completely so all modules face the sun.
- Select a location with direct, continuous sunlight.
- Secure the panel using the provided snap hooks if necessary.
- Verify that your end device is compatible with the output ports (USB or DC).
- Ensure you have the correct DC adapter plug for your device if using the DC output.
Specs in practice
- Vmp (Peak Power Voltage)
- The voltage at which the solar panel produces maximum power (18V).
- Imp (Peak Power Current)
- The current at which the solar panel produces maximum power (6.6A).
- Voc (Open Circuit Voltage)
- The maximum voltage the panel can output when no load is connected (21.6V).
- Isc (Short Circuit Current)
- The maximum current the panel can output when the terminals are shorted (7.33A).
Images and diagrams
- Fig 1: Illustrates the scope of delivery, including the panel bag, DC adapters, and carabiners.
- Fig 2: Shows the layout of the panel, including the connection compartment and eyelets.
- Fig 3: Details the connection panel, identifying the DC output, USB-C port, and USB-A QC 3.0 port.
Model compatibility
- Compatible with smartphones, tablets, GPS trackers, power banks, and power stations.
- Requires devices that support 5V (USB) or 12V-18V (DC) input.

Manual page author
David Miller
Documentation analyst
Organizes user manual content into clear summaries, with attention to model details, product context, and everyday usability.