Power / Solar Panels
User Manual for BougeRV 120W Solar Panel Kit
Quick guide for the BougeRV 120W Solar Panel Kit. Includes installation steps, electrical connection diagrams, maintenance tips, and troubleshooting for your solar setup.
Table of contents
Manual images
Click an image to enlargeQuick guide from the manual
This manual provides essential installation, maintenance, and safety information for the BougeRV 120W Solar Panel Kit. Before installation, ensure you have the necessary tools (not included) and verify that all parts are present. The kit is designed for renewable solar electricity generation. For technical support or warranty inquiries, contact BougeRV via [email protected] or 1-669-232-7427.
Package Contents
The kit includes the following hardware for mounting:
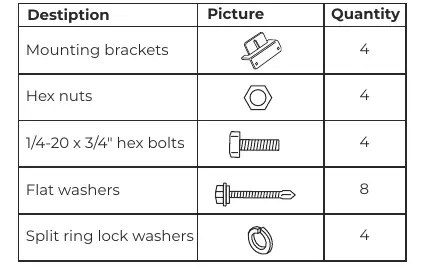
- 4 Mounting brackets
- 4 Hex nuts
- 4 1/4-20 x 3/4" hex bolts
- 8 Flat washers
- 4 Split ring lock washers
Electrical Connections
The solar panel can be wired in two configurations:
- Series Connection: Used to produce the desired voltage output.
- Parallel Connection: Used to produce the desired current output using the parallel connector.
Ensure correct polarity is observed during all connections to avoid damage and voiding the warranty.
Installation
Installation Overview:
- Choose a mounting site free from shade that receives maximum daily sunlight.
- Mount the charge controller (not included) within 5 feet of the battery to prevent current loss.
- Wire the battery to the charge controller, then the solar panel to the charge controller.
Mounting:
- The panels can be permanently installed using the included Z-brackets.
- If not using the included brackets, ensure a 1/2 inch space between the mounting surface and the panel for proper airflow.
- For RV installations, ensure solid mounting to the roof. Use molly fasteners for rubber roofs over thin plywood, or drill pilot holes for fiberglass roofs to reach the plywood below.
- Never lift or move the panel by the cables or junction box.
Maintenance and Cleaning
Periodic cleaning improves performance, especially in low-precipitation regions. Clean the panels during early morning or evening when irradiance and module temperatures are low to avoid electrical shock or burns.
- Wash the glass surface with potable, non-heated water.
- Pressurized water (up to 1500 psi) may be used.
- For stubborn dirt, use over-the-counter glass cleaners or a 3% soap-and-water solution.
- Use a soft sponge or seamless cloth to wipe the surface in a circular motion.
- Do not use harsh industrial-strength materials, scouring powder, steel wool, scrapers, or blades, as these will void the warranty.
Frequently Asked Questions
- Upgrading: You can upgrade from 120W to 240W by adding a similar 120W panel to the same charge controller.
- Compatibility: The panels are compatible with most portable power stations on the market via MC4 connectors.
- Output: Actual power generation is typically 60-80% of the rated 120W (approx. 72W-96W) depending on light intensity, angle, and shading.
- Breaker: A 10A breaker is recommended for a single panel setup.
Manufacturer information
BougeRV
Practical help
Common problems
Damaged, missing parts, or no output upon receipt
Send relevant pictures and your order number to [email protected] immediately.
Low power output
Check for shading, light angle, and light intensity. Ensure the panel is clean.
Reverse polarity during connection
Ensure correct polarity is maintained; reverse polarity can cause damage and void the warranty.
Before use
- Check all parts against the package contents list.
- Ensure the mounting site is free from shade.
- Have proper tools (not included) ready for installation.
- Mount the charge controller within 5 feet of the battery.
- Use gloves when handling panels.
- Ensure the panel glass is not in contact with abrasive surfaces.
Specs in practice
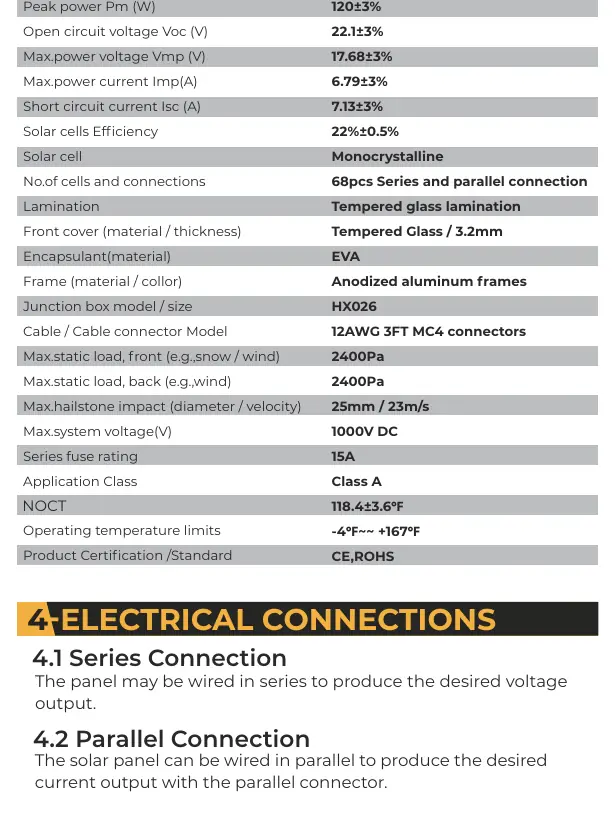
- Peak power (Pm)
- 120W (nominal); actual output varies based on conditions.
- Open circuit voltage (Voc)
- 22.1V ±3%.
- Max. power current (Imp)
- 6.79A ±3%.
- Series fuse rating
- 15A.
Images and diagrams
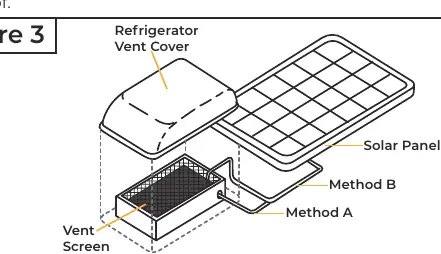
- Figure 3: Illustrates routing the solar panel wire into an RV through the refrigerator vent.
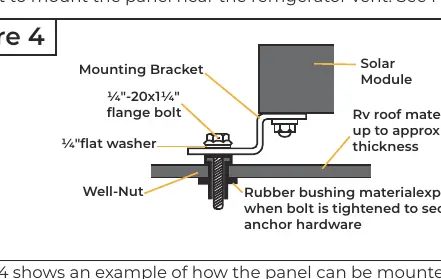
- Figure 4: Details the Z-bracket mounting assembly, including the flange bolt, flat washer, and well-nut for RV roof installation.
Model compatibility
- Compatible with most portable power stations using MC4 connectors.
- Can be upgraded to 240W by adding a second 120W panel to the same charge controller.

Manual page author
Michael Turner
Technical manual editor
Reviews PDF manuals for structure, safety notes, and practical product details so readers can find the right information quickly.