Electronics / Night Vision
User Manual for BRESSER Explorer 200RF Night Vision Device
Comprehensive user manual for the BRESSER Explorer 200RF night vision device. Includes setup instructions, charging guidelines, operation modes, rangefinder usage, troubleshooting, and technical specifications.
PDF source: Deutsch · summary: English
Quick answers from the manual
Quick answer
- The BRESSER Explorer 200RF is a night vision device with a laser rangefinder. It supports photo and video recording on a MicroSD card and is powered by two 18650 Li-Ion batteries. p. 1, 13
Key actions
- Charging the device p. 7, 19
- Inserting MicroSD card p. 8, 20
- Adjusting focus p. 7, 19
First start
- Charge the device fully using a 5V/2A adapter. p. 7, 19
- Insert a MicroSD card. p. 8, 20
Show 4 more answers Show less
Problems and fixes
Device shuts down
Charge via 5V/2A adapter as IR LEDs consume high power.
p. 13, 25
Poor image
Keep glasses on, check IR settings, adjust focus.
p. 13, 25Maintenance and reset
- Format SD card via menu settings to clear files. p. 11, 23
Technical specifications
| Parameter | Value | Meaning | Pages |
|---|---|---|---|
| Optical Magnification | 6x | Fixed optical zoom level | p. 12, 24 |
| Range-Finding Distance | 200m (night) / 500m (day) | Maximum distance for rangefinder | p. 13, 24 |
Where to find it in the PDF
- Parts Overview p. 2, 6, 18
- Specifications p. 12, 13, 24
Table of contents
Manual images
Click an image to enlargeQuick Guide
The BRESSER Explorer 200RF is a digital night vision device with a built-in laser rangefinder. Before first use, ensure the device is fully charged using a 5V/2A adapter. Insert a compatible MicroSD card (4-64 GB) to enable photo and video recording. The device features day and night modes, with adjustable IR illumination for night viewing.
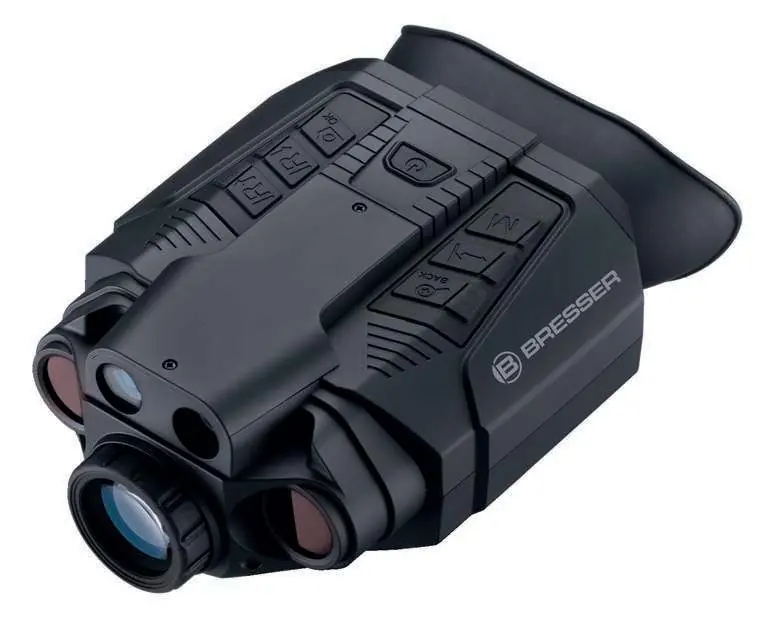
Parts Overview
The device features several key controls:
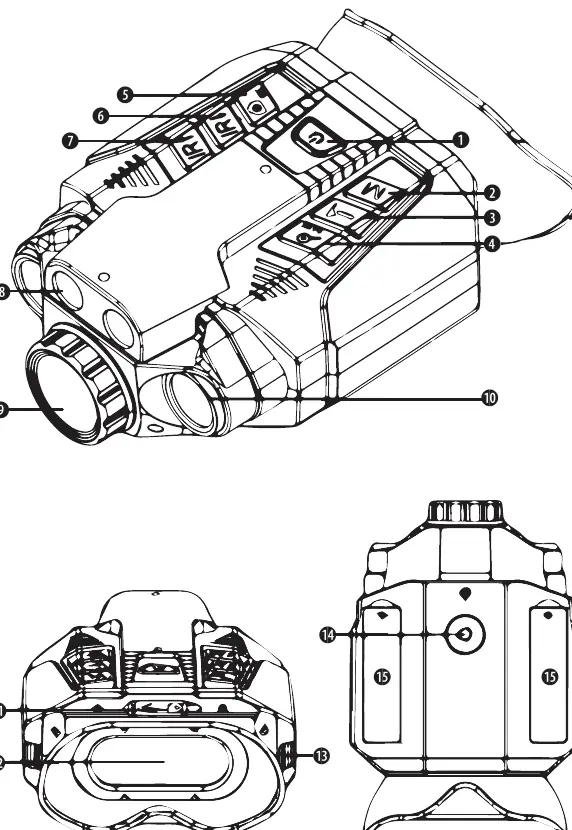
- Power Button: Turns the device on/off and adjusts screen brightness.
- Mode Button: Switches between Photo, Video, and Playback modes.
- RF Button: Activates the laser rangefinder.
- Zoom/Back Button: Adjusts digital zoom (up to 3x).
- IR Buttons: Adjust IR illumination levels (1-7).
- Camera/OK Button: Captures photos/videos and confirms menu selections.
- Objective Lens: Rotate to manually adjust focus.
Charging the Device
Use the included USB cable to charge the device. Connect the USB-A plug to a 5V/2A power adapter (e.g., a smartphone charger). A full charge takes approximately 3 hours. Do not charge via a PC/Notebook USB port as the current is insufficient. It is recommended to charge the batteries at least once every three months, even if the device is not in use.
Operation
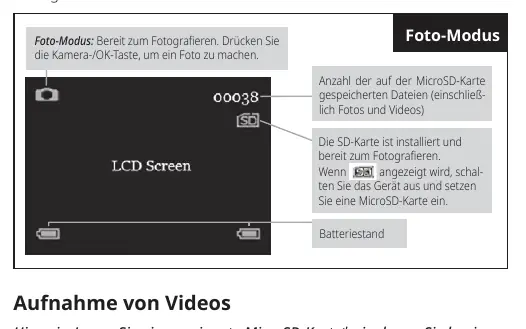
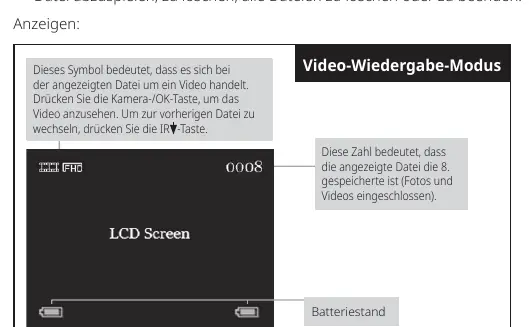
Daytime Use
Ensure the IR function is turned off. If the image appears in color, the IR function is inactive. Adjust the focus by rotating the objective lens until the image is sharp.
Nighttime Use
Turn on the IR function by pressing the IR button. You can select from 7 brightness levels to optimize visibility in the dark.
Using the Rangefinder
While viewing an object, press the RF button to measure the distance. Press and hold the RF button to toggle between meters (M) and yards (Yd).
MicroSD Card Management
To record media, insert a MicroSD card into the slot. If the card contains existing files, it is recommended to save them to a computer and format the card before use. If the "Memory Full" message appears, transfer files to a computer and delete them from the card.
Menu Settings
Access the menu by pressing the Mode button multiple times. Use the IR buttons to navigate and the Camera/OK button to select. You can configure settings such as Auto Power Off, Date/Time, and Lidar units (M/YD).
Battery Replacement
The device uses two 18650 Li-Ion batteries. To replace them, open the battery compartments with a screwdriver. Ensure you use legitimate, branded batteries with a cap (not flat top), between 18-19mm wide and 68-69mm high.
Cleaning and Maintenance
Disconnect from power before cleaning. Use a dry cloth for the exterior. Clean lenses and eyepieces only with a soft, lint-free cloth (e.g., microfiber). Do not use cleaning fluids. Store in the provided bag in a dust-free environment.
Manufacturer information
Bresser GmbH
Practical help
Common problems
Device shuts down unexpectedly
IR LEDs consume significant power. If the battery is low, the device may shut down to protect the circuit. Charge the device using a 5V/2A adapter.
Poor image quality
If you wear glasses, keep them on. Ensure IR is off for day use and on for night use. Adjust focus by slowly rotating the objective lens.
"No SD Card" message
Turn off the device, remove and re-insert the card. If the issue persists, try a different compatible MicroSD card.
Before use
- Charge the device fully (approx. 3 hours)
- Insert a compatible MicroSD card (4-64 GB)
- Ensure batteries are installed correctly
- Adjust the objective lens focus for your vision
Show more Show less
Specs in practice
- Optical Magnification
- 6x fixed optical zoom
- Digital Zoom
- Up to 3x additional zoom
- Range-Finding Distance
- Up to 200m (night) / 500m (day)
- Battery Type
- 18650 Li-Ion (3.7V, min 3000mAh recommended)
Images and diagrams
- Buttons 1-7 are located on the top for easy access during operation
- The objective lens (9) is at the front for manual focusing
- Battery compartments (15) are located on the left and right sides
Model compatibility
- Requires 5V/2A power adapter for charging
- MicroSD cards must be 4-64 GB
- 18650 batteries must have a cap (not flat top)

Manual page author
Emily Carter
User documentation editor