Power / Solar Panels
User Manual for Bresser 20X Stereo Microscope
Quick guide for the Bresser 20X Stereo Microscope. Learn how to set up, use, adjust focus, install batteries, and maintain your microscope safely.
PDF source: Deutsch · summary: English
Quick answers from the manual
Quick answer
- The Bresser 20X Stereo Microscope is a binocular microscope for viewing small objects. It requires 2x AA batteries for the LED illumination. p. 1, 3, 9
Key actions
- Install batteries p. 9
- Adjust focus p. 9
First start
- Insert 2x AA batteries into the base compartment. p. 9
Show 4 more answers Show less
Problems and fixes
Image is not clear
Adjust the distance of the eyepieces (3) and turn the focus knob (7).
p. 9Maintenance and reset
- Remove batteries if the device will not be used for a long time. p. 9
Technical specifications
| Parameter | Value | Meaning | Pages |
|---|---|---|---|
| Batteries | 2x AA | Power source for LED illumination | p. 3, 9 |
Where to find it in the PDF
- Parts Overview p. 4, 8
- Operation p. 5, 9
Table of contents
Manual images
Click an image to enlargeQuick guide from the manual
This manual provides instructions for the Bresser 20X Stereo Microscope. Key operations include setting up the device, installing batteries for the LED light, and adjusting the focus for clear observation. Always ensure the device is used in a safe environment away from small children due to choking hazards.
Safety Warnings
- Choking Hazard: Contains small parts; keep away from children.
- Electric Shock: Use only as described in the manual.
- Fire/Explosion: Do not expose to high temperatures, do not short-circuit, and do not throw batteries into fire.
- Chemical Burn: Handle batteries with care; ensure correct polarity. Use gloves if batteries are damaged.
- Sharp Tools: Use caution with sharp tools when preparing samples.
Parts Overview
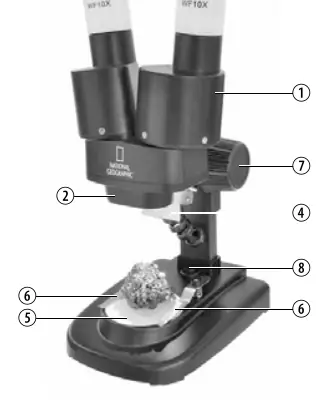
- 1. Binocular view piece (with eyepiece supports)
- 2. Stereo objective
- 3. Eyepieces
- 4. Illumination (LED)
- 5. Microscope stage (with object plate)
- 6. Stage clips
- 7. Focus knob
- 8. On/off switch (illumination)
- 9. Battery compartment
- 10. Battery compartment clamp closure
- 11. Mineral samples
Setup and Observation
Choose a location with sufficient light, such as near a window or desk lamp. Place your object in the center of the stage (5) and secure it with the clips (6) if necessary. Look through the eyepieces (1) and adjust the distance between them until you see a clear, circular image. Use the focus knob (7) to sharpen the view.
Illumination
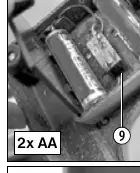
To use the LED light, remove the eyepieces (3) and turn the microscope over. Open the battery compartment (9) in the base by pressing the clamp closure (10). Insert 2x AA batteries, ensuring the flat minus poles (-) press against the spring terminals and the plus poles (+) touch the flat contact sheets. Close the compartment, replace the eyepieces, and use the switch (8) on the base to turn the light on or off.
Cleaning and Maintenance
Disconnect from power before cleaning. Use only a dry cloth for the exterior. Do not use cleaning fluids to avoid damaging electronics. Protect the device from dust and moisture. Remove batteries if the device will not be used for a long time.
Manufacturer information
Bresser GmbH
Practical help
Common problems
Image is blurry
Slowly turn the focus knob (7) to adjust sharpness.
Light not working
Check if batteries are installed correctly in the base compartment (9) and the switch (8) is in the ON position.
Before use
- Ensure you have adequate lighting (window or desk lamp).
- Check that batteries are installed correctly.
- Place the object in the center of the stage.
- Ensure the microscope is on a stable surface.
Show more Show less
Images and diagrams
- The microscope features a binocular head (1), focus knob (7), and stage clips (6) to hold samples.
- The battery compartment (9) is located in the base of the microscope.
Model compatibility
- Requires 2x AA batteries for illumination.

Manual page author
Emily Carter
User documentation editor