Electronics / Networking
Installation Guide for BrosTrend 2.5G Gigabit PCIe Network Adapter P1
Quick installation guide for the BrosTrend 2.5G Gigabit PCIe Network Adapter (Model P1). Includes step-by-step hardware installation, driver setup instructions, LED indicator status meanings, and troubleshooting tips.
Quick answers from the manual
Quick answer
- The BrosTrend P1 is a PCIe network adapter. Installation requires powering off the PC, inserting the card into a PCIe slot, securing it, and installing the drivers from the included CD or the manufacturer's website. p. 1
Key actions
- Install the hardware into a PCIe slot p. 1
- Install drivers p. 1
First start
- Power off, install card, power on, install drivers p. 1
Problems and fixes
Adapter not detected
Restart computer, re-insert card, or try different PCIe slot.
p. 1Where to find it in the PDF
- Hardware and Driver Installation p. 1
Table of contents
Quick guide from the manual
This document provides the necessary steps to install the BrosTrend 2.5G Gigabit PCIe Network Adapter (Model P1) into a desktop computer. It covers physical hardware installation, driver setup, and understanding LED status indicators.
Hardware Connection
Follow these steps to install the network adapter into your computer:
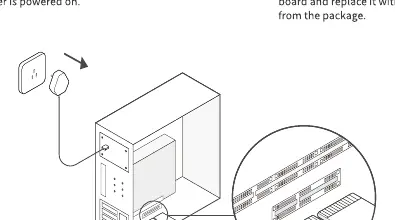
- Turn off your computer and unplug the power cable.
- Remove the computer case panel.
- Locate an available PCIe slot on the motherboard and insert the adapter.
- If the metal bracket is not suitable for your computer, detach it from the adapter and replace it with the low-profile bracket included in the package.
- Put the case panel back on, plug in the power cable, and turn on your computer.
Driver Installation
After installing the hardware, you must install the drivers:
- Insert the provided CD into your computer's disc drive.
- If the interface does not pop up automatically, open the 'Driver & Manual' folder on the device via 'This PC' or 'File Explorer'.
- Follow the on-screen instructions to complete the installation.
LED Indicator Status
The LED indicators on the adapter provide information about the connection speed:
- 2.5G: Solid indicates 2.5Gbps speed; Blinking indicates data activity.
- 1000M: Solid indicates 1Gbps speed; Blinking indicates data activity.
- 100/10M: Solid indicates 100Mbps or 10Mbps speed; Blinking indicates data activity.
If no LEDs flash, check that the adapter is properly seated in the PCIe slot and that the driver is installed successfully.
Troubleshooting
If you encounter issues, consider the following:
- If the CD does not run, download the driver from the official website at www.brostrend.com/pages/download-center.
- If the computer cannot find the adapter, restart the computer, try re-inserting the card, or try a different PCIe slot.
Official resources from the manual
Practical help
Common problems
Driver installation interface does not pop up
Open the 'Driver & Manual' folder on the device via 'This PC' or 'File Explorer' and run the installer manually.
Computer does not detect the adapter
Restart the computer, ensure the card is firmly seated in the PCIe slot, or try a different PCIe slot on the motherboard.
Before use
- Power off the computer and unplug the power cable before opening the case.
- Ensure you have an available PCIe slot on your motherboard.
- Check if your computer case requires the included low-profile bracket.
- Have the driver installation CD or access to the online download center ready.
Images and diagrams
- The hardware installation diagram illustrates removing the computer case panel, inserting the adapter into the PCIe slot, and securing it with the bracket.
Model compatibility
- Requires a free PCIe slot on the motherboard.
- Includes a low-profile bracket for smaller computer cases.

Manual page author
Emily Carter
User documentation editor
Prepares concise manual descriptions and highlights the most useful setup, operation, and maintenance information for readers.