Electronics / Networking
BrosTrend Outdoor 1KM Wireless Bridge Kit User Guide
Quick setup guide for the BrosTrend Outdoor 1KM Wireless Bridge Kit. Learn how to configure automatic or manual bridging, install the devices, and troubleshoot connection issues.
Quick answers from the manual
Quick answer
- The BrosTrend 1KM Wireless Bridge Kit is a point-to-point wireless solution. It can be set up automatically (plug-and-play) or manually via a web interface at 192.168.2.1. p. 1
Key actions
- Reset to factory defaults p. 1
- Manual configuration p. 1
First start
- Automatic Bridging p. 1
Problems and fixes
Bridge not connecting
Reset both units to factory defaults and ensure they are in the same room during initial pairing.
p. 1Maintenance and reset
- Factory Reset p. 1
Technical specifications
| Parameter | Value | Meaning | Pages |
|---|---|---|---|
| Operating Temperature | -30 to 70 degrees Celsius | Safe operating range | p. 1 |
| Power Input | 12V DC | Required power supply | p. 2 |
Where to find it in the PDF
- Quick Installation Guide p. 1
- Multilingual Setup & Regulatory p. 2
Table of contents
Quick guide from the manual
The BrosTrend Outdoor 1KM Wireless Bridge Kit is designed to extend your network wirelessly over a distance of up to 1KM. The system supports two main setup methods: Automatic Bridging (Plug-and-Play) and Manual Bridging (via web interface). Ensure you have a clear line of sight between the transmitter and receiver for optimal performance.
Getting to know your device
The device features LED indicators and ports to manage your connection:
- Signal LED 1 & 2: Indicate signal strength.
- PoE/LAN LED: Indicates power and data transmission status.
- Wall/Pole mounting slots: Used for physical installation.
- PoE/LAN Port: Connects to the PoE injector for power and data.
- Reset Button: Used to restore factory settings.
Point to Point Connection
The system consists of a Transmitter (AP) and a Receiver (Station). The Transmitter connects to your main router via a PoE injector, and the Receiver connects to your remote network device (e.g., PC, camera) via a second PoE injector. A clear line of sight is required between the two units.
Setup procedures
Automatic Bridging
- Power on both CPEs in the same room.
- Wait for the LEDs to blink, indicating they are pairing.
- Once paired, the LEDs will remain solid.
- Install the units in their final locations.
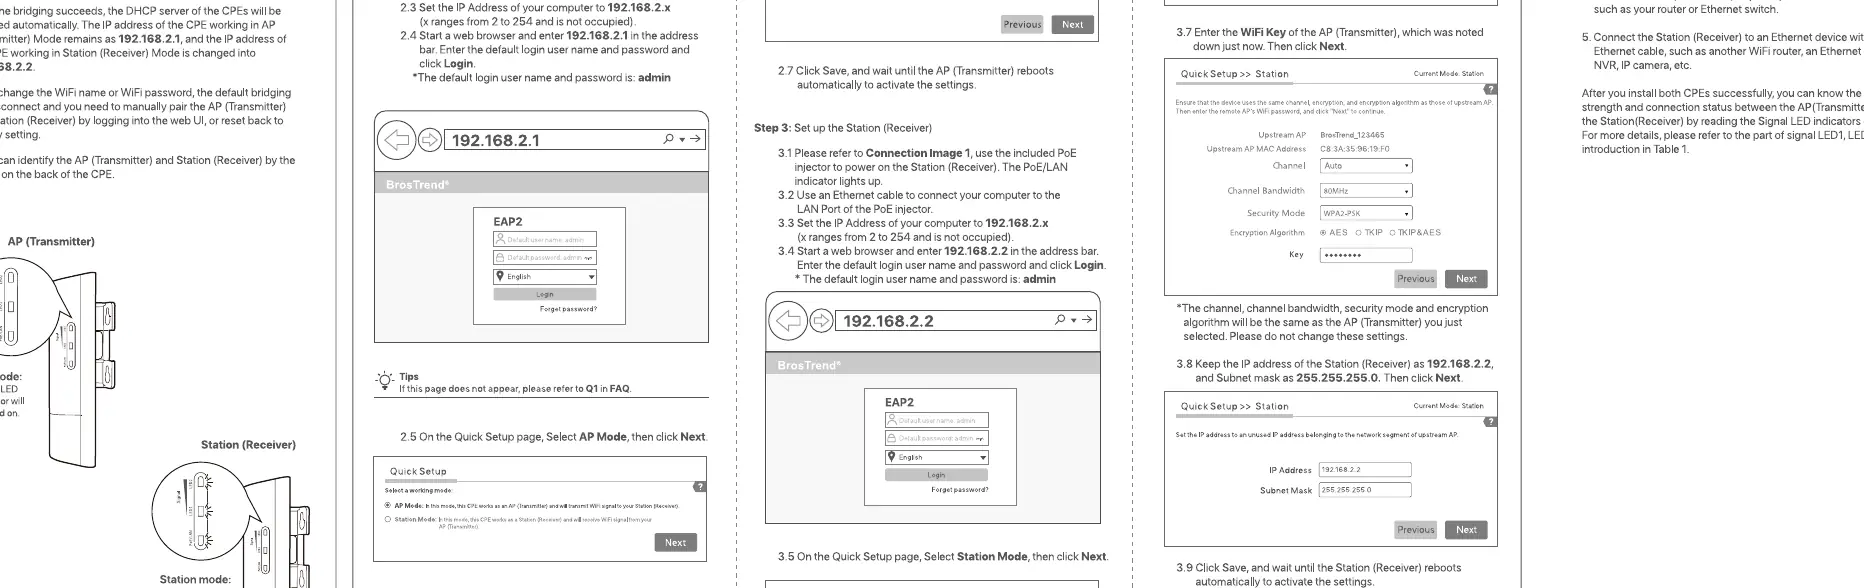
Manual Bridging
- Connect the CPE to your computer using the PoE injector.
- Set your computer's IP address to 192.168.2.x (where x is between 2 and 254).
- Open a web browser and navigate to 192.168.2.1.
- Log in with the default username and password (admin).
- Follow the Quick Setup wizard to configure the SSID, security, and mode (AP for Transmitter, Station for Receiver).
Installation
For best performance, mount the units at a height of at least 2 meters. Use the included pole straps to secure the CPEs to a pole, ensuring they are pointed directly at each other (horizontal 60 degrees, vertical 60 degrees).
Troubleshooting
- Bridge not connecting: Ensure both units are in factory default settings. If not, reset them.
- Weak signal: Adjust the distance and ensure a clear line of sight.
- Resetting: Hold the reset button for 8 seconds until the LEDs blink to restore factory defaults.
Safety precautions
Do not use the device in areas where wireless devices are not allowed. Use only the provided PoE injector. Ensure the operating temperature is between -30 degrees Celsius and 70 degrees Celsius. Keep the device away from fire, high electric fields, and inflammable explosives.
Practical help
Common problems
Bridge units do not connect automatically
Ensure both CPEs are in factory default settings. If they have been configured previously, perform a factory reset.
No internet access after bridging
Verify that the main router is connected to the Transmitter CPE via the PoE injector and that the Receiver CPE is connected to the remote device.
Weak wireless signal
Adjust the physical alignment of the Transmitter and Receiver. Ensure there is a clear line of sight between them.
Before use
- Ensure both CPEs are in factory default settings
- Have a clear line of sight between the Transmitter and Receiver
- Use the provided PoE injectors and Ethernet cables
- Mount the units at a height of at least 2 meters
- Verify the operating temperature is within -30 to 70 degrees Celsius
Specs in practice
- PoE (Power over Ethernet)
- Technology that allows the Ethernet cable to carry both power and data to the device.
Images and diagrams
- The Transmitter (AP) connects to the main router via the PoE injector.
- The Receiver (Station) connects to the remote device via the PoE injector.
- The units must be pointed at each other for optimal signal strength.
Model compatibility
- Requires a clear line of sight for optimal performance.
- Not suitable for use in areas where wireless devices are prohibited.

Manual page author
David Miller
Documentation analyst
Organizes user manual content into clear summaries, with attention to model details, product context, and everyday usability.