Home / Security
Calex Smart LED Downlight Installation and Setup Guide
A comprehensive guide for installing and configuring your Calex Smart LED Downlight. Includes step-by-step wiring instructions, safety precautions, and app setup procedures.
Quick answers from the manual
Quick answer
- The Calex Smart LED Downlight is installed by drilling a 68-74mm hole, connecting the 220-240V power supply, and securing it with spring clips. It is configured via the Calex Smart app on a 2.4GHz Wi-Fi network. p. 3, 4, 11
Key actions
- Reset the device p. 11
- Connect to Wi-Fi p. 11
First start
- Download the Calex Smart app, enable Bluetooth, and follow the in-app instructions to add the device. p. 11
Show 4 more answers Show less
Problems and fixes
Device fails to connect
Check if the network is 2.4GHz and perform a reset by toggling power 3 times.
p. 11Maintenance and reset
- Switch the lamp off and on again three times. p. 11
Technical specifications
| Parameter | Value | Meaning | Pages |
|---|---|---|---|
| Voltage | 220-240V | Operating voltage | p. 3 |
| Hole Size | 68-74 mm | Required ceiling cutout diameter | p. 3 |
Where to find it in the PDF
- Installation Instructions p. 2, 3, 4, 5
- Safety and Parameters p. 8, 9
- App Setup p. 11
Table of contents
Manual images
Click an image to enlargeQuick guide from the manual
This document provides instructions for the installation and setup of the Calex Smart LED Downlight. It covers physical installation, electrical safety, and connecting the device to the Calex Smart app.
Safety Precautions
- Always switch off the mains power supply before starting any installation, maintenance, or repair.
- If in doubt, consult a qualified electrician.
- Ensure the product is installed according to relevant electrical regulations.
- Do not connect the product to a power supply while it is in the package or wound on a reel.
- Do not cover the luminaire with insulating material.
- Ensure the product is suitable for the intended location (e.g., indoor use, ceiling mounting).
- If the protective glass is damaged, it must be replaced immediately.
- This product is dimmable and compatible with a TRIAC dimmer.
Installation
Before installing, ensure you have the correct tools and that the power is disconnected.
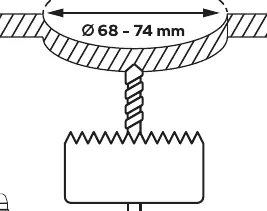
- Drilling: Create a hole in the ceiling with a diameter of 68-74 mm.
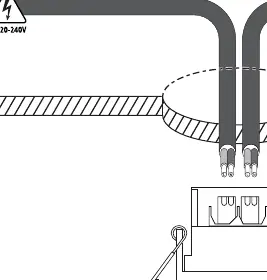
- Wiring: Connect the electrical wires to the connector. Ensure the wires are correctly connected to the L (Live) and N (Neutral) terminals.
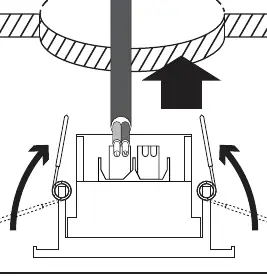
- Mounting: Insert the luminaire into the hole. The spring clips will secure the unit in place.
- Testing: Turn on the power to test the luminaire.
App Setup
This device requires a 2.4GHz Wi-Fi network. It will not work on 5GHz networks.
- Download the Calex Smart app from the Google Play Store or Apple App Store.
- Open the app and create an account.
- Ensure Bluetooth is enabled on your phone for automatic connection.
- If automatic connection fails, tap the + icon in the top right corner of the app to add the device manually.
- Follow the on-screen prompts to complete the installation.
Troubleshooting
If you encounter issues during setup, you may need to reset the device.
- Reset Procedure: Switch the lamp off and on again three times. The lamp will start blinking, indicating it is ready to be paired.
- Connection Issues: Ensure your router is set to 2.4GHz frequency.
Manufacturer information
Calex
Practical help
Common problems
Device not connecting to Wi-Fi
Ensure your network is 2.4GHz. The device is not compatible with 5GHz Wi-Fi networks.
Device not appearing in app
Reset the device by switching the power off and on three times until it blinks, then try adding it again.
Before use
- Switch off the mains power supply.
- Verify the ceiling hole diameter is between 68-74 mm.
- Ensure you have a 2.4GHz Wi-Fi network available.
- Download the Calex Smart app.
- Ensure Bluetooth is enabled on your smartphone.
Show more Show less
Images and diagrams
- The drilling diagram shows the required hole size of 68-74 mm.
- The wiring diagram illustrates the connection of Live (L) and Neutral (N) wires to the connector block.
- The spring clip diagram shows how to fold the clips up to insert the light into the ceiling.
Model compatibility
- Only compatible with 2.4GHz Wi-Fi networks.
- Not suitable for 5GHz Wi-Fi networks.
- Compatible with TRIAC dimmers.

Manual page author
David Miller
Documentation analyst