Smart Home / Smart Plugs & Strips
User Manual for Calex Smart Indoor Camera C4
Quick guide for the Calex Smart Indoor Camera C4. Learn how to set up your device, connect to 2.4GHz WiFi, understand status light indicators, and manage SD card storage.
Table of contents
Manual images
Click an image to enlargeQuick guide from the manual
This guide provides essential information for setting up and operating your Calex Smart Indoor Camera. Before beginning, ensure you have a strong WiFi signal and your network name and password ready. Note that this device is compatible only with 2.4GHz WiFi networks and is intended for indoor use.
Device components
The package includes the camera, power adapter, USB cable, and adhesive tape. The device features:
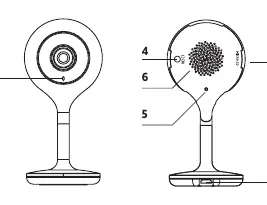
- Status light: Indicates the current connection and operational state.
- SD Card slot: Supports local storage up to 128GB.
- Power input: Requires DC 5V +/- 10%.
- Reset button: Used to restore factory settings.
- Microphone and Speaker: For two-way audio communication.
Status light indicators
The status light on the front of the camera provides feedback on its current state:
- Red light solid: The camera network is abnormal.
- Blinking red light: Awaiting WiFi connection.
- Blue light solid: Camera is running correctly.
- Blinking blue light: Currently connecting.
Setup and pairing
- Download the Calex Smart app from the Google Play Store or Apple Store.
- Open the app and create an account if you are a first-time user.
- Power on the device. You will hear a sound, and the blue indicator light will start blinking, indicating pairing mode.
- In the app, click the '+' icon or 'Add Device' and select your product.
- Enter your WiFi password and confirm.
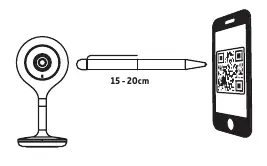
- Scan the QR code that appears in the app using the camera lens. Hold the QR code 10-15 cm in front of the camera.
- Follow the on-screen instructions to complete the setup.
Reset procedure
If you need to reset the device to factory defaults (e.g., to change WiFi settings), locate the reset button. Press and hold the button for 5 seconds until you hear a sound. The indicator light will start blinking, and you can proceed with the pairing process again.
Safety and maintenance
This device is double-insulated (Safety Class II) and does not require an earthed socket. Do not use the device if it is damaged, especially if the cable or fitting is compromised. Always use the original adapter. The device should only be opened by an authorized technician. For disposal, observe local legislation regarding electronic waste; do not dispose of it in normal household waste.
Manufacturer information
Calex
Practical help
Common problems
Camera not connecting to WiFi
Ensure your router is set to 2.4GHz frequency. This device does not support 5GHz networks.
Device not pairing
Reset the device by holding the reset button for 5 seconds until a sound is heard, then restart the pairing process.
Red light is solid
This indicates the camera network is abnormal. Check your internet connection and router settings.
Before use
- Check WiFi signal strength at the installation location.
- Verify your router is broadcasting a 2.4GHz network.
- Have your WiFi network name and password ready.
- Download the Calex Smart app.
- Ensure you have a compatible MicroSD card (up to 128GB) if local storage is required.
Images and diagrams
- 1: Status light
- 2: SD Card slot
- 3: Power input
- 4: Reset button
- 5: Microphone
Model compatibility
- Indoor use only.
- Only compatible with 2.4GHz WiFi networks.
- Safety Class II (double insulated).

Manual page author
Emily Carter
User documentation editor
Prepares concise manual descriptions and highlights the most useful setup, operation, and maintenance information for readers.