Lighting / Smart Lighting
User Manual for Philips Hue Still Ceiling Lamp
A comprehensive guide for the Philips Hue Still ceiling lamp, covering installation, wiring, and operation. Learn how to mount the fixture, connect the electrical wiring, and use the Hue controls for dimming and scene selection.
Quick answers from the manual
Quick answer
- This manual provides installation and operation instructions for the Philips Hue Still ceiling lamp, including wiring, mounting, and basic lighting control. p. 2, 3, 4, 5
Key actions
- Installation p. 3, 4, 5, 6
- Operation p. 8
First start
- Turn off power, mount the base, connect wires, attach the cover, and restore power. p. 3, 4, 5, 6
Show 3 more answers Show less
Maintenance and reset
- Hold the power button for 3 seconds to reset or pair. p. 8
Technical specifications
| Parameter | Value | Meaning | Pages |
|---|---|---|---|
| Battery | CR2032 | Battery for the switch | p. 2 |
| Protocol | Zigbee | Wireless connectivity | p. 2 |
Where to find it in the PDF
- Installation p. 3, 4, 5, 6
- Operation p. 8
Table of contents
Manual images
Click an image to enlargeQuick guide from the manual
This document provides instructions for the installation and operation of the Philips Hue Still ceiling lamp. Before starting, ensure the main power is turned off at the circuit breaker. The installation requires basic tools including a drill, screwdriver, and pencil. The lamp is designed for indoor use and supports Zigbee connectivity.
Installation
Follow these steps to install the ceiling lamp:
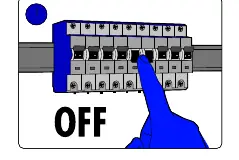
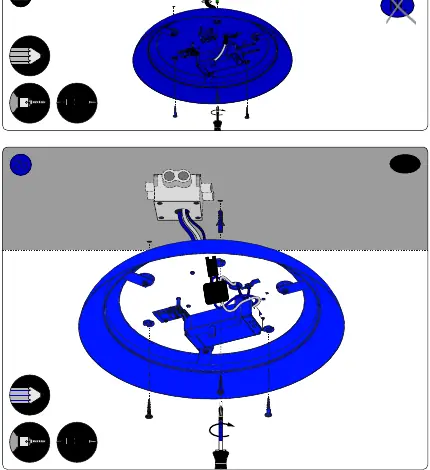
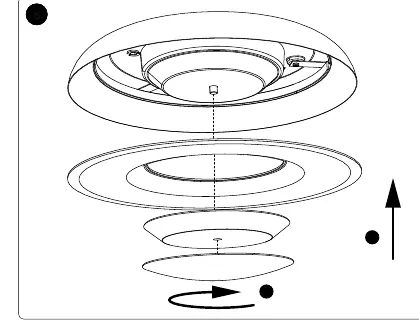
- Power Off: Turn off the main power supply at the circuit breaker.
- Preparation: Mark the ceiling for drilling using the provided template.
- Mounting: Drill holes and secure the base plate to the ceiling using the provided screws and wall plugs.
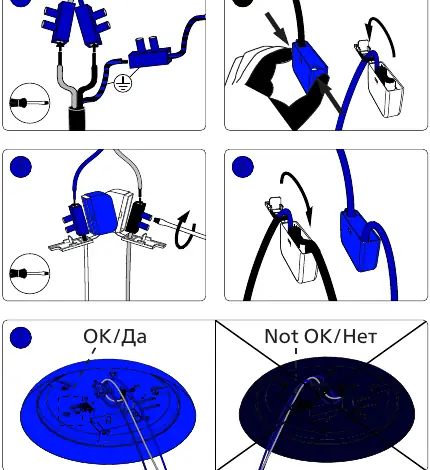
- Wiring: Connect the electrical wires according to the diagram. Ensure the ground wire is connected correctly.
- Final Assembly: Attach the lamp housing to the base plate and secure the cover.
- Power On: Restore power at the circuit breaker.
Wiring
Ensure the wires are stripped to 8mm. Connect the live (L), neutral (N), and ground wires to the corresponding terminals on the lamp base. Ensure all connections are secure and no loose wires are exposed.
Operation
The lamp can be controlled using the Hue switch or app:
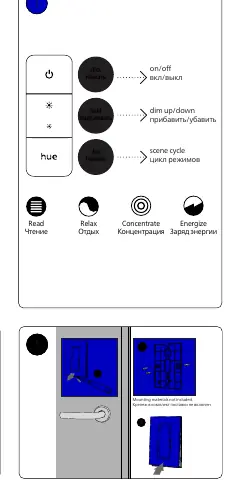
- On/Off: Click the power button.
- Dimming: Hold the brightness buttons to increase or decrease light intensity.
- Scene Cycle: Click the Hue button to cycle through preset scenes like Read, Relax, Concentrate, and Energize.
Manufacturer information
Philips
Practical help
Common problems
Light does not turn on
Check if the circuit breaker is on and verify that all wiring connections are secure.
Cannot control light via switch
Ensure the light is powered on and within range of the Hue bridge or controller.
Before use
- Turn off main power at the circuit breaker.
- Ensure you have a drill, screwdriver, and pencil.
- Verify the ceiling can support the lamp weight.
- Check that wires are stripped to 8mm.
- Ensure the installation area is indoors.
Show more Show less
Images and diagrams
- Steps 3-6: Detailed wiring connection instructions.
- Step 8: Final assembly of the lamp cover.
- Page 8: Button functions for dimming and scene selection.
Model compatibility
- Designed for indoor use only.
- Requires Hue compatible controller for advanced features.

Manual page author
Michael Turner
Technical manual editor