Lighting / Smart Lighting
Installation and User Manual for Philips Hue Aurelle LED Surface Light
A complete installation and user guide for the Philips Hue Aurelle LED surface light. This manual covers safety requirements, step-by-step mounting instructions, electrical wiring, and pairing with the Hue smart lighting system.
Quick answers from the manual
Quick answer
- The Philips Hue Aurelle is an indoor LED surface light. Installation requires turning off the main power, mounting the bracket, connecting the wires (8mm strip length), and attaching the fixture. It can be controlled via the Hue switch by pairing it with a 3-second button hold. p. 2, 3, 7, 11
Key actions
- Mounting the fixture p. 3, 5, 9
- Wiring the light p. 7, 8
- Pairing with Hue switch p. 11
First start
- Turn off power, install bracket, connect wires, attach light, turn on power, and pair with Hue switch. p. 3, 5, 7, 10
Show 4 more answers Show less
Problems and fixes
Light not responding to switch
Re-pair the switch by holding the 'On' button for 3 seconds.
p. 11Maintenance and reset
- No specific reset procedure mentioned other than re-pairing. p. 11
Technical specifications
| Parameter | Value | Meaning | Pages |
|---|---|---|---|
| Wire strip length | 8mm | Required length for wire connection. | p. 2 |
| Water distance | 2.25m | Minimum distance from water sources. | p. 2 |
Where to find it in the PDF
- Safety and Requirements p. 2
- Installation Steps p. 3, 4, 5, 6
- Usage and Pairing p. 11
Table of contents
Manual images
Click an image to enlargeImportant Safety and Installation Information
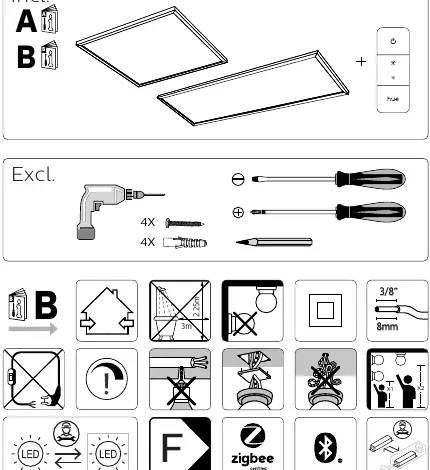
Before beginning the installation, ensure the main power supply is turned off at the circuit breaker. This product is designed for indoor use only. Ensure the installation location is at least 2.25 meters away from water sources. When preparing wires, strip the insulation to a length of 8mm.
Installation Steps
- Power Off: Switch off the main power supply before starting any work.
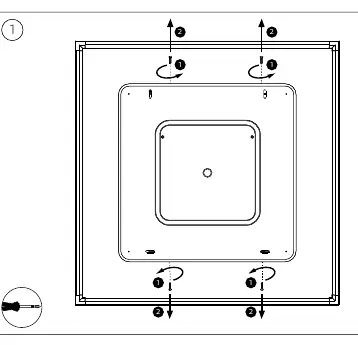
- Remove Bracket: Unscrew the mounting bracket from the back of the light fixture.
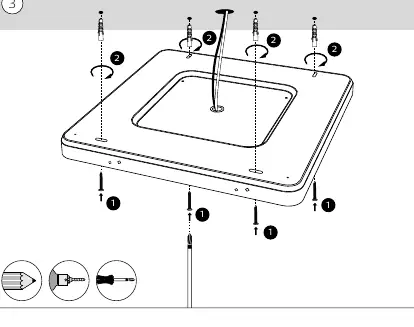
- Mounting: Use the provided screws and wall plugs to secure the bracket to the ceiling or wall. Ensure the surface is suitable for the weight of the fixture.
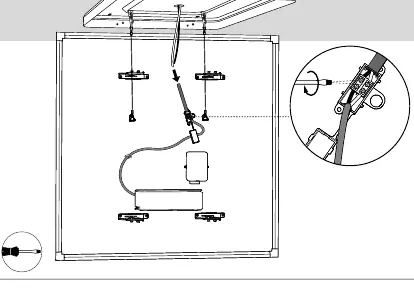
- Wiring: Connect the mains power wires to the terminal block on the fixture. Ensure the connections are secure and properly insulated.
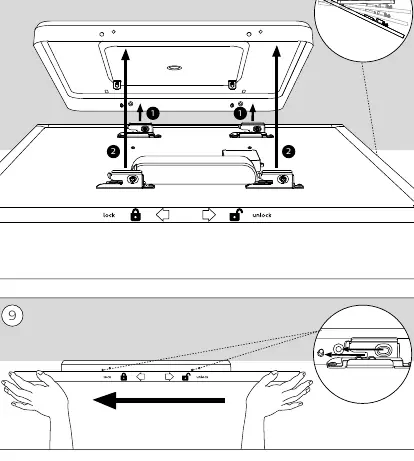
- Attach Light: Align the light fixture with the mounted bracket and lock it into place.
- Power On: Restore power at the circuit breaker to test the light.
Using the Hue Switch
To pair the light with a Hue switch:
- Hold the switch close to the light.
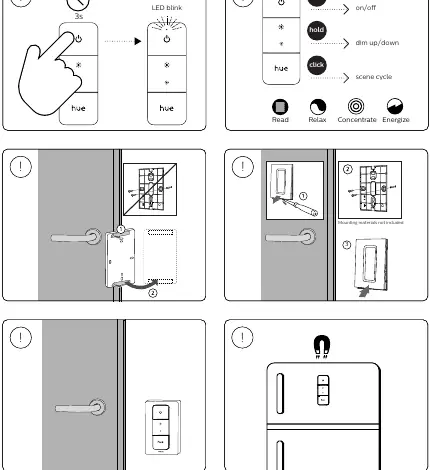
- Press and hold the 'On' button for 3 seconds until the LED blinks.
- The switch can then be used to turn the light on/off, dim the brightness, and cycle through scenes (Read, Relax, Concentrate, Energize).
Support
For further assistance, visit the official website at www.philips-hue.com. The manufacturer is Signify, located in Eindhoven, the Netherlands.
Official resources from the manual
Manufacturer information
Philips
Practical help
Common problems
Light does not turn on after installation
Check if the main power is on at the circuit breaker and verify that all wire connections in the terminal block are secure.
Hue switch not controlling the light
Ensure the switch is within range and perform the pairing process again by holding the 'On' button for 3 seconds until the LED blinks.
Before use
- Turn off the main power supply at the circuit breaker.
- Ensure the installation area is indoors and dry.
- Verify the distance from water sources is at least 2.25 meters.
- Prepare tools: drill, screwdriver, and pencil.
- Strip wire insulation to exactly 8mm.
Show more Show less
Specs in practice
- Wire strip length
- 8mm of insulation must be removed from the wires for a secure connection.
Images and diagrams
- The manual provides visual guides for removing the mounting bracket, drilling holes, connecting wires to the terminal block, and locking the fixture onto the bracket.
- The final page illustrates the button functions of the Hue switch: On/Off, Dimming, and Scene Cycling.
Model compatibility
- Compatible with Philips Hue smart lighting ecosystem.
- Requires a Hue switch for advanced control features.

Manual page author
David Miller
Documentation analyst