Electronics / Audio
User Manual for Caliber HCG 012QiDAB-BT DAB+ Radio
Quick guide for the Caliber HCG 012QiDAB-BT DAB+ digital radio. Learn how to set up the clock, alarms, use Bluetooth, wireless charging, and radio functions.
Table of contents
Quick Start Guide
The Caliber HCG 012QiDAB-BT is a multifunctional DAB+ digital radio with Bluetooth, wireless charging, and dual alarm capabilities. To begin, connect the provided power adapter to the DC input (2). It is recommended to insert 2x AAA batteries (not included) into the bottom hatch to maintain clock and alarm settings during power interruptions.
Device Overview
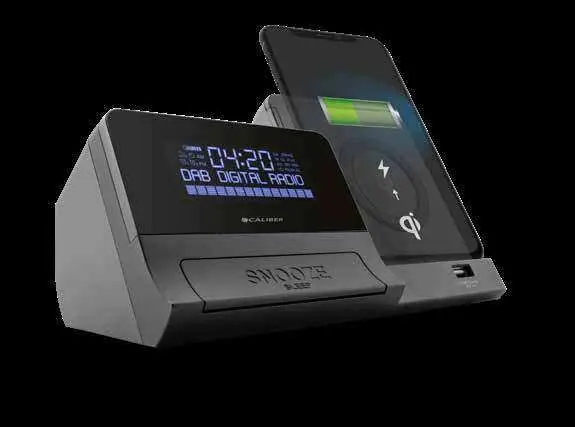
The device features several key controls:
- Source/Standby (8): Switch between DAB+, FM, Bluetooth, AUX, and Standby.
- Menu/Info (4): Access menu settings and radio information.
- Pairing/Play/Pause (5): Control playback and initiate auto-scan for radio channels.
- Alarm 1/2 (6, 7): Set and adjust alarms.
- Snooze/Sleep (15): Snooze the alarm or set the sleep timer.
- Wireless Charging Pad (14): Place Qi-compatible devices here for charging.
- USB Port (16): 5V 1A output for wired charging.
Setup and Clock
Upon first power-up, the device will attempt to auto-set the time if a DAB+ signal is received. To set the clock manually:
- Press the Clock (10) button.
- Use the Down (11) and Up (12) buttons to adjust the time.
- Confirm by pressing Clock (10) again.
- Follow the on-screen prompts to set the date.
Alarm Settings
The device supports dual alarms:
- Ensure the unit is in Standby mode.
- Press Alarm 1 (6) or Alarm 2 (7).
- Press Select (9) to enter the alarm wizard.
- Use the Up/Down buttons to adjust settings and Select (9) to confirm.
- Configure the duration, source (radio/buzzer), and frequency.
- The wizard will display 'SAVED' when complete.
When the alarm sounds, press the Snooze (15) button to pause it for 9 minutes, or press the Alarm or Standby button to turn it off.
Radio Operation
DAB+ Mode: Select 'DAB' using the Source button. Press and hold Play/Pause (5) to auto-scan for available stations. Use the Up/Down buttons to navigate channels.
FM Mode: Select 'FM' using the Source button. Press and hold Play/Pause (5) to auto-scan. Use Up/Down for fine-tuning or long-press to seek the next/previous station.
Charging and Connectivity
Wireless Charging: Place a Qi-compatible device on the charging pad (14). Charging begins automatically if the device is within 6mm of the pad.
Bluetooth: Select 'Bluetooth' mode using the Source button. Search for 'HCG012QI_DAB_BT' on your phone or tablet to pair.
AUX-IN: Connect an external device (e.g., MP3 player) to the AUX jack (3) using a 3.5mm cable. Switch to 'AUX' mode to play audio.
Maintenance
Clean the device with a soft, dry cloth. For stubborn stains, use a slightly damp cloth with water only. Do not use chemical cleaners as they may damage the plastic or paint. Ensure the device is kept in a well-ventilated area between 0°C and +45°C.
Manufacturer information
Caliber Europe
Practical help
Common problems
Alarm does not sound
Ensure the alarm is set to ON and the correct source (radio or buzzer) is selected in the alarm setup wizard.
Wireless charging not starting
Ensure the device is Qi-compatible and placed correctly on the pad (within 6mm distance). Remove any thick cases or obstructions.
Settings lost after power outage
Ensure 2x AAA batteries are installed in the bottom battery compartment to act as a memory backup.
Before use
- Connect the provided power adapter to the DC input.
- Insert 2x AAA batteries (not included) for clock memory backup.
- Place the unit on a flat, stable surface.
- Ensure there is sufficient ventilation around the device.
- Select the desired source (DAB+/FM/Bluetooth/AUX) using the Source button.
Specs in practice
- Bluetooth 4.2
- Supports A2DP and AVRCP profiles for wireless audio streaming and control.
- Wireless Charging
- Qi-certified charging pad for compatible smartphones.
- Backup Battery
- Requires 2x 1.5V AAA batteries to save time and alarm settings during power loss.
Images and diagrams
- 2: DC 9V power input
- 3: AUX-IN jack
- 8: Standby/Source button
- 14: Qi Wireless Charging surface
- 16: USB charging port
Model compatibility
- Wireless charging requires a Qi-compatible device.
- Bluetooth playback control depends on device support for AVRCP.
- AUX-IN playback control buttons on the unit may not function for external devices.

Manual page author
David Miller
Documentation analyst
Organizes user manual content into clear summaries, with attention to model details, product context, and everyday usability.