Home Appliances / Small Kitchen Appliances
User Manual for Camry CR 3063 Sandwich Maker
Quick guide for the Camry CR 3063 sandwich maker. Includes setup, usage instructions, cleaning tips, safety warnings, and technical specifications.
Quick answers from the manual
Quick answer
- This manual provides safety instructions, operating procedures, cleaning guidelines, and technical specifications for the Camry CR 3063 Sandwich Maker. p. 3, 4, 5
Key actions
- Open the device p. 4
- Cleaning the device p. 5
First start
- Preparation before first use p. 5
Show 2 more answers Show less
Technical specifications
| Parameter | Value | Meaning | Pages |
|---|---|---|---|
| Power Supply | 220-240V ~50/60Hz | Voltage and frequency requirements | p. 5 |
| Power Nom | 750W | Nominal power consumption | p. 5 |
| Max Power | 1000W | Maximum power consumption | p. 5 |
Where to find it in the PDF
- Portuguese p. 12, 13, 14
- Lithuanian p. 14, 15, 16
- Estonian p. 19, 20, 21
- Romanian p. 21, 22, 23
- Hungarian p. 24, 25, 26
- Macedonian p. 26, 27, 28
- Slovenian p. 35, 36, 37
- Croatian p. 47, 48, 49
Table of contents
Manual images
Click an image to enlargeQuick guide from the manual
The Camry CR 3063 is a versatile sandwich maker designed for home use. It features interchangeable plates for sandwiches, grilling, and cookies. Always ensure the device is placed on a stable, heat-resistant surface and kept away from flammable materials.
Description of the device
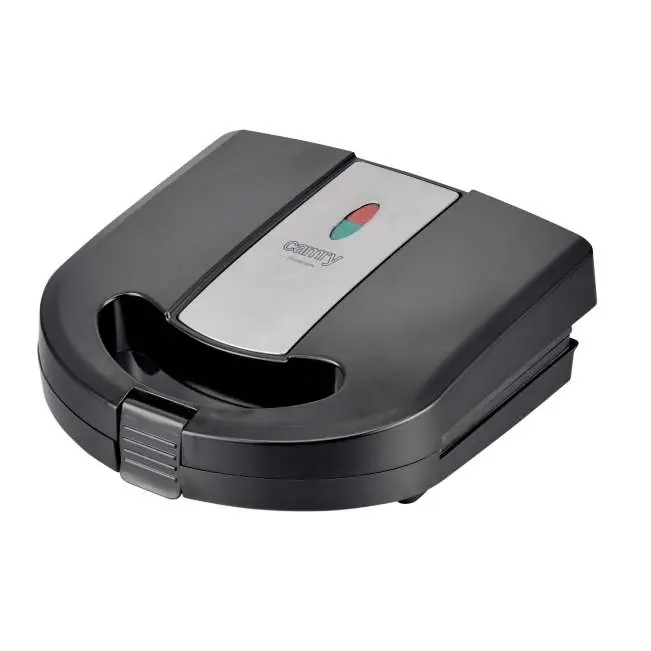
- 1: Upper housing
- 2: Power indicator light (red)
- 3: Thermostat lamp (green)
- 4: Closing clip
- 5: Heating plate lock
- 6: Plate for cookies 'nuts'
- 7: Plate for toasted bread sandwiches
- 8: Grill plate
Before first use
- Remove all packaging, labels, and accessories from the inside and outside of the device.
- Wipe the heating plates with a damp cloth, then dry with a soft cloth.
- Apply a small amount of edible oil or vegetable fat to the plates.
- Close the device and plug it in. The power indicator light (2) will turn on.
- Let the device run for a few minutes to eliminate any manufacturing odor. It is normal for a small amount of smoke to appear.
- Clean the device according to the cleaning instructions.
Using the device
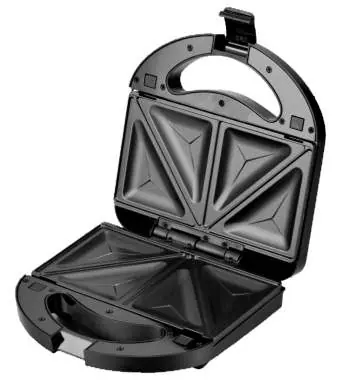
- Prepare your ingredients.
- Plug the device into a grounded socket. The power indicator light (2) will turn on.
- Wait approximately 5 minutes for the device to reach the required temperature. The ready indicator light (3) will turn on.
- Open the device fully and place the prepared product on the bottom plate.
- Close the device and secure it with the closing clip (4). Do not force the lid (1) closed.
- The cooking time is approximately 5 to 15 minutes, depending on ingredients and personal preference.
- During operation, the thermostat lamp (3) will cycle on and off, indicating that the device is maintaining the correct temperature.
- Open the lid (1) and remove the finished product using only a wooden or plastic spatula.
- After use, unplug the device and allow it to cool down.
Cleaning and maintenance
- Always unplug the device and wait for it to cool down completely before cleaning.
- Wipe the heating plates with a damp cloth, then dry with a soft cloth or paper towel.
- If residue is difficult to remove, apply a small amount of cooking oil, wait a few minutes, and gently remove it with a wooden spatula.
- Do not use sharp or abrasive tools, as they can damage the non-stick coating.
- Never immerse the device in water.
Safety precautions
- The device is intended for indoor, domestic use only.
- Do not leave the device unattended while connected to the power source.
- Keep the device away from children. Children over 8 years old may use the device only under adult supervision.
- Do not use the device if the power cord is damaged.
- Do not place the device on or near hot surfaces (e.g., gas or electric stoves).
- Always allow the device to cool down before storing.
- Do not use external timers or separate remote control systems with this device.
Manufacturer information
Camry
Practical help
Common problems
Device emits smoke or odor during first use
This is normal. Run the device for a few minutes to burn off manufacturing residue.
Food sticking to plates
Ensure plates are clean and lightly oiled. Use only wooden or plastic utensils to avoid damaging the non-stick coating.
Indicator light does not turn on
Check if the device is properly plugged into a functioning power outlet.
Before use
- Remove all packaging and labels
- Wipe plates with a damp cloth
- Apply a small amount of edible oil to plates
- Plug in and preheat for 5 minutes
Show more Show less
Specs in practice
- Power Supply
- 220-240V ~50/60Hz
Images and diagrams
- 1: Upper housing
- 2: Power indicator light (red)
- 3: Thermostat lamp (green)
- 4: Closing clip
- 5: Heating plate lock
Model compatibility
- Not compatible with external timers or remote control systems.
- Use only on heat-resistant surfaces.

Manual page author
Michael Turner
Technical manual editor