HVAC / Air Conditioners
Control Board Replacement Kit for Carrier FMA4 Fan Coils
Installation guide for the Carrier control board replacement kit (17223000A06817, 17223000A06818) for FMA4 fan coils. Includes step-by-step wiring and installation instructions.
Quick answers from the manual
Quick answer
- This document provides installation instructions for replacing the control board in Carrier FMA4 fan coils (sizes 18-36) using kit 17223000A06817 or 17223000A06818. p. 1
Key actions
- Remove existing control board p. 1, 2
- Install new control board p. 2
- Connect wiring harness p. 2
First start
- Refer to outdoor unit Installation Instructions for system start-up and refrigerant charging. p. 3
Where to find it in the PDF
- Safety and Kit Contents p. 1
- Installation Steps p. 2
- Final Steps and Start-up p. 3
Table of contents
Manual images
Click an image to enlargeQuick Guide
This document provides instructions for replacing the control board in Carrier FMA4 fan coils (sizes 18-36) using kit 17223000A06817 or 17223000A06818. Before beginning, ensure all power to the unit is turned off. Wear appropriate safety gear, including safety glasses and work gloves, as sheet metal parts may have sharp edges.
Installation
Removing the Existing Control Board:
- Remove the door from the unit to locate the control board.
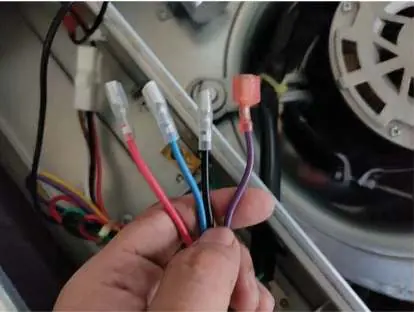
- Unplug and keep the black, blue, purple, and red motor wires; these will be reused.
- Unplug the low-voltage signal wires from the thermostat and save the rubber gasket.
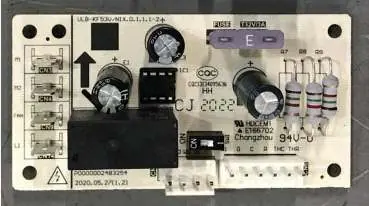
- Remove the existing PC board while keeping the transformer and power wire harness intact. Take care not to damage the plastic retaining clips.
- Dispose of the old control board and wiring according to local codes.
Installing the Replacement Control Board:
- Thread the red, brown, green, and white signal wires through the opening in the top of the case and connect them to the thermostat wires.
- Reinstall the rubber gasket between the wires and the case.
- Snap the new control board onto the plastic retainers and verify a secure fit.
Wiring Connections:
- Transformer and GND: Connect the yellow wire to the upper transformer secondary output. Connect the purple/green wires to the lower transformer secondary output. Connect the red wire to the 240V lead on the transformer. Connect the black wire to the transformer COM terminal. Connect the ground wire to the green screw on the back of the case.
- Motor Harness: Connect the red motor wire to FAN, black motor wire to M2, blue motor wire to M1, and the purple wire to the black transformer COM wire.
Final Steps
- Double-check all wire connections to ensure they are correct and tight.
- Use zip ties to dress loose wires.
- Apply the new rating plate sticker over the existing rating plate located on the exterior of the door.
- Refer to the outdoor unit installation instructions for system start-up and refrigerant charging details.
Manufacturer information
Carrier Global Corporation
Practical help
Common problems
Unit not starting after installation
Double-check all wire connections against the wiring diagrams and ensure they are tight.
Difficulty fitting the board
Ensure the board is snapped securely onto the plastic retainers.
Before use
- Turn off all power to the unit.
- Wear safety glasses, protective clothing, and work gloves.
- Ensure you have the correct replacement kit for your FMA4 fan coil size (18-36).
- Verify all wire connections are tight and secure.
Images and diagrams
- Fig 1: Old vs New board identification.
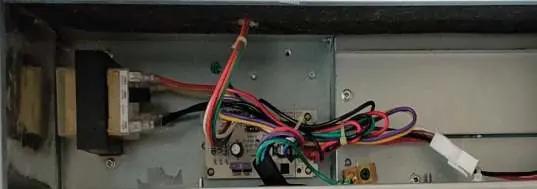
- Fig 2: Location of the control board in the wall-hung unit.
- Fig 6-8: Specific wiring connections for transformer, ground, and motor harness.
Model compatibility
- Compatible with FMA4 Fan Coils, sizes 18 thru 36.

Manual page author
David Miller
Documentation analyst
Organizes user manual content into clear summaries, with attention to model details, product context, and everyday usability.