Tools / Tool Storage
User Guide for CAT 1750A Lithium Professional Power Station PPSCL3
Quick guide for the CAT 1750A Lithium Professional Power Station (PPSCL3). Learn how to jump-start vehicles, use the air compressor, charge devices via USB/AC, and maintain your unit safely.
Quick answers from the manual
Quick answer
- The CAT 1750A is a lithium power station featuring a jump-starter, 120V AC outlet, USB ports, and an air compressor. Always fully charge before first use and every 3-6 months. p. 1, 24
Key actions
- Jump-starting: Connect red clamp to positive, black to chassis. Turn ignition for 5-6 seconds. p. 13, 14
- Charging: Use USB-C to USB-C cable with PD 30W source for fastest charging. p. 12, 13
First start
- Fully charge the unit before first use. p. 5, 12
Problems and fixes
Unit not charging
Ensure all functions are off, check power source, allow unit to cool/warm.
p. 21Maintenance and reset
- Charge the battery at least every 3-6 months. p. 5, 24
Technical specifications
| Parameter | Value | Meaning | Pages |
|---|---|---|---|
| Boost Ampere | 1750A Max | Peak current for jump-starting | p. 24 |
| AC Outlet | 200W | Maximum continuous power | p. 24 |
Where to find it in the PDF
- Features p. 2
- Safety Instructions p. 4, 5, 6, 7
- Jump-Starting p. 13, 14
- Portable Compressor p. 15, 16
- Specifications p. 24
Table of contents
Manual images
Click an image to enlargeQuick Guide
The CAT 1750A Lithium Professional Power Station is a multi-functional tool designed for jump-starting 12V vehicles, inflating tires, and providing portable power via USB and AC outlets. Always fully charge the unit before first use and every 3-6 months to maintain battery health.
Features and Controls
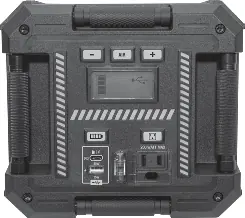
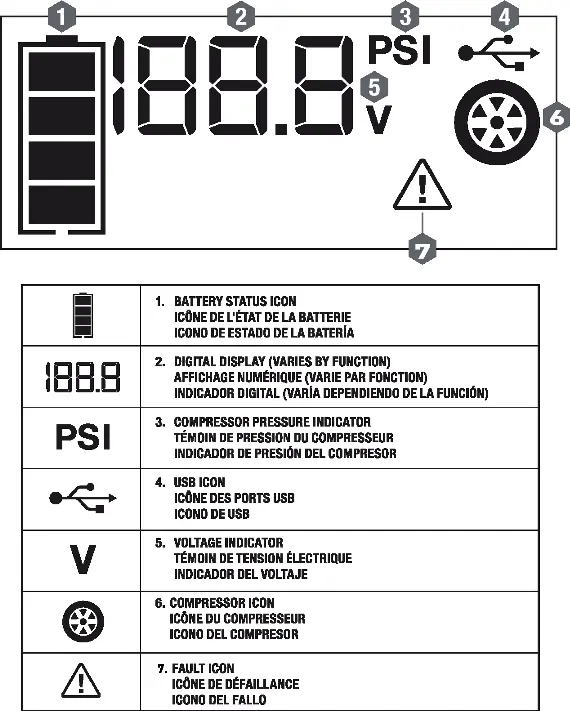
The unit features a digital LCD screen that displays battery status, voltage, and fault conditions. Key controls include the AC power button, compressor control buttons, and the LED area light button. The front panel houses the USB-A and USB-C ports, the 120V AC outlet, and the smart cable port.
Charging the Unit
The unit is delivered partially charged. To charge:
- Use the included USB charging cables.
- For fastest results, use a USB-C to USB-C cable with an external USB-C power source with PD 30W output.
- Ensure all unit functions are turned off during charging.
- The battery status icon will show bars filling from empty to solid when charging.
- Do not charge for more than 10 hours via a PD 30W source.
Jump-Starting
Safety Warning: Only use on 12V DC battery systems. Ensure the unit is in an upright position.
- Turn off vehicle ignition and all accessories.
- Connect the Smart Cables Connector to the Smart Cables Port on the unit.
- Connect the positive (RED) clamp to the positive battery post.
- Connect the negative (BLACK) clamp to the vehicle chassis or engine block (away from the battery).
- Ensure the Bi-Color Status Indicator on the Smart Cables Controller lights green.
- Turn on the ignition and crank the engine in 5-6 second bursts.
- Once started, disconnect the clamps in reverse order (negative first).
Using the Compressor
The compressor is capable of inflating up to 120 PSI.
- Screw the Sure Fit nozzle onto the valve stem.
- Press the Compressor Power Button.
- Use the '+' and '-' buttons to set the desired pressure.
- Press the Compressor Power Button again to begin inflation.
- The unit will automatically stop when the set pressure is reached.
Note: Do not operate the compressor continuously for longer than 10 minutes to prevent overheating.
USB and AC Power
- USB Ports: Provide power to external devices. USB-A supports up to 15W; USB-C supports up to PD 30W. Total output is 15W when both are used simultaneously.
- 120V AC Outlet: Supports a maximum continuous power draw of 200W. Ensure the appliance wattage does not exceed this limit.
Maintenance
Periodically wipe the exterior with a soft cloth. Do not immerse in water. There are no user-replaceable parts. If the unit fails to operate, contact technical support at 855.806.9228.
Manufacturer information
Caterpillar Inc.
Practical help
Common problems
Unit not charging
Ensure all functions are turned off. Check the power source and connection. If the unit is overheated or too cold, allow it to reach a normal temperature before resuming.
Engine fails to jump-start
Verify proper polarity connection. Ensure the unit is fully charged. If the unit is in over-current/over-time protection, remove clamps and allow a 30-minute cooling period.
Compressor will not inflate
Ensure the compressor is turned on and not in jump-start mode. Check that the nozzle is securely attached. Allow the unit to cool down if it has been running for 10 minutes.
Before use
- Fully charge the unit before first use.
- Verify the vehicle battery is a 12V system.
- Ensure all unit functions are turned off before connecting.
- Check for damaged cords, clamps, or plugs.
- Ensure the unit is on a flat, stable surface during use.
Specs in practice
- Boost Ampere
- 1750A Max peak current for jump-starting.
- USB-C Output
- Supports PD 30W output for fast charging devices.
Images and diagrams
- LCD screen displays battery status, voltage, and fault icons.
- Control panel includes buttons for AC power, compressor, and LED light.
- Smart cable port is located on the front for jump-starting.
Model compatibility
- Designed for 12V DC vehicle battery systems only.
- Not intended for marine applications.
- Not tested for medical devices.
- Some high-wattage appliances (e.g., hair dryers, toasters) are not supported.

Manual page author
Michael Turner
Technical manual editor
Reviews PDF manuals for structure, safety notes, and practical product details so readers can find the right information quickly.