Tools / Air Dusters
User Manual for Technaxx 18W Solar Power Station Set TX-200
Quick guide for the Technaxx 18W Solar Power Station Set TX-200. Learn how to charge the unit, connect the LED lamps, use the USB output, and maintain your solar power station.
Quick answers from the manual
Quick answer
- The Technaxx TX-200 is a solar power station with an 18W solar panel, 4 LED bulbs, and a USB charging port. It can be charged via AC (6-9 hours) or solar power and provides up to 36 hours of working time. p. 3, 4, 5
Key actions
- Charge the battery p. 4
- Connect LED bulbs p. 4
First start
- Plug the AC charging cable into the power station and a 110V-230V outlet to charge the battery fully. p. 4
Problems and fixes
Low battery
Charge the device. Indicated by a slow flashing orange light.
p. 4Technical specifications
| Parameter | Value | Meaning | Pages |
|---|---|---|---|
| Battery | 12V / 7AH SLA | Rechargeable lead acid battery | p. 5 |
| USB Output | 5V / 1A | Charging output for devices | p. 5 |
Where to find it in the PDF
- Product Overview p. 4
Table of contents
Manual images
Click an image to enlargeImportant Information
The Technaxx 18W Solar Power Station Set TX-200 is designed to charge small devices like smartphones or radios and provide lighting for camping or emergency situations. Before first use, ensure the battery is fully charged using the AC adapter. The device is intended for household use only and should not be used in extreme temperatures, rain, or moist environments.
Product Overview
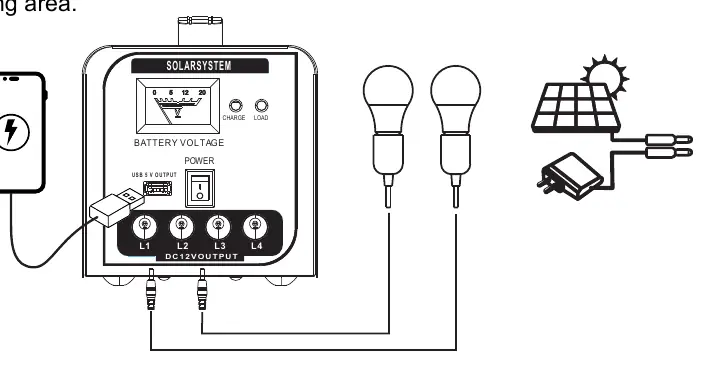
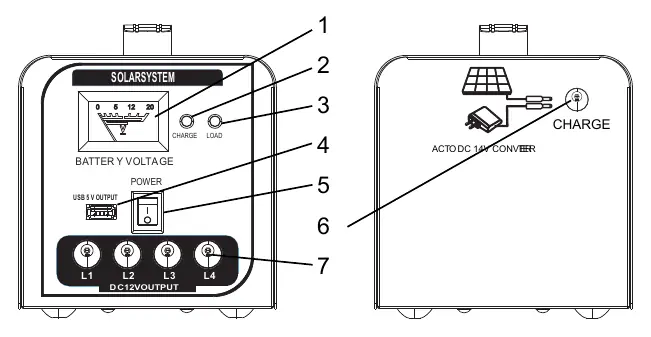
The power station features a front panel with a battery voltage indicator, charge and load status LEDs, a power switch, a USB output port, and four DC 12V outputs for the included LED bulbs. The solar panel input is located on the side of the unit.
First Use and Charging
To charge the battery for the first time:
- Connect the AC charging cable to the power station and a 110V-230V 50-60Hz AC outlet.
- Charge until the indicator LED (4) turns solid green.
- This process typically takes 6-9 hours.
Solar Powered Charging
Place the 18W solar panel in direct sunlight, ensuring the panel faces the sun for optimal energy harvesting. Connect the solar panel plug into the power station input. Note that charging time varies based on weather conditions. Charging devices via USB or using the LED lights while solar charging will extend the required charging time.
LED Light Bulb System
The set includes 4 LED bulbs. To use them:
- Plug the bulb cables into the DC 12V outputs on the power station.
- Each bulb can be switched on or off individually using the switch on its power cord.
- Warning: Never plug these LED bulbs into a standard E27 socket with more than 12V, as this may cause electric shock or fire.
USB Output
To charge mobile devices, plug your USB charging cable into the USB port on the front panel. Note that the output is limited to 5V/1A, which may be slower than standard wall chargers.
Care and Maintenance
- Clean the device only with a dry or slightly damp, lint-free cloth.
- Do not use abrasive cleaners.
- Avoid exposing the device to extreme temperatures, moisture, rain, or strong shocks.
Technical Specifications
- Battery: 12V / 7AH SLA (Rechargeable lead acid)
- Solar Panel: Max 18W
- USB Output: 5V / 1A
- Charging Time: 6-9 hours
- Working Temperature: -15°C to 40°C
- Weight: 5.25 kg (Power station), 1.0 kg (Solar panel)
Manufacturer information
Technaxx Deutschland GmbH & Co. KG
Practical help
Common problems
Low battery
Charge the device using the AC adapter or solar panel. The indicator will show a slow flashing orange light when battery is low.
Charging takes too long
Ensure the solar panel is in direct sunlight. Using USB devices or LED lights while charging will increase the total charging time.
Device not charging
Check all cable connections. Ensure the AC outlet is active or the solar panel is positioned correctly in the sun.
Before use
- Inspect the device and cables for visible damage.
- Verify that your mains voltage matches the type plate specifications.
- Charge the battery fully using the AC adapter before first use.
- Ensure the solar panel is placed in direct sunlight for optimal charging.
Specs in practice
- Operating Temperature
- The device functions between -15°C and 40°C.
Images and diagrams
- The front panel contains the battery voltage meter, charge/load status LEDs, power switch, USB port, and four DC 12V outputs for the LED bulbs.
Model compatibility
- LED bulbs are specific to this system; do not connect them to standard E27 sockets with voltage higher than 12V.

Manual page author
Emily Carter
User documentation editor
Prepares concise manual descriptions and highlights the most useful setup, operation, and maintenance information for readers.