Furniture / Home Furnishing
Celestron NexStar 102SLT Telescope
Comprehensive guide for the Celestron NexStar 102SLT Maksutov-Cassegrain telescope, covering assembly, computerized hand control operation, alignment, and maintenance.
Table of contents
Manual images
Jump to the sectionIntroduction to NexStar SLT
The Celestron NexStar 102SLT is a high-performance Maksutov-Cassegrain telescope designed for both beginners and experienced astronomers. It features innovative automated technology that allows for easy navigation of the night sky. With a computerized hand control containing a database of over 40,000 celestial objects, the telescope can automatically locate and track planets, stars, and deep-sky objects. The system is designed for portability and quick setup, allowing users to begin observing after a simple three-object alignment process.
Assembly and Setup
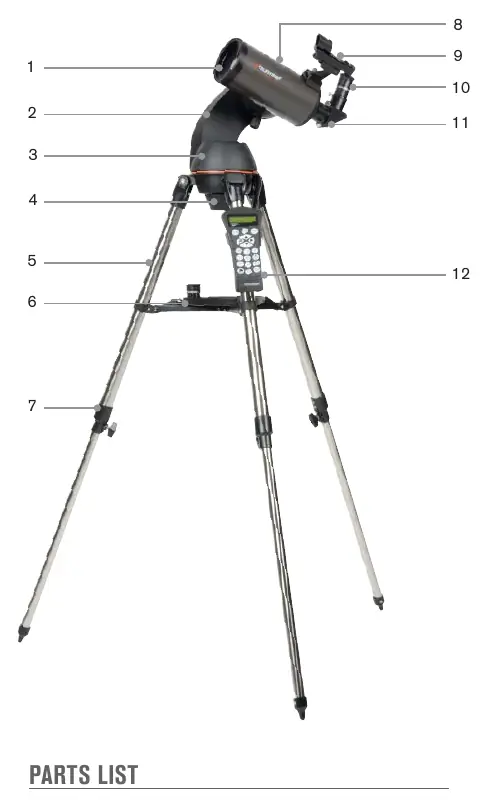
The telescope consists of three main sections: the tripod, the fork arm, and the optical tube. Begin by setting up the tripod and attaching the accessory tray. Once the tripod is level, the fork arm base is secured to the tripod mounting platform using the quick-release coupling screw. The optical tube is then attached to the fork arm via a dovetail mounting bar. After assembly, install the star diagonal and the desired eyepiece. Ensure the StarPointer finderscope is properly aligned with the main optics during daylight hours to facilitate accurate object location at night.
Operation and Alignment
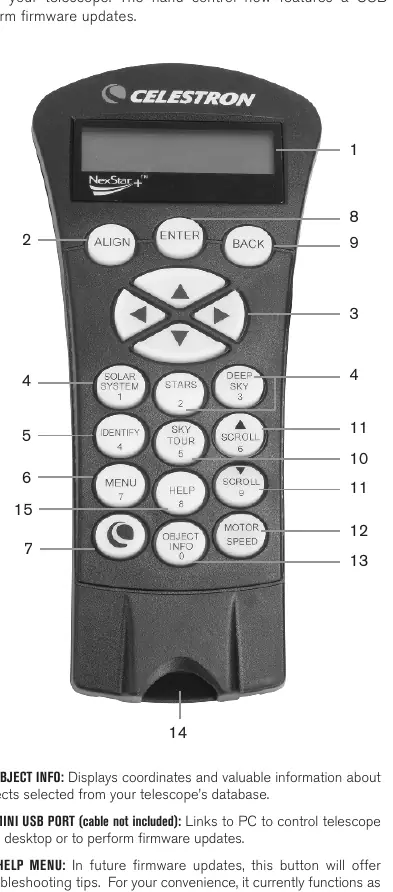
Power the telescope using 8 AA batteries or an optional 12V AC adapter. The NexStar+ hand control is the primary interface for operating the telescope. Upon powering on, follow the on-screen instructions to perform the alignment procedure. The hand control allows you to select objects from the database, adjust motor speeds, and activate the Sky Tour feature. For optimal performance, always use the hand control to move the telescope; moving it by hand while powered on will cause a loss of alignment.
Observing and Maintenance
For the best viewing experience, avoid observing through window glass or over heat-radiating surfaces. When observing the Moon or planets, use appropriate filters to enhance contrast and reduce glare. Regular maintenance involves keeping the optics clean. Use a camel's hair brush or pressurized air to remove dust from the corrector plate. If cleaning solution is required, use a mixture of 60% isopropyl alcohol and 40% distilled water, applying it to a tissue rather than directly to the lens. Always replace lens covers when the telescope is not in use to prevent dust accumulation.
Manufacturer information
Celestron
Practical help
Common problems
Image is blurry
Turn the focusing knob until the image is sharp. If the knob reaches the end of its travel, turn it in the opposite direction.
Telescope loses alignment
Ensure the telescope is controlled only via the hand control. Moving the tube by hand while powered on causes loss of alignment.
StarPointer red dot not aligned
Align the finderscope during the day by centering a distant object in the main eyepiece, then adjusting the finderscope knobs until the red dot is on the same object.
Before use
- Remove the clear protective tape from the LCD screen.
- Ensure 8 fresh AA batteries are installed or an AC adapter is connected.
- Level the tripod and adjust leg height.
- Remove the protective dust cap from the focuser barrel.
- Ensure the StarPointer finderscope is aligned.
- Remove the plastic battery tab from the StarPointer.
Specs in practice
- Aperture (102mm)
- The diameter of the telescope's light-gathering lens, determining resolution and brightness.
- Focal Length (1325mm)
- The distance light travels inside the telescope, used to calculate magnification.
- Highest Useful Magnification (241x)
- The maximum power at which the image remains clear under ideal conditions.
Images and diagrams
- The tripod assembly uses a central flange post and locking tabs for the accessory tray.
- The fork arm attaches to the tripod via a central coupling screw.
- The optical tube uses a dovetail bar that slides into the fork arm clamp.
- The hand control connects to the base of the fork arm via a phone-jack style connector.
- The focusing knob is located on the rear cell of the telescope.
Model compatibility
- Uses standard 1.25-inch barrel diameter eyepieces.
- Compatible with 12V DC power sources (750mA, tip positive).
- Hand control firmware can be updated via mini-USB connection to a PC.

Manual page author
David Miller
Documentation analyst
Organizes user manual content into clear summaries, with attention to model details, product context, and everyday usability.