Garden / Hedge Trimmers
User Manual for Certa PowerPlus 20V Cordless Multi Function Tool
Comprehensive user guide for the Certa PowerPlus 20V Cordless Multi Function Tool (CTPMUTIFUCA). Includes instructions for battery installation, charging, tool operation, safety warnings, and maintenance.
Quick answers from the manual
Quick answer
- The Certa PowerPlus 20V Cordless Multi Function Tool is a versatile power tool intended for sawing, cutting, and sanding. It features a quick-change accessory system and variable speed control. p. 1, 11, 16
Key actions
- Insert the battery by sliding it into the tool body until it latches. p. 13
- Change accessories by pressing the quick-change button and inserting the tool into the shaft. p. 16
First start
- Ensure the battery is charged, insert it into the tool, press the lock-off switch, and then press the power switch. p. 13, 14, 16
Problems and fixes
Tool does not charge
Check power supply, ensure outlet is not switched off, and verify ambient temperature is between 4.5°C and 40.5°C.
p. 15Maintenance and reset
- Charge the battery pack regularly (at least once every 6 months). p. 18
Technical specifications
| Parameter | Value | Meaning | Pages |
|---|---|---|---|
| No-load Speed | 5000-20000 RPM | Oscillation speed range | p. 19 |
| Charger Input | 220-240V-50/60Hz | Required electrical input | p. 19 |
Where to find it in the PDF
- Safety Instructions p. 3, 4, 5, 6
- Components and Overview p. 11, 12
- Assembly and Operation p. 13, 14, 16
- Specifications p. 19
Table of contents
Manual images
Click an image to enlargeQuick guide from the manual
The Certa PowerPlus 20V Cordless Multi Function Tool is designed for sawing, cutting, and sanding tasks. It is compatible with Certa PowerPlus 20V batteries and chargers. Always remove the battery before performing any maintenance or changing accessories. Ensure you wear appropriate personal protective equipment (PPE) such as safety goggles, ear protection, and a dust mask during operation.
Product Overview
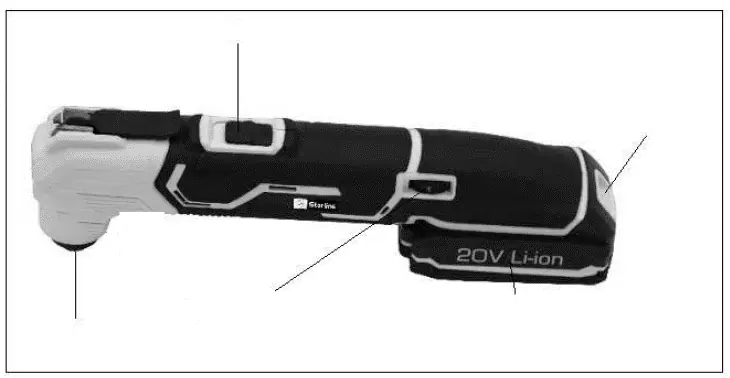
The tool consists of the main body, a stationary shaft for attaching accessories, a quick-change button, a lock-off switch, a power switch, and a speed control switch. The battery pack attaches to the base.

Assembly
Fitting and Removing the Battery:
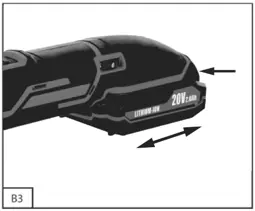
- To insert, slide the battery into the tool body until it latches securely.
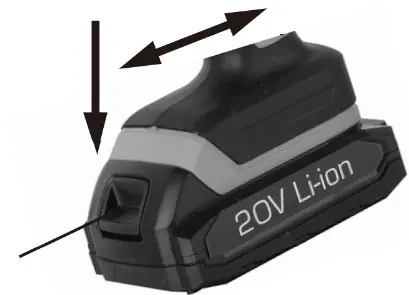
- To remove, press and hold the buttons on both sides of the battery pack and slide it away from the tool.
Changing the Tool:
- Set the rotational direction switch to the centre position before changing accessories.
- Press the quick-change button.
- Insert the desired tool (blade, scraper, or sanding pad) into the stationary shaft.
- Release the quick-change button to lock the accessory in place.
Operation
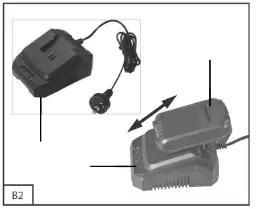
Charging the Battery:
- Remove the battery pack from the tool.
- Connect the charger to an electrical outlet.
- Place the battery onto the charger. A red LED indicates charging; a green LED indicates the battery is fully charged.
- Charging typically takes about 1 hour.
Using the Tool:
- Press the lock-off switch in any direction.
- Press the power switch to operate the tool.
- Use the speed control switch to adjust the oscillation speed based on the material and task.
Selecting a Tool
- Straight Saw Blade: Suitable for cutting and plunge sawing in sheet and tube metals (up to 3mm thick) and soft materials.
- Half Round Saw Blade: Suitable for cutting concrete and flooring.
- Scraper: Ideal for removing mortar, concrete residues, tile/carpet adhesives, and paint/silicone residues.
Cleaning and Maintenance
- Always remove the battery before cleaning.
- Keep air vents and the motor housing free of dust.
- Wipe the equipment with a clean cloth or use low-pressure compressed air.
- Do not use solvents or harsh cleaning agents.
- Charge the battery at least once every 6 months to maintain battery health.
Safety Instructions
- Do not use the tool in environments with a risk of explosion (flammable liquids, gases, or dust).
- Keep children and bystanders away while operating.
- Always secure the workpiece with clamps or a vice.
- Use a detector to check for hidden electrical wires, gas lines, or water pipes before cutting.
- Avoid charging batteries in temperatures below 4.5°C or above 40.5°C.
Practical help
Common problems
Tool does not start
Ensure the battery is fully charged and correctly inserted. Check that the lock-off switch is disengaged.
Battery not charging
Verify the power outlet is working. Ensure the charger and battery are within the acceptable temperature range (4.5°C to 40.5°C).
Excessive dust during sanding
Always wear a dust mask and use vacuum dust extraction if available. Ensure the work area is well-ventilated.
Before use
- Charge the battery fully.
- Wear safety goggles, ear protection, and a dust mask.
- Ensure the accessory is securely locked in the stationary shaft.
- Secure the workpiece with clamps or a vice.
- Check the work area for hidden utilities (wires, pipes) using a detector.
- Set the rotational direction switch to the centre position before changing tools.
Specs in practice
- No-load Speed
- The oscillation speed of the tool without a load, ranging from 5000 to 20000 RPM.
- Nominal Voltage
- The operating voltage of the tool, which is 20V.
- Charging Temperature
- The safe ambient temperature range for charging the battery (4.5°C to 40.5°C).
Images and diagrams
- 1: Stationary shaft for accessories
- 2: Quick-change button
- 3: Lock-off switch
- 4: Power switch
- 5: Speed control switch
Model compatibility
- Designed for use with Certa PowerPlus 20V 2.0Ah Lithium Battery (CT20VBAT20A).
- Designed for use with Certa PowerPlus 20V Rapid Charger (CT20VHTLBCHB).

Manual page author
Emily Carter
User documentation editor
Prepares concise manual descriptions and highlights the most useful setup, operation, and maintenance information for readers.