Tools / Air Compressors & Pneumatics
User Manual for Certa 18V Cordless Drill CT18VDRILXA
Comprehensive user guide for the Certa 18V Cordless Drill (CT18VDRILXA). Includes setup, battery charging, torque settings, drilling operations, maintenance, and troubleshooting.
Quick answers from the manual
Quick answer
- The Certa 18V Cordless Drill (CT18VDRILXA) is a battery-powered tool featuring 19+1 torque settings, a 13mm chuck, and two-speed gear selection. It is charged via the included charger in approximately 1 hour. p. 7, 8
Key actions
- Change gears p. 8, 9
- Change drill bits p. 9, 10
First start
- Charge the battery fully before first use. p. 7, 8
Problems and fixes
Battery not charging
Check outlet, check battery contact, ensure temperature is between 0°C and 60°C.
p. 10, 11Maintenance and reset
- Clean vents with compressed air and wipe handles with a damp cloth. p. 10
Technical specifications
| Parameter | Value | Meaning | Pages |
|---|---|---|---|
| Voltage | 17V d.c. | Operating voltage | p. 8 |
| Weight | 1.5kg | Tool weight | p. 8 |
Where to find it in the PDF
- Safety Warnings p. 2, 3, 4, 5
- Product Layout p. 7
- Technical Specifications p. 8
Table of contents
Manual images
Click an image to enlargeQuick guide from the manual
This manual provides essential safety and operational instructions for the Certa 18V Cordless Drill. Always ensure the tool is switched off before inserting or removing the battery pack. Use only the provided charger and battery pack. Wear appropriate personal protective equipment, including eye protection, during operation.
Product Layout
The drill features the following key components:
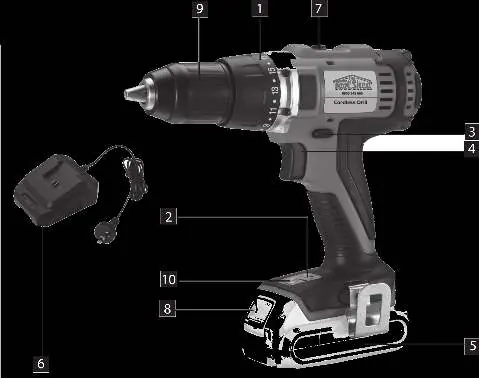
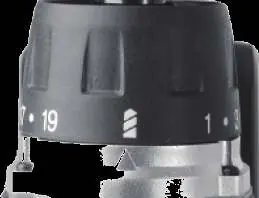
- Torque Selector: Adjusts torque for different materials and screws.
- Battery Capacity Indicator: Shows remaining charge when the trigger is pressed.
- Changeover Switch: Controls forward/reverse rotation and locks the trigger.
- Gear Selection Switch: Switches between 1st and 2nd gear.
- Quick-change Drill Chuck: Holds drill bits or screwdriver bits.
- LED Lamp: Automatically illuminates the work area.
Charging the Battery Pack
To charge the battery:
- Remove the battery pack from the drill by pressing the push-lock buttons.
- Plug the charger into a mains socket; the green LED will illuminate.
- Insert the battery pack into the charger. The green LED will turn off, and the red LED will illuminate, indicating charging is in progress.
- Charging takes approximately 1 hour. Once complete, the green LED will illuminate, and the red LED will turn off.
Note: If the battery fails to charge, check the power supply and ensure the battery is properly seated in the charger. Do not charge in extreme temperatures.
Drill Operations
Torque Settings: Use the set-collar to select the appropriate torque. The clutch will disengage with a grating sound when the set torque is reached. For drilling, move the collar to the 'drill' icon to disable the slip clutch.
Forward/Reverse Switch: Use the slide switch above the ON/OFF trigger to select rotation direction. The center position locks the trigger.
Gear Selection: Use the selector switch to choose between high or low speed. Only change gears when the tool is at a complete standstill.
Changing the Tool
To change a drill bit or screwdriver bit:
- Set the changeover switch to the center position to lock the tool.
- Open the quick-action chuck.
- Insert the desired tool as far as possible into the chuck.
- Tighten the chuck securely and verify the tool is held firmly.
Maintenance and Servicing
To maintain the tool:
- Clean dust and debris from vents and electrical contacts using compressed air.
- Keep handles clean, dry, and free of oil or grease.
- Use only mild soap and a damp cloth for cleaning. Avoid harsh solvents like gasoline or ammonia.
- Tool maintenance should be performed by qualified personnel.
Troubleshooting
If the tool fails to start, check that the battery is installed correctly and charged. If the battery does not charge, ensure the charger is plugged into a working outlet and that the surrounding temperature is within the acceptable range (0°C to 60°C for battery cells).
Practical help
Common problems
Tool will not start
Check that the battery pack is installed properly and is fully charged.
Battery pack will not charge
Ensure the charger is plugged into a working outlet, check for proper contact, and verify the ambient temperature is suitable for charging.
Before use
- Ensure the battery pack is fully charged.
- Check that the changeover switch is in the desired position (not center-locked).
- Verify the correct bit is securely tightened in the chuck.
- Set the torque selector to the appropriate level for the task.
- Wear safety goggles and appropriate protective gear.
Specs in practice
- Torque Settings
- 19+1 settings; 19 for screwdriving, 1 for drilling mode.
- Idling Speed
- 0-400rpm (1st gear) / 0-1400rpm (2nd gear).
- Chuck Clamping Width
- Maximum 13mm capacity for drill bits.
- Charging Time
- Approximately 1 hour.
Images and diagrams
- The layout diagram identifies the torque selector, battery indicator, gear switch, and chuck.
- The charging diagram illustrates the battery removal and insertion process into the charger.
Model compatibility
- Use only the charger and battery pack supplied with the product.
- Do not use extension cords unless absolutely necessary.

Manual page author
David Miller
Documentation analyst
Organizes user manual content into clear summaries, with attention to model details, product context, and everyday usability.