Tools / Drills
User Guide for Certa 2-in-1 40m Laser and Tape Measure CTLASTAPEMA
Comprehensive user guide for the Certa 2-in-1 40m Laser and Tape Measure (CTLASTAPEMA). Learn how to operate laser measurements, switch units, calibrate offsets, and use the device features.
Quick answers from the manual
Quick answer
- The Certa 2-in-1 40m Laser and Tape Measure is a dual-function tool. Power on by holding the measurement/settings button for 2 seconds. Use the measurement method button to switch between distance, area, volume, and Pythagoras modes. p. 4
Key actions
- Power on p. 4
- Change measurement mode p. 4
- Change units p. 5
- Power off p. 6
First start
- Charge the device via USB-C. p. 6
- Power on the device. p. 4
Problems and fixes
Clear measurement data
Press the power button.
p. 6Where to find it in the PDF
- Components and Overview p. 3
- Operation p. 4
- Settings and Calibration p. 5, 6
Table of contents
Manual images
Click an image to enlargeImportant Information
This guide provides instructions for the Certa 2-in-1 40m Laser and Tape Measure. Ensure the device is charged before first use. The device allows for both physical tape measurements and laser distance measurements, including area, volume, and Pythagorean calculations.
Components Overview
The device consists of the following main parts:
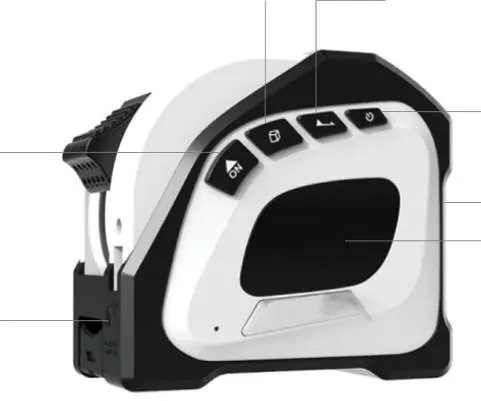
- Tape measure
- Clip
- USB Type-C charging cable
- User guide
The control panel features a display, a laser emitter, and four buttons: Power, Measurement/Settings, Measurement Method, and Unit/End.
Operation
Powering on: Press and hold the measurement/settings button for 2 seconds.
Measuring:
- Press the measurement/settings button to take a single measurement.
- Press and hold the measurement/settings button to take a continuous measurement.
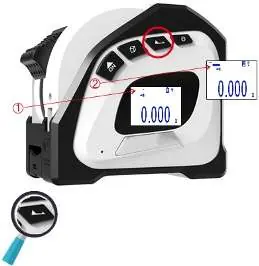
Changing the measurement method:
- Press the measurement method button once for area measurement.
- Press the measurement method button twice for volume measurement.
- Press the measurement method button three times for Pythagoras theorem measurement.
The display will flash to indicate the order of sides that need to be measured for area, volume, and Pythagorean calculations.
Settings and Calibration
To access settings, press and hold the measurement/settings button for 5 seconds until the display shows 'Boot'.
- Offset Settings: Press and hold the measurement/settings button for 2 seconds to enter offset settings ('CAL.0'). Adjust the offset between -7mm to 7mm by repeatedly pressing the measurement/settings button. Hold the button for 2 seconds to confirm.
- Sound Settings: After offset settings, the display shows sound options. Press the measurement/settings button to toggle sound on/off. Hold for 2 seconds to confirm.
- Backlight Settings: After sound settings, the display shows backlight options. Press the measurement/settings button to toggle the backlight on/off. Hold for 2 seconds to confirm.
Changing units: Press and hold the unit/end button to cycle between metres (m), inches (in), and feet (ft).
Changing '0' reference: Press the unit/end button to toggle between measuring from the front or the end of the tape measure.
Clearing Data and Powering Off
- Clear data: Press the power button to clear measurement data.
- Power off: Press and hold the power button for 2 seconds.
Charging
- Plug the USB Type-C charging cable into the charging port.
- Connect the other end to a power adapter (not supplied) and plug into a socket.
- Turn on the power to charge.
Using the Clip
The tape measure can be slid and secured onto the included clip. The clip can also be passed through a belt or strap for convenient carrying.
Practical help
Common problems
Device not measuring correctly
Check the calibration offset (CAL.0) in settings and adjust between -7mm to 7mm.
Need to clear measurement data
Press the power button to clear the current data.
Laser not turning on
Ensure the device is powered on by holding the measurement/settings button for 2 seconds.
Before use
- Charge the device using the provided USB Type-C cable.
- Ensure the device is powered on by holding the measurement/settings button for 2 seconds.
- Verify the desired measurement unit (m, in, ft).
- Check the '0' reference point (front or end of the device).
Specs in practice
- Offset adjustment
- Allows calibration of the tape measure between -7mm and 7mm to ensure accuracy.
- Measurement modes
- Includes distance, area, volume, and Pythagoras theorem calculations.
Images and diagrams
- The device features a display, laser emitter, and four main buttons: Power, Measurement/Settings, Measurement Method, and Unit/End.
Model compatibility
- Requires a standard USB power adapter (not supplied) for charging.

Manual page author
Michael Turner
Technical manual editor
Reviews PDF manuals for structure, safety notes, and practical product details so readers can find the right information quickly.