Electronics / Networking
Cisco Business 151AXM Mesh Extender Quick Start Guide
Quick start guide for the Cisco Business 151AXM Mesh Extender. Learn how to set up your device, configure it via the Cisco Business Mobile app or web browser, and understand LED status indicators.
Table of contents
Manual images
Click an image to enlargeQuick Start Guide
This guide provides the necessary steps to set up and configure your Cisco Business 151AXM Mesh Extender to expand your existing Cisco Business Wireless (CBW) Wi-Fi 6 network.
Requirements
- Active internet connection.
- An operational and configured CBW Wi-Fi 6 Primary AP with Mesh enabled.
- Cisco Business Mobile app or a compatible web browser (Microsoft Edge ver. 10+, Safari ver. 7+, Firefox ver. 33+, or Chrome ver. 38+).
- A router or switch to act as your DHCP server.
Product Features
The device includes the following components:

- Status LED: Indicates device state.
- AC Plug: Varies by country.
- Power On/Off button.
- Mode Button.
- QR Code: For setup and identification.
- Kensington Lock.
- Console Port: For technical support only.
- Disabled Port.
Get Connected
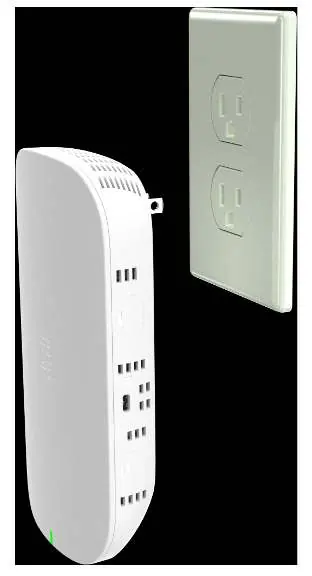
Plug the Mesh Extender into a power outlet to begin the initial boot-up process. During this time, the Status LED will cycle through green, red, and off. This process takes at least 6 minutes. Once the connection is established, the Status LED will turn blue.
Configuration
Using the Cisco Business Mobile App
- Connect to the wireless network (SSID) created when deploying the CB site.
- Open the app.
- Connect to the site.
- Select Add Devices.
- Select Get Started.
- Select Add Mesh Extender and use a QR code reader or the barcode to proceed.
Using a Web Browser
- Connect to the wireless network (SSID) created when deploying the CB site.
- Open a web browser and navigate to https://ciscobusiness.cisco.
- Log in with your password.
- Navigate to Wireless Settings > WLAN Users > Local MAC Address.
- Click Add MAC Address.
- Enter the MAC Address (found on the barcode sticker on the back of the device or via QR code) and a Description.
- Select the Type as Allowlist.
- Click Apply.
Support
For additional product documentation, including the Administration Guide, visit: https://cisco.com/go/cbw151axm
Official resources from the manual
Manufacturer information
Cisco Systems, Inc.
Practical help
Common problems
Status LED is cycling through green, red, and off.
This is normal during the initial boot-up process. Wait at least 6 minutes for the device to connect.
Cannot find the MAC address for manual configuration.
The MAC address is located on the barcode sticker on the back of the Mesh Extender. Alternatively, scan the QR code to display it.
Before use
- Ensure you have an active internet connection.
- Verify that your CBW Wi-Fi 6 Primary AP is operational and configured with Mesh enabled.
- Have a router or switch available to act as your DHCP server.
- Download the Cisco Business Mobile app or ensure your web browser is updated to the required version.
Specs in practice
- Status LED (Green/Red/Off)
- Indicates the device is booting up. This is normal behavior.
- Status LED (Blue)
- Indicates the device is successfully connected.
Images and diagrams
- The product features diagram identifies the location of the Status LED, AC Plug, Power button, Mode button, QR code, Kensington lock, and ports.
- The connection diagram illustrates plugging the device directly into a wall power outlet.
Model compatibility
- Requires an existing Cisco Business Wireless (CBW) Wi-Fi 6 network.
- The Console Port is strictly for technical support use only.

Manual page author
Emily Carter
User documentation editor
Prepares concise manual descriptions and highlights the most useful setup, operation, and maintenance information for readers.