Electronics / Networking
Quick Start Guide for Cisco Business 143AC Mesh Extender
Get started with your Cisco Business 143AC Mesh Extender. This guide covers setup, connection via app or web interface, LED status indicators, and configuration requirements.
Table of contents
Manual images
Click an image to enlargeQuick guide from the manual
The Cisco Business 143AC Mesh Extender is designed to expand the coverage of your existing Cisco Business Wireless Network. To get started, ensure you have an active internet connection, a router acting as a DHCP server, and an operational Cisco Business Master AP (140AC, 145AC, or 240AC) with Mesh enabled. You can configure the device using either the Cisco Business mobile app or a web browser.
What is in the box
- Cisco Business 143AC Mesh Extender
- Quick Start Guide
- Power Adapter
- Mounting Kit
- Technical Support Contact List
- Pointer Card China RoHS
- Compliance Information (for EU SKU only)
Product features
The device includes the following physical features:
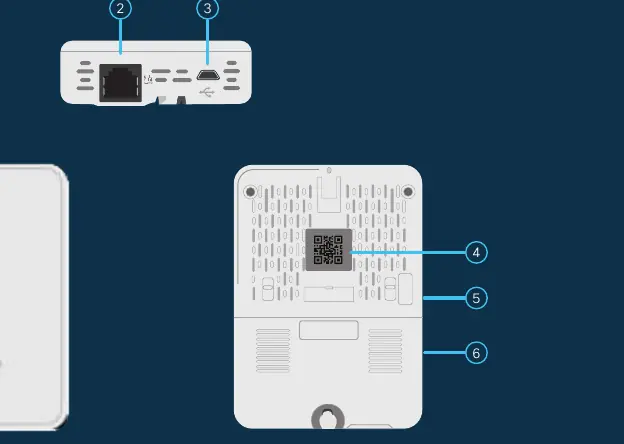
- Status LED
- PoE-In Port
- Type B USB Port (power supply)
- QR Code
- Mode button (on side)
- Kensington Lock (on side)
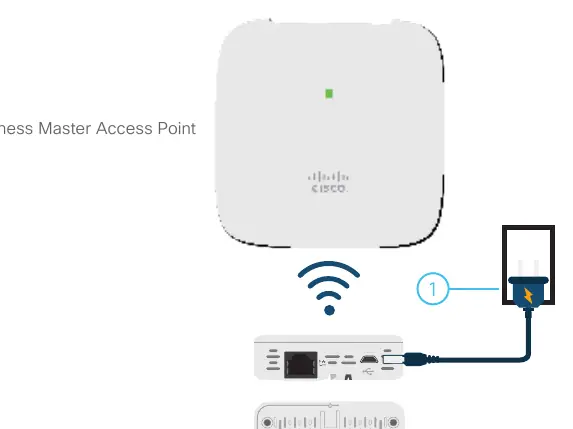
Preparing the device
Connect the provided power adapter to the mesh extender and plug it into a power source. The device will begin its initial boot-up process. During this time, the LED will cycle through red, amber, and green. This is normal behavior. Once the device is powered, you can proceed to configuration.
Configuration methods
Via Cisco Business App
Download the free Cisco Business app. Open the app, navigate to Monitor my network, select the Discovered Master, log in, and select Add a device. Follow the on-screen prompts to complete the setup.
Via Web UI
- Join the SSID of the Master AP that was set up during initial configuration.
- Launch a web browser and visit https://ciscobusiness.cisco.
- Log in with the username and password created during the Master AP configuration.
- Navigate to Wireless Settings, then WLAN Users, and select Local MAC Addresses.
- Click Add MAC Address and enter the MAC address of the mesh extender.
- Set the Type to Whitelist.
- Save the configuration by clicking the red disk icon in the web interface header and select OK.
- The LED will cycle through multiple states while the unit joins the network. A solid or blinking green LED indicates success.
Support
For additional documentation, including the Administration Guide, visit cisco.com/go/cbw143ac.
Official resources from the manual
Manufacturer information
Cisco Systems, Inc.
Practical help
Common problems
Mesh support not enabled
If the access point was not set up with Mesh support, you cannot add extenders. Go to Wireless Settings > Mesh, enable the Mesh button (green), and select Apply. The AP will reboot.
LED status during setup
During boot, the LED cycles through red, amber, and green. A solid or blinking green LED confirms the unit has successfully joined the Master AP.
Before use
- Active Internet connection
- Operational Cisco Business Master AP (140AC, 145AC, or 240AC) with Mesh enabled
- Router acting as a DHCP server
- Cisco Business app or a QR code reader
Specs in practice
- Type B USB Port
- Used for power supply.
Images and diagrams
- The device features a status LED on the front face.
- Ports (PoE and USB) are located on the bottom/back of the unit.
- The QR code and Mode button are located on the back/side.
Model compatibility
- Requires a configured Cisco Business Master AP (140AC, 145AC, or 240AC) to function.

Manual page author
Emily Carter
User documentation editor
Prepares concise manual descriptions and highlights the most useful setup, operation, and maintenance information for readers.