Power / Batteries & Chargers
User Manual for Clarke IBC50 12V 50A Intelligent Battery Charger
Quick guide for the Clarke IBC50 12V 50A Intelligent Battery Charger. Includes setup, charging modes, safety precautions, troubleshooting, and maintenance instructions.
Table of contents
Manual images
Click an image to enlargeQuick guide from the manual
The Clarke IBC50 is an intelligent 12V battery charger designed for various lead-acid battery types, including WET, MF, EFB, GEL, and AGM. It features a 10-step charging process, an engine start function, and an alternator check mode. Always ensure the charger is unplugged before connecting or disconnecting leads to the battery.
Safety precautions
- Do not use to charge Lithium-Ion or dry-cell batteries.
- Do not charge frozen, damaged, or leaking batteries.
- Wear eye, hand, and clothing protection when working near a battery.
- Use in a well-ventilated area to avoid explosive gases.
- Remove metal jewelry (rings, bracelets) to prevent short circuits.
- Keep the charger away from the engine compartment and moving parts.
Electrical connections
The unit operates on 230VAC 50Hz. If the plug needs to be changed, ensure the wiring is correct: Blue to Neutral (N/Black), Brown to Live (L/Red), and Yellow/Green to Earth (E/Green). It is recommended to use a Residual Current Device (RCD).
Connecting to the battery
- Identify battery polarity (POS/P/+ and NEG/N/-).
- For negative grounded vehicles (most common): Connect the RED POSITIVE clamp to the positive terminal, then the BLACK NEGATIVE clamp to the negative terminal or chassis.
- For positive grounded vehicles: Connect the BLACK NEGATIVE clamp to the negative terminal, then the RED POSITIVE clamp to the positive terminal or chassis.
- Disconnect in reverse order.
Operation and charging modes
Use the DISPLAY button to toggle between Voltage, Battery %, and Alternator %. Use the FUNCTION button to select modes:

- CHARGE: Press and hold RATE SELECTION to choose battery type, then select current. Press FUNCTION until the CHARGING LED is lit.
- START: Used for jump-starting. Connect to the battery, press FUNCTION until the START LED is lit, then turn the ignition. If the engine fails to start, wait 4 minutes before trying again.
- REPAIR: An advanced recovery mode for old or sulfated batteries. Press and hold FUNCTION until the REPAIR LED is lit.
Alternator check
With the charger connected, press the DISPLAY button until the ALTERNATOR% LED is lit. Start the vehicle and turn on the headlights. Readings below 0% (LO) or above 100% (HI) indicate a potential issue with the vehicle's electrical system.
Care and maintenance
Keep the charger clean and dry. Wind up leads when not in use. Regularly examine leads for damage. Clean clamps with a solution of water and baking soda if corrosion is present.

Troubleshooting and error messages
If an error occurs, the ERROR LED will light up alongside a code on the display:
- E01: Reverse connection.
- E02: Charger temperature too high.
- E03: Battery cannot store charge (dead battery).
- E04: No battery connected or voltage below 1 volt.
Manufacturer information
Clarke International
Practical help
Common problems
Battery does not charge
Check AC power, 40A fuses on the rear, battery connections, correct voltage selection, and ensure the battery is not frozen.
Display not showing
Check AC power, 50A fuses on the rear, and the AC plug fuse.
Before use
- Ensure battery is 12V lead-acid (WET, MF, EFB, GEL, AGM).
- Clean battery terminals.
- Wear eye and hand protection.
- Ensure the area is well-ventilated.
- Check for damaged leads.
Specs in practice
- Input Voltage
- 230V AC, 50Hz.
- Output Currents
- 5A/10A for charging, 50A for Start Mode.
- Boost Duty Cycle
- 10 seconds on, 180 seconds off.
- Min./Max. Battery Size
- 4Ah - 100Ah.
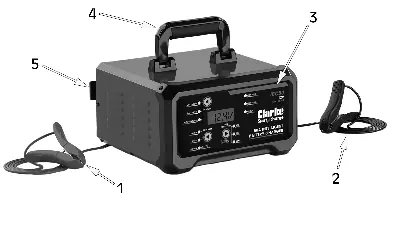
Images and diagrams
- 1: Positive (Red) Lead
- 2: Negative (Black) Lead
- 3: Display & Control Panel
- 5: Cable Rack
- 6: 2 x 40A Fuses
Model compatibility
- Not for Lithium-Ion batteries.
- Not for dry-cell batteries.
- Not for frozen, damaged, or leaking batteries.

Manual page author
Michael Turner
Technical manual editor
Reviews PDF manuals for structure, safety notes, and practical product details so readers can find the right information quickly.