Home Appliances / Fans
User Manual for Goldair 132cm DC Ceiling Fan GPCF300B/W
Quick guide for the Goldair 132cm DC Ceiling Fan (GPCF300B/W). Includes installation steps, wiring diagrams, remote control pairing, and troubleshooting.
Table of contents
Manual images
Click an image to enlargeQuick guide from the manual
This manual provides instructions for the Goldair 132cm DC Ceiling Fan. Before installation, ensure the ceiling is suitable for mounting and that the location allows for at least 2.1m clearance from the floor and 1.5m from the wall to the blade. Installation must be performed by a qualified installer. Do not connect the fan to a dimmer switch or regulator.
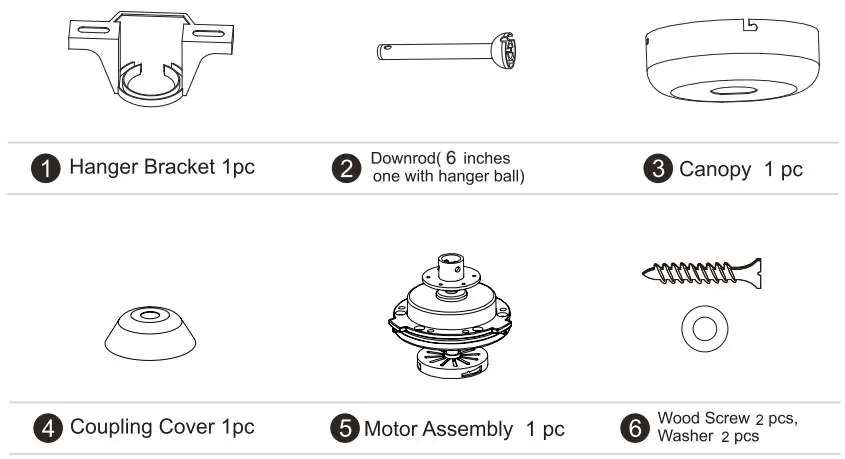
Components
The package includes the following main components: Hanger Bracket, Downrod (with hanger ball), Canopy, Coupling Cover, Motor Assembly, Remote Control, 3 Blades, Blade screws, Motor housing, and Receiver.
Installation
1. Fixing the Hanging Bracket: For GIB ceilings, locate a wooden beam to secure screws. For concrete ceilings, drill an 8mm hole for expansion plugs and fix the bracket.
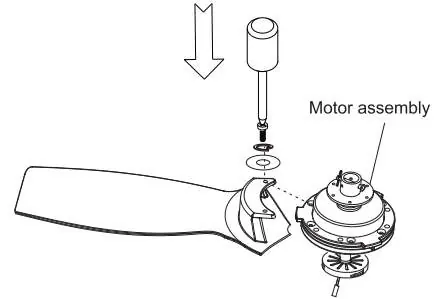
2. Assembling the Blade: Insert the 3 blades into the upper aligning plate and secure them with 6 screws and washers.
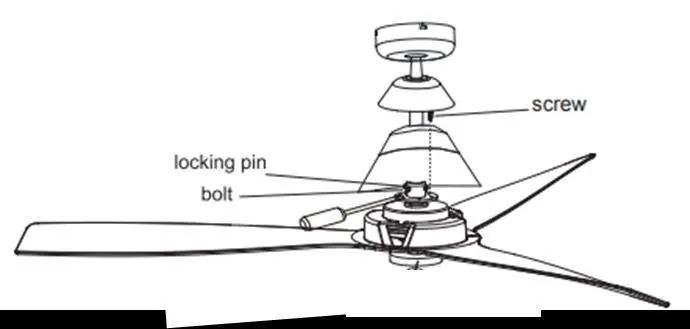
3. Assembling the Motor Housing, Down Rod, Coupling Cover and Canopy: Secure the motor housing to the coupler with 3 screws. Thread wiring through the down rod, insert the bolt and locking pin, and cover with the coupling cover. Place the canopy and hanging ball on the down rod.
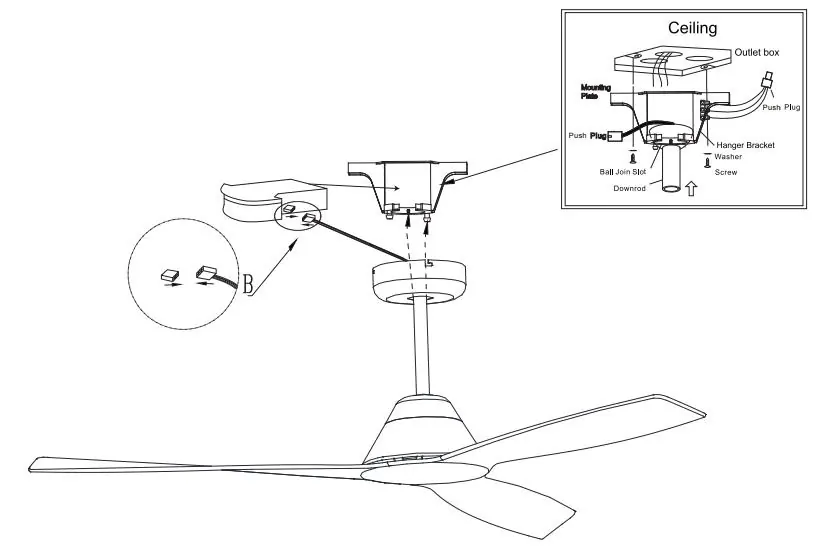
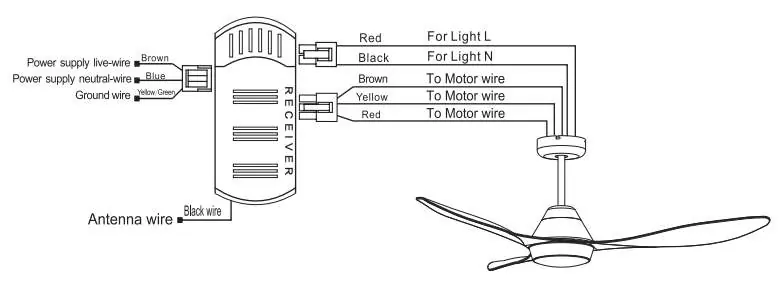
4. Connecting the Power Supply Wire: Use the quick connect system to join the male and female couplings between the receiver, fan, and power supply.
5. Mounting the Ceiling Fan: Place the hanger ball into the bracket, ensuring the concave groove locates into the lugs. Connect the receiver and fan wiring, then slide the canopy up and fasten it to the mounting bracket.
Remote Control Operation
The remote controls fan speed (1-5), light (if applicable), summer/winter mode, and timer. To pair the remote: turn on the wall power switch, and within 30 seconds, press the "FAN ON/OFF" button for 5 seconds until a long beep is heard.
Cleaning and Maintenance
Clean periodically with a soft brush or lint-free cloth. Do not use water. The motor has permanently lubricated ball bearings and does not require oil. If the fan wobbles, check that blade brackets are tightened, blade levels are consistent, and the hanger ball is seated correctly.
Troubleshooting
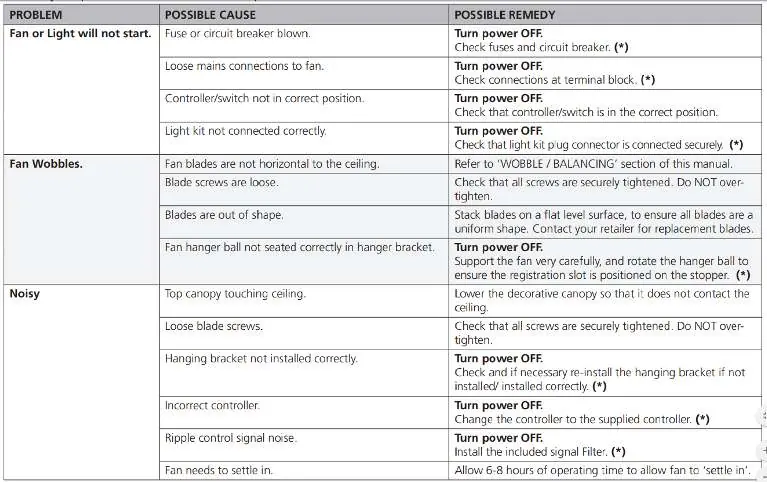
If the fan or light does not start, check the fuse, circuit breaker, and terminal block connections. If the fan is noisy, ensure the canopy is not touching the ceiling and that all screws are tight. Allow 6-8 hours of operation for the fan to 'settle' if new.
Technical Specifications
Supply: 220-240VAC 50/60HzWattage: 45W
Manufacturer information
Goldair
Practical help
Common problems
Fan or Light will not start
Check fuse or circuit breaker, ensure loose mains connections are fixed, and verify the controller/switch is in the correct position.
Fan wobbles
Check that blade brackets are tightened, ensure blades are level, and verify the hanger ball is seated correctly in the hanger bracket.
Noisy operation
Ensure the top canopy is not touching the ceiling, tighten loose blade screws, and check that the hanging bracket is installed correctly.
Before use
- Ensure the ceiling mounting is secure.
- Verify 2.1m clearance from the floor and 1.5m from the wall to the blade.
- Turn off power before assembly or disassembly.
- Ensure all screws are tight throughout installation.
- Ensure blades are unobstructed and can turn freely.
Images and diagrams
- Wiring diagram shows the connection between the receiver, DC motor, and terminal block.
- Installation diagrams illustrate the assembly of the hanger bracket, motor housing, and blade attachment.
Model compatibility
- Do not connect the ceiling fan to any dimmer switch or regulator.
- Do not install in wet or high humidity areas such as bathrooms.
- Not for use in areas continuously exposed to wind.

Manual page author
Emily Carter
User documentation editor
Prepares concise manual descriptions and highlights the most useful setup, operation, and maintenance information for readers.