Home Appliances / Small Kitchen Appliances
Owner's Manual for Westinghouse Widespan 100-inch Ceiling Fan
Quick guide for the Westinghouse Widespan 100-inch High Volume Ceiling Fan. Includes installation steps, wiring diagrams, remote control operation, and troubleshooting.
Table of contents
Manual images
Click an image to enlargeQuick guide from the manual
This manual provides instructions for the installation and operation of the Westinghouse Widespan 100-inch High Volume Ceiling Fan. This fan is designed for large, high-ceiling areas such as factories, barns, ranches, gyms, and warehouses. Important: Installation must be performed by a qualified electrician. Do not use solid-state variable speed controls with this fan; use only the specified control part #BF-5.
Installation
Before starting, ensure the power is turned off at the fuse box. The ceiling structure must be capable of supporting the fan. Use the provided expansion anchors for mounting.
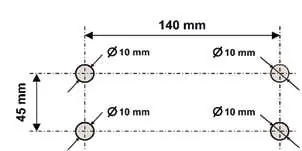
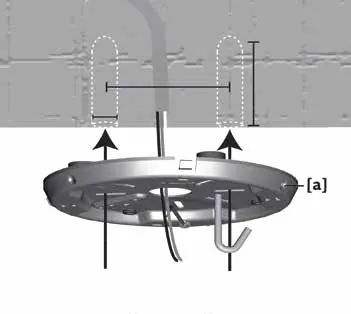
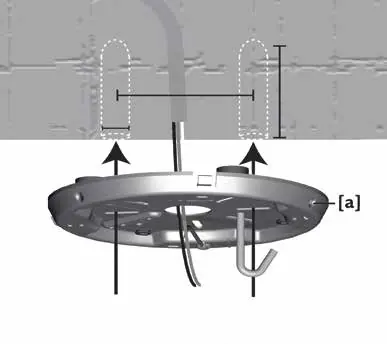
- Mounting: Drill holes according to the specified pattern (140mm x 45mm) for expansion anchors. Secure the mounting bracket firmly to the ceiling structure.
- Downrod: Prepare the downrod by removing the clamp pin and cross pin. Insert the downrod through the canopy and coupling cover. Re-install the cross pin and secure the downrod to the motor coupling.
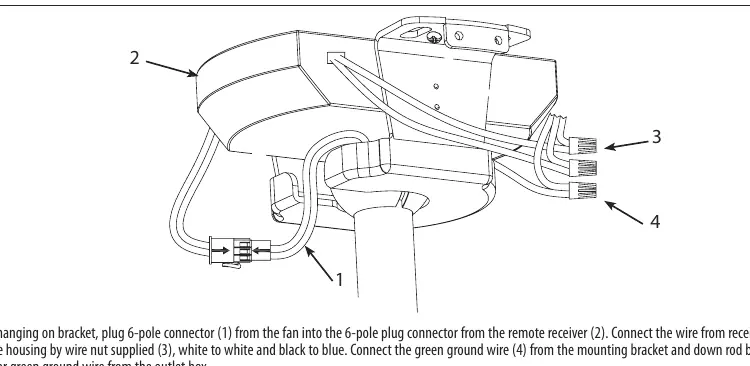
- Wiring: Connect the 6-pole connector from the fan to the remote receiver. Connect the receiver wires to the house supply wires (white to white, black to blue) using wire nuts. Connect the green ground wire to the house ground.
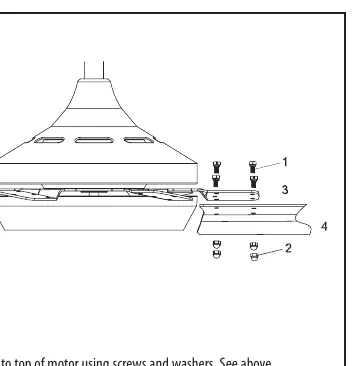
- Blades: Install the blades to the top of the motor using the provided screws and washers.
Operation
The fan is operated via the included remote control.

- Speed Control: The remote offers 6 speed settings (1-lowest to 6-highest).
- Timer: Includes a 1-8 hour operation duration setting.
- Air Flow Direction: Use the slide switch on the transmitter to change direction. Forward (Warm Weather): Counterclockwise rotation creates a downward cooling breeze. Reverse (Cool Weather): Clockwise rotation moves warm air off the ceiling.
Maintenance
Regular maintenance ensures the longevity of your fan:
- Check support connections, brackets, and blade attachments twice a year for looseness.
- Clean periodically using a soft brush or lint-free cloth. Do not use water or harsh cleaners like bleach or ammonia.
- The motor features permanently lubricated bearings; no oiling is required.
Troubleshooting
If you experience issues, check the following:
- Fan does not start: Check circuit breakers, verify wire connections, and ensure the forward/reverse switch is fully engaged (not in the middle).
- Fan is noisy: Ensure all motor housing and blade screws are snug. Do not use solid-state speed controls. Allow a 24-hour break-in period.
- Fan wobbles: Ensure blades are tightened securely and the mounting bracket is firmly attached to the ceiling joist. Interchanging adjacent blades may help redistribute weight.
Practical help
Common problems
Fan does not start
Check main and branch circuit fuses or breakers. Verify wire connections. Ensure the forward/reverse switch is firmly in the up or down position (not in the middle).
Fan sounds noisy
Check that all screws in the motor housing and blade attachments are snug. Do not use a solid-state variable speed control. Allow a 24-hour break-in period.
Fan wobbles
Check that all blades are tightened securely. Ensure the canopy and mounting bracket are tightened securely to the ceiling joist. Try interchanging two adjacent blades to redistribute weight.
Before use
- Ensure the outlet box is rated for fan support (35 lbs or 22.7 kg depending on mounting method)
- Turn off power at the fuse box before installation
- Gather required tools: Phillips screwdriver, wire cutters, pliers, step ladder
- Verify all set screws are tightened before installation
- Ensure the installation site allows for blade rotation without obstructions (minimum 10 feet clearance from floor)
Images and diagrams
- Drilling pattern for expansion anchors (140mm x 45mm)
- Wiring diagram for connecting the remote receiver to the fan and house supply
- Blade installation sequence to the motor
Model compatibility
- Not compatible with solid-state variable speed controls
- Requires a fan-rated electrical box or ceiling joist

Manual page author
David Miller
Documentation analyst
Organizes user manual content into clear summaries, with attention to model details, product context, and everyday usability.