Lighting / Fixtures
Installation Guide for Costway 2 Dining Chairs & 2-Seater Bench
Comprehensive assembly guide for the Costway 2 Dining Chairs & 2-Seater Bench set. Includes a detailed parts list, step-by-step installation instructions, and guidance on using the stacking function.
Quick answers from the manual
Quick answer
- This guide provides assembly instructions for the Costway 2 Dining Chairs & 2-Seater Bench set, including hardware lists and stacking procedures. p. 1
Key actions
- Assemble on a flat, stable surface. p. 2
- Fully tighten all screws/bolts before use. p. 8, 11
First start
- Separate and count all parts and hardware before beginning assembly. p. 2
Problems and fixes
Damaged parts
Take photos of box markings and damaged parts, then email the seller.
p. 15Where to find it in the PDF
- Parts List p. 3, 4
- Assembly Steps p. 6, 7, 8, 9
- Stacking Function p. 13, 14
Table of contents
Manual images
Click an image to enlargeImportant Information
Before beginning assembly, please read all instructions carefully. Ensure you have a flat, steady, and stable surface to work on. It is recommended to assemble the items near the area where they will be placed to avoid unnecessary movement after assembly. Keep all small parts and packaging materials away from children to prevent choking hazards.
Parts List
Before starting, separate and count all parts and hardware to ensure everything is included:
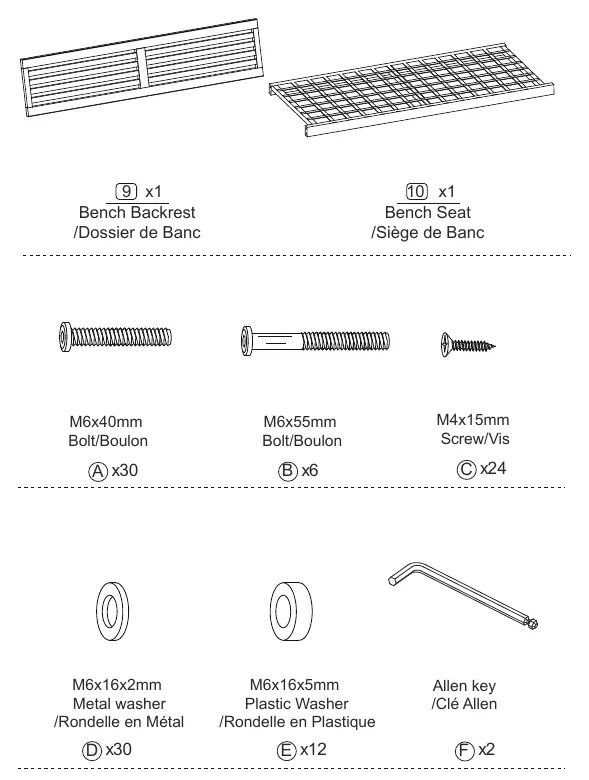
- Chairs: Chair-Backrest (x2), Back-Right Chair Leg (x3), Back-Left Chair Leg (x3), Chair Seat (x2), Front-Right Chair Leg (x3), Front-Left Chair Leg (x3), Chair-Seat Cushion (x2).
- Bench: Bench Backrest (x1), Bench Seat (x1), Bench-Seat Cushion (x1).
- Hardware: M6x40mm Bolts (x30), M6x55mm Bolts (x6), M4x15mm Screws (x24), M6x16x2mm Metal Washers (x30), M6x16x5mm Plastic Washers (x12), Allen key (x2).
Assembly Instructions
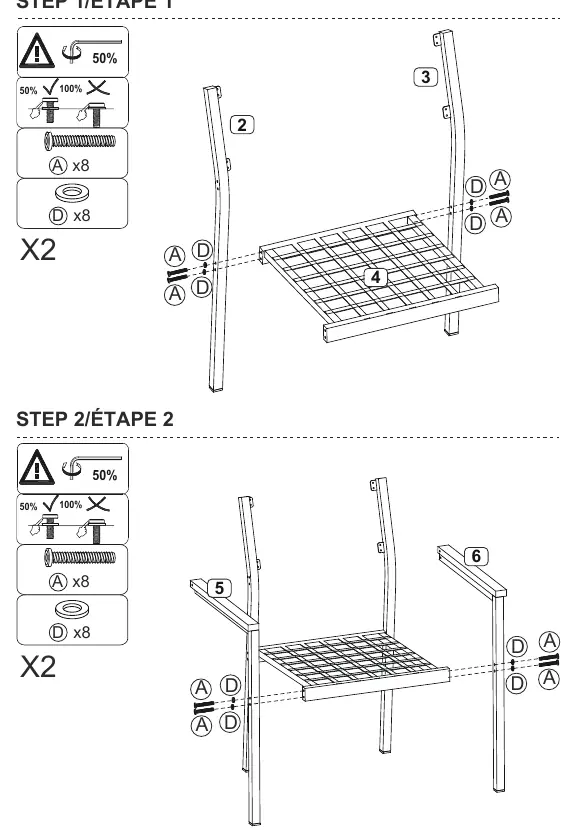
Follow the steps in the correct order. Do not fully tighten bolts until instructed.
Chair Assembly
- Step 1: Attach the Back-Right Chair Leg (2) and Back-Left Chair Leg (3) to the Chair Seat (4) using Bolts (A) and Metal Washers (D).
- Step 2: Attach the Front-Right Chair Leg (5) and Front-Left Chair Leg (6) to the Chair Seat (4) using Bolts (A) and Metal Washers (D).
- Step 3: Secure the armrests using Bolts (A), Bolts (B), Metal Washers (D), and Plastic Washers (E).
- Step 4: Attach the Chair-Backrest (1) to the frame using Screws (C).
- Step 5: Fully tighten all screws and bolts before placing the Chair-Seat Cushion (7).
Bench Assembly
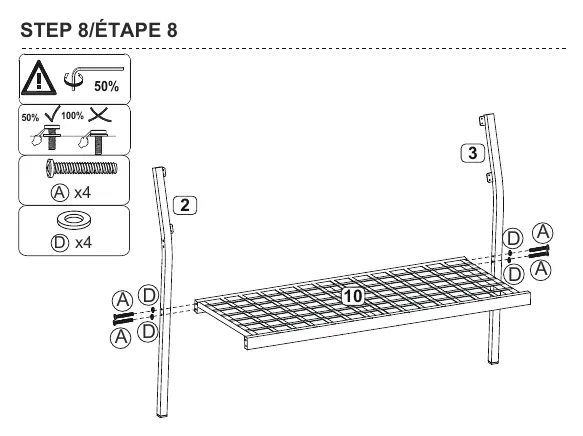
- Step 8: Attach the Back-Right Chair Leg (2) and Back-Left Chair Leg (3) to the Bench Seat (10) using Bolts (A) and Metal Washers (D).
- Step 9: Attach the Front-Right Chair Leg (5) and Front-Left Chair Leg (6) to the Bench Seat (10) using Bolts (A) and Metal Washers (D).
- Step 10: Secure the armrests using Bolts (A), Bolts (B), Metal Washers (D), and Plastic Washers (E).
- Step 11: Attach the Bench Backrest (9) to the frame using Screws (C).
- Step 12: Fully tighten all screws and bolts before placing the Bench-Seat Cushion (8).
Stacking Function
The chairs can be stacked when not in use. You must remove the cushions before stacking. Stack the chairs one by one. It is recommended to cover the products with a cover when stored for long periods to avoid dust, rust, and dirt.
Return and Damage Claims
If a return is required, the item must be returned in its original box. Do not discard the packaging. Take photos of the box markings and any damaged parts, then email the marketplace seller with the images and a description of your claim.
Manufacturer information
Costway
Practical help
Common problems
Damaged parts upon arrival
Take a photo of the box markings and the damaged part, then email the marketplace seller with the images and a description of your claim.
Difficulty assembling
Ensure you are following the steps in the correct order and that all parts are separated and counted before starting.
Before use
- Read all instructions carefully.
- Separate and count all parts and hardware.
- Assemble near the area of use.
- Ensure the surface is flat, steady, and stable.
- Keep small parts away from children.
Images and diagrams
- Steps 1-2: Chair frame assembly
- Steps 3-4: Armrest and backrest attachment
- Steps 8-10: Bench frame assembly
- Steps 13-14: Stacking procedure
Model compatibility
- Cushions must be removed before stacking chairs.

Manual page author
Michael Turner
Technical manual editor
Reviews PDF manuals for structure, safety notes, and practical product details so readers can find the right information quickly.