Furniture / Home Furnishing
User Manual for Craftsman 5HP 22-inch Snow Thrower 536.886140
Comprehensive user guide for the Craftsman 5HP 22-inch dual-stage snow thrower (model 536.886140). Includes assembly instructions, operation procedures, maintenance schedules, and troubleshooting tips.
Table of contents
Manual images
Click an image to enlargeQuick guide from the manual
This manual provides essential instructions for the safe operation and maintenance of your Craftsman 5HP 22-inch dual-stage snow thrower. Before first use, ensure all assembly steps are completed, the discharge chute rotates freely, and the engine oil is at the proper level. Always wear safety glasses and be familiar with all controls before starting the engine. Never operate the machine on surfaces above ground level, such as roofs.
Assembly
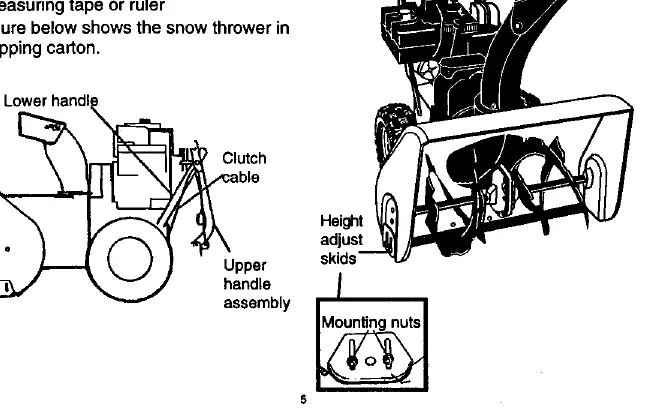
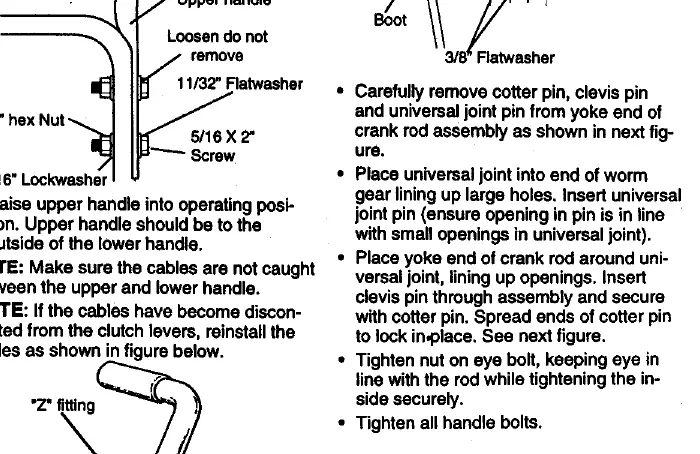
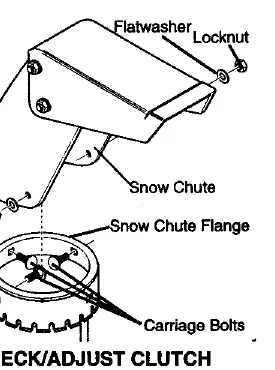
The snow thrower requires assembly of the handles, crank assembly, and discharge chute. Tools required include a knife, 1/2-inch, 9/16-inch, and 3/4-inch wrenches, pliers, a screwdriver, and a measuring tape. Ensure all cables are properly routed and not caught between the upper and lower handles. The shifter lever must be moved to the first gear during assembly. Tighten all bolts securely after installation.
Operation
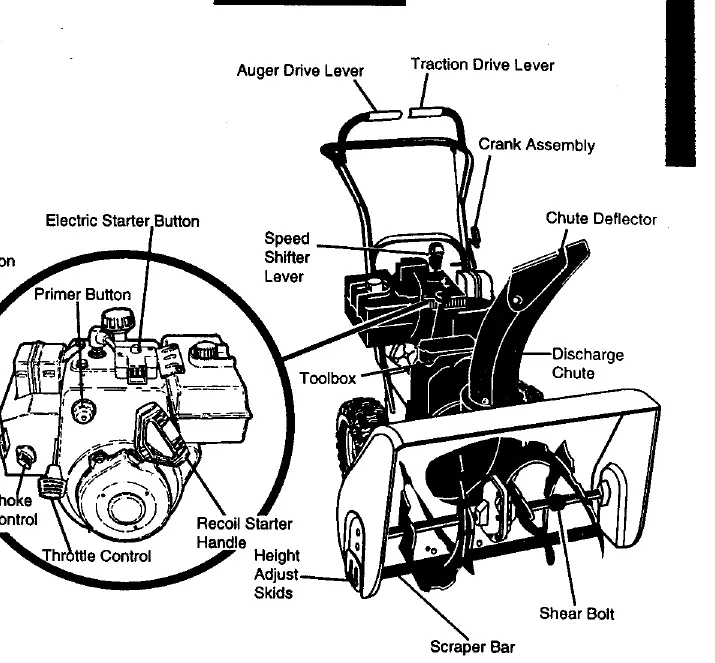
The snow thrower features both electric and recoil starting methods. For a cold start, ensure the auger and traction drive levers are disengaged, set the throttle to FAST, engage the choke, and prime the engine according to the temperature guidelines. For electric starting, connect the 120V power cord to the switch box first, then to a grounded receptacle. Always stop the engine by moving the throttle to STOP and removing the ignition key. Use the speed shifter lever to select between 6 forward and 2 reverse speeds.
Maintenance
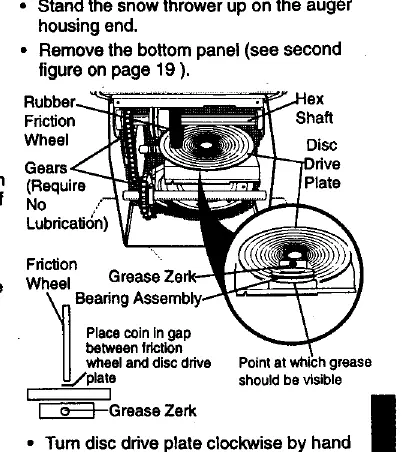
Regular maintenance is crucial for longevity. Check shear bolts and other fasteners frequently for tightness. Lubricate the disc drive plate every 25 hours and at the end of the season. Change the engine oil every 25 hours. After each use, clean the snow thrower thoroughly to prevent ice accumulation. If the unit fails to discharge snow, check for a broken shear bolt or a clogged discharge chute.
Troubleshooting
If the engine is difficult to start, check for a defective spark plug or water/dirt in the fuel system. If the unit fails to propel itself, inspect the drive belt and traction cable adjustment. Excessive vibration indicates loose parts or a damaged impeller; stop the engine immediately and inspect the unit. If the unit fails to discharge snow, check the auger belt, shear bolt, or clear the discharge chute.
Product Specifications
The unit is powered by a 5HP engine with a 12.04 cu. in. displacement. It requires 5W-30 oil (20 oz. capacity) and uses a Champion RJ19LM spark plug (gap .030). The gasoline tank capacity is 2 quarts of unleaded fuel.
Manufacturer information
CRAFTSMAN
Practical help
Common problems
Difficult starting
Check for a defective spark plug or water/dirt in the fuel system. Use the carburetor bowl drain to flush and refill with fresh fuel.
Engine stalls
Ensure the unit is not running on CHOKE. Move the choke lever to the OFF position.
Excessive vibration
Stop the engine immediately and disconnect the spark plug wire. Check for loose parts or a damaged impeller.
Unit fails to propel itself
Check if the drive belt is loose or damaged. Adjust the traction drive cable.
Unit fails to discharge snow
Check if the auger belt is loose or damaged, the auger control cable is adjusted correctly, or if a shear bolt is broken. Clear any foreign objects from the auger.
Before use
- Ensure all assembly instructions have been completed.
- Verify the discharge chute rotates freely.
- Check that there are no remaining loose parts in the carton.
- Ensure engine oil is at the proper level.
- Fill the gas tank with clean, fresh, unleaded gasoline.
- Become familiar with all controls, their location, and function.
Specs in practice
- Displacement
- 12.04 cu. in.
- Gasoline Capacity
- 2 quarts (unleaded)
Images and diagrams
- Assembly diagrams show handle installation and cable routing.
- Drive assembly diagrams detail belt and friction wheel locations.
- Engine diagrams show carburetor and starter components.
Model compatibility
- Use only original equipment replacement parts.
- Designed for use on sidewalks, driveways, and ground-level surfaces only.
- Do not use on surfaces above ground level, such as roofs.

Manual page author
Emily Carter
User documentation editor
Prepares concise manual descriptions and highlights the most useful setup, operation, and maintenance information for readers.