Tools / Saws
Operator's Manual for Craftsman 10-inch Compound Miter Saw 315.212330
Quick guide for the Craftsman 10-inch Compound Miter Saw (Model 315.212330). Includes assembly, operation, safety instructions, maintenance, and adjustment procedures.
Table of contents
Manual images
Click an image to enlargeQuick guide from the manual
This manual provides essential instructions for the safe operation and maintenance of the Craftsman 10-inch Compound Miter Saw (Model 315.212330). Always read and understand the full operator's manual before using the tool. Key safety requirements include wearing eye protection, keeping hands away from the cutting area, and ensuring the saw is securely mounted to a workbench.
Assembly
The saw requires assembly before use. Follow these steps:
- Unpacking: Lift the saw by the carrying handle and base. Release the saw arm by pushing down, cutting the tie-wrap, and pulling out the lock pin.
- Mounting: Secure the saw to a workbench using the four bolt holes in the base.
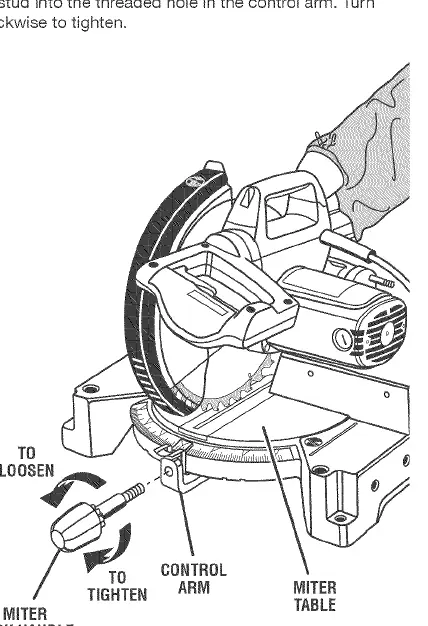
- Miter Lock Handle: Install by placing the threaded stud into the control arm and turning clockwise.
- Dust Bag: Squeeze the metal clips to open the mouth and slide it onto the dust guide.
- Table Extensions: Insert into the sides of the base and secure with clamp brackets.
- Work Clamp: Insert the shaft into the hole on the saw table base and rotate the knob to secure the workpiece.
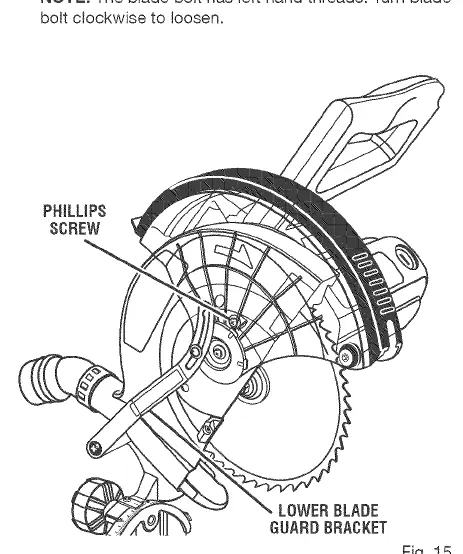
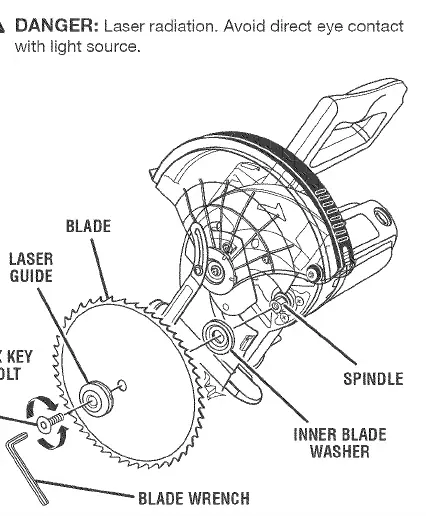
- Blade Installation: Unplug the saw. Loosen the phillips screw on the blade bolt cover, raise the lower blade guard, depress the spindle lock button, and use the provided wrench to remove/install the blade bolt (left-hand threads).
- Laser Guide: Mount onto the spindle, aligning the double D flats. Secure with the provided hex key bolt.
Operation
Before starting, perform a dry run of the cutting operation. Always allow the blade to reach maximum speed before lowering it into the workpiece.
- Miter Cut: Loosen miter lock handles, rotate the table to the desired angle, and retighten.
- Bevel Cut: Loosen the bevel lock knob, tilt the saw arm to the desired angle (0 to 45 degrees), and retighten.
- Compound Miter Cut: Combines both miter and bevel angle settings. Adjustments are interdependent; test on scrap material first.
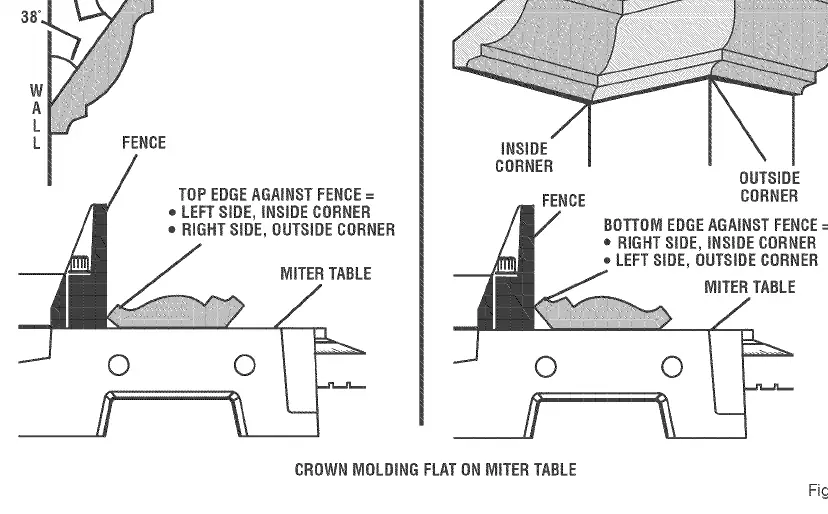
- Crown Molding: Can be cut flat on the miter table or using the crown molding stop. Settings are precise; always test on scrap material.
Adjustments
The saw is factory-adjusted, but may require periodic checks:
- Squaring Miter Table to Fence: Use a framing square against the fence and throat plate. Adjust using the socket head screws.
- Squaring Blade to Fence: Use a framing square against the fence and the flat part of the blade. Adjust using the mounting bracket hex screws.
- Squaring Blade to Miter Table: Use a combination square against the table and blade. Adjust using the positive stop adjustment screw.
- Depth Stop: Limits downward travel. Adjust using the hex nut and screw at the rear of the arm.
Maintenance
- Brush Replacement: Periodically check brushes for wear. Replace both if carbon length is less than 1/4 inch.
- Battery Replacement: The laser guide uses three button cell batteries (Number 357 silver oxide). Remove the laser guide from the saw, separate the cover, and replace batteries.
- Lubrication: Bearings are lubricated for the life of the unit; no further lubrication is required.
Manufacturer information
CRAFTSMAN
Practical help
Common problems
Saw arm does not raise automatically
Check pivot joints for play or damage. Have repaired by a qualified service technician if necessary.
Blade is not square to the fence or table
Perform squaring adjustments using a framing square and the appropriate adjustment screws on the mounting bracket or positive stop.
Laser line is not visible
The laser only activates when the motor is running (centrifugal switch). If it still does not work, check or replace the three 1.5V silver oxide batteries.
Before use
- Ensure the saw is securely mounted to a workbench or workstand.
- Verify all guards are in place and functioning correctly.
- Check that the blade is sharp, clean, and the correct size (10-inch).
- Ensure the work area is clean, well-lit, and free of obstructions.
- Wear safety glasses with side shields and hearing protection.
- Perform a dry run of the cut without power to ensure no interference.
Specs in practice
- 15 Amp Motor
- Provides sufficient power for tough cutting jobs.
- Double Insulated
- Safety design that isolates internal components, eliminating the need for a grounded power cord.
Images and diagrams
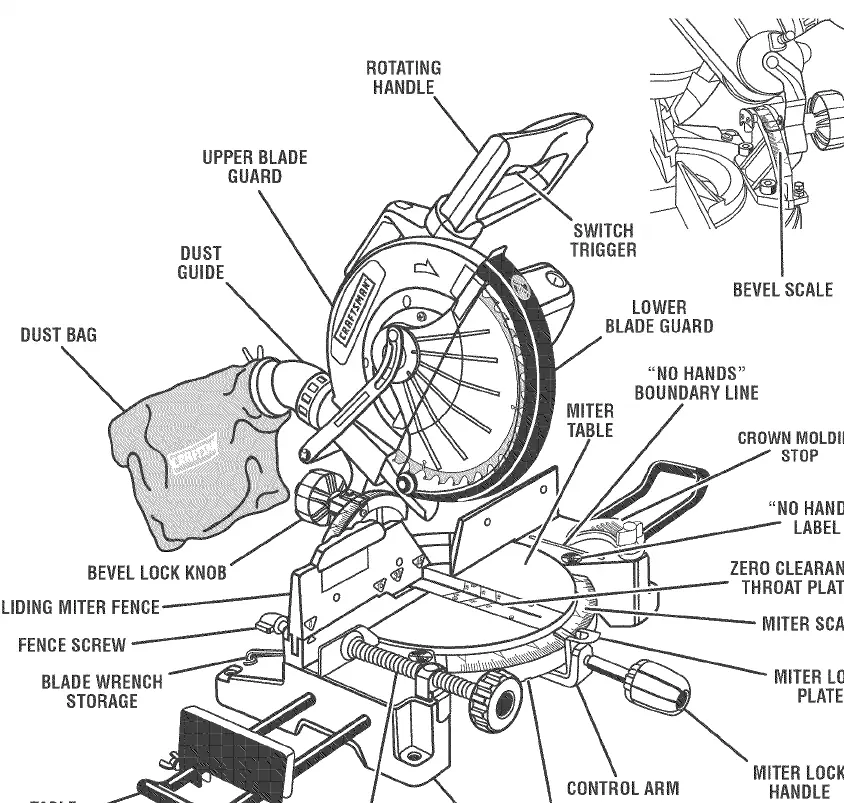
- Figure 1: Overview of all features and controls.
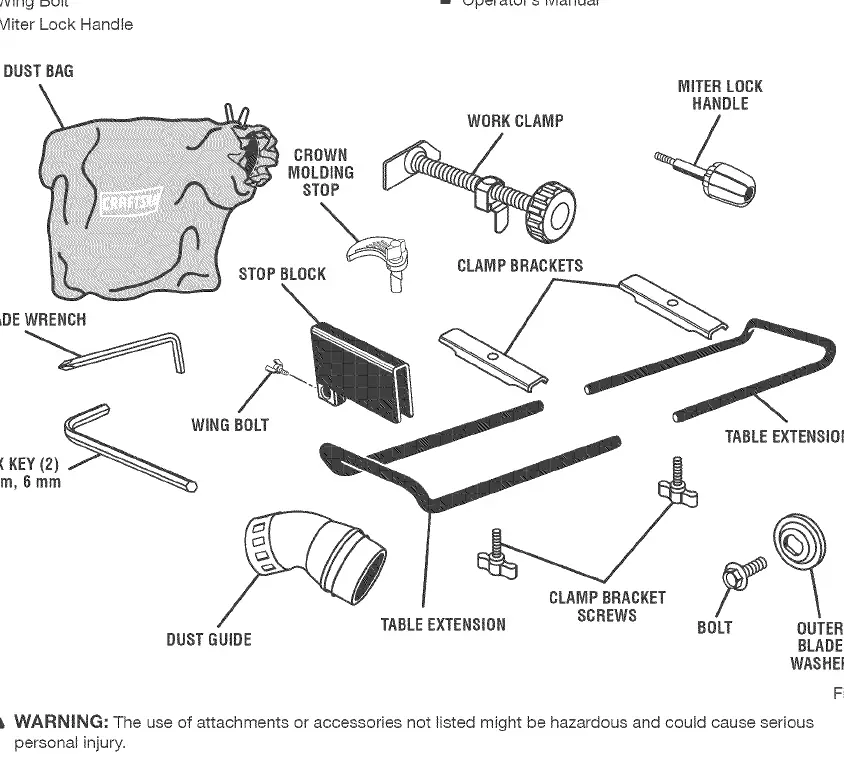
- Figure 7: Identification of loose parts included for assembly.
- Figure 16: Correct orientation for blade installation.
- Figure 38: Setup for cutting crown molding flat on the table.
Model compatibility
- Use only 10-inch blades.
- Requires 120V, 60Hz, AC power supply.
- Do not use on DC power.

Manual page author
Emily Carter
User documentation editor
Prepares concise manual descriptions and highlights the most useful setup, operation, and maintenance information for readers.